
Here’s how to review, save, and share your HomeKit Secure Video footage
- apr
- 07
The Home app is the key to unleashing your HomeKit camera's full potential.
HomeKit Secure Video — Apple's privacy-centric security camera solution — makes it easy to view, save, and share recordings from smart cameras through the Home app. HomeKit cameras also provide advanced features like Face Recognition, Activity Zones, and iCloud+ storage, which keeps all of your home's activity safe and secure in the cloud. However, you need to know where to look to get the most out of your cameras. Here's how to manage HomeKit Secure Video cameras in the Home app.
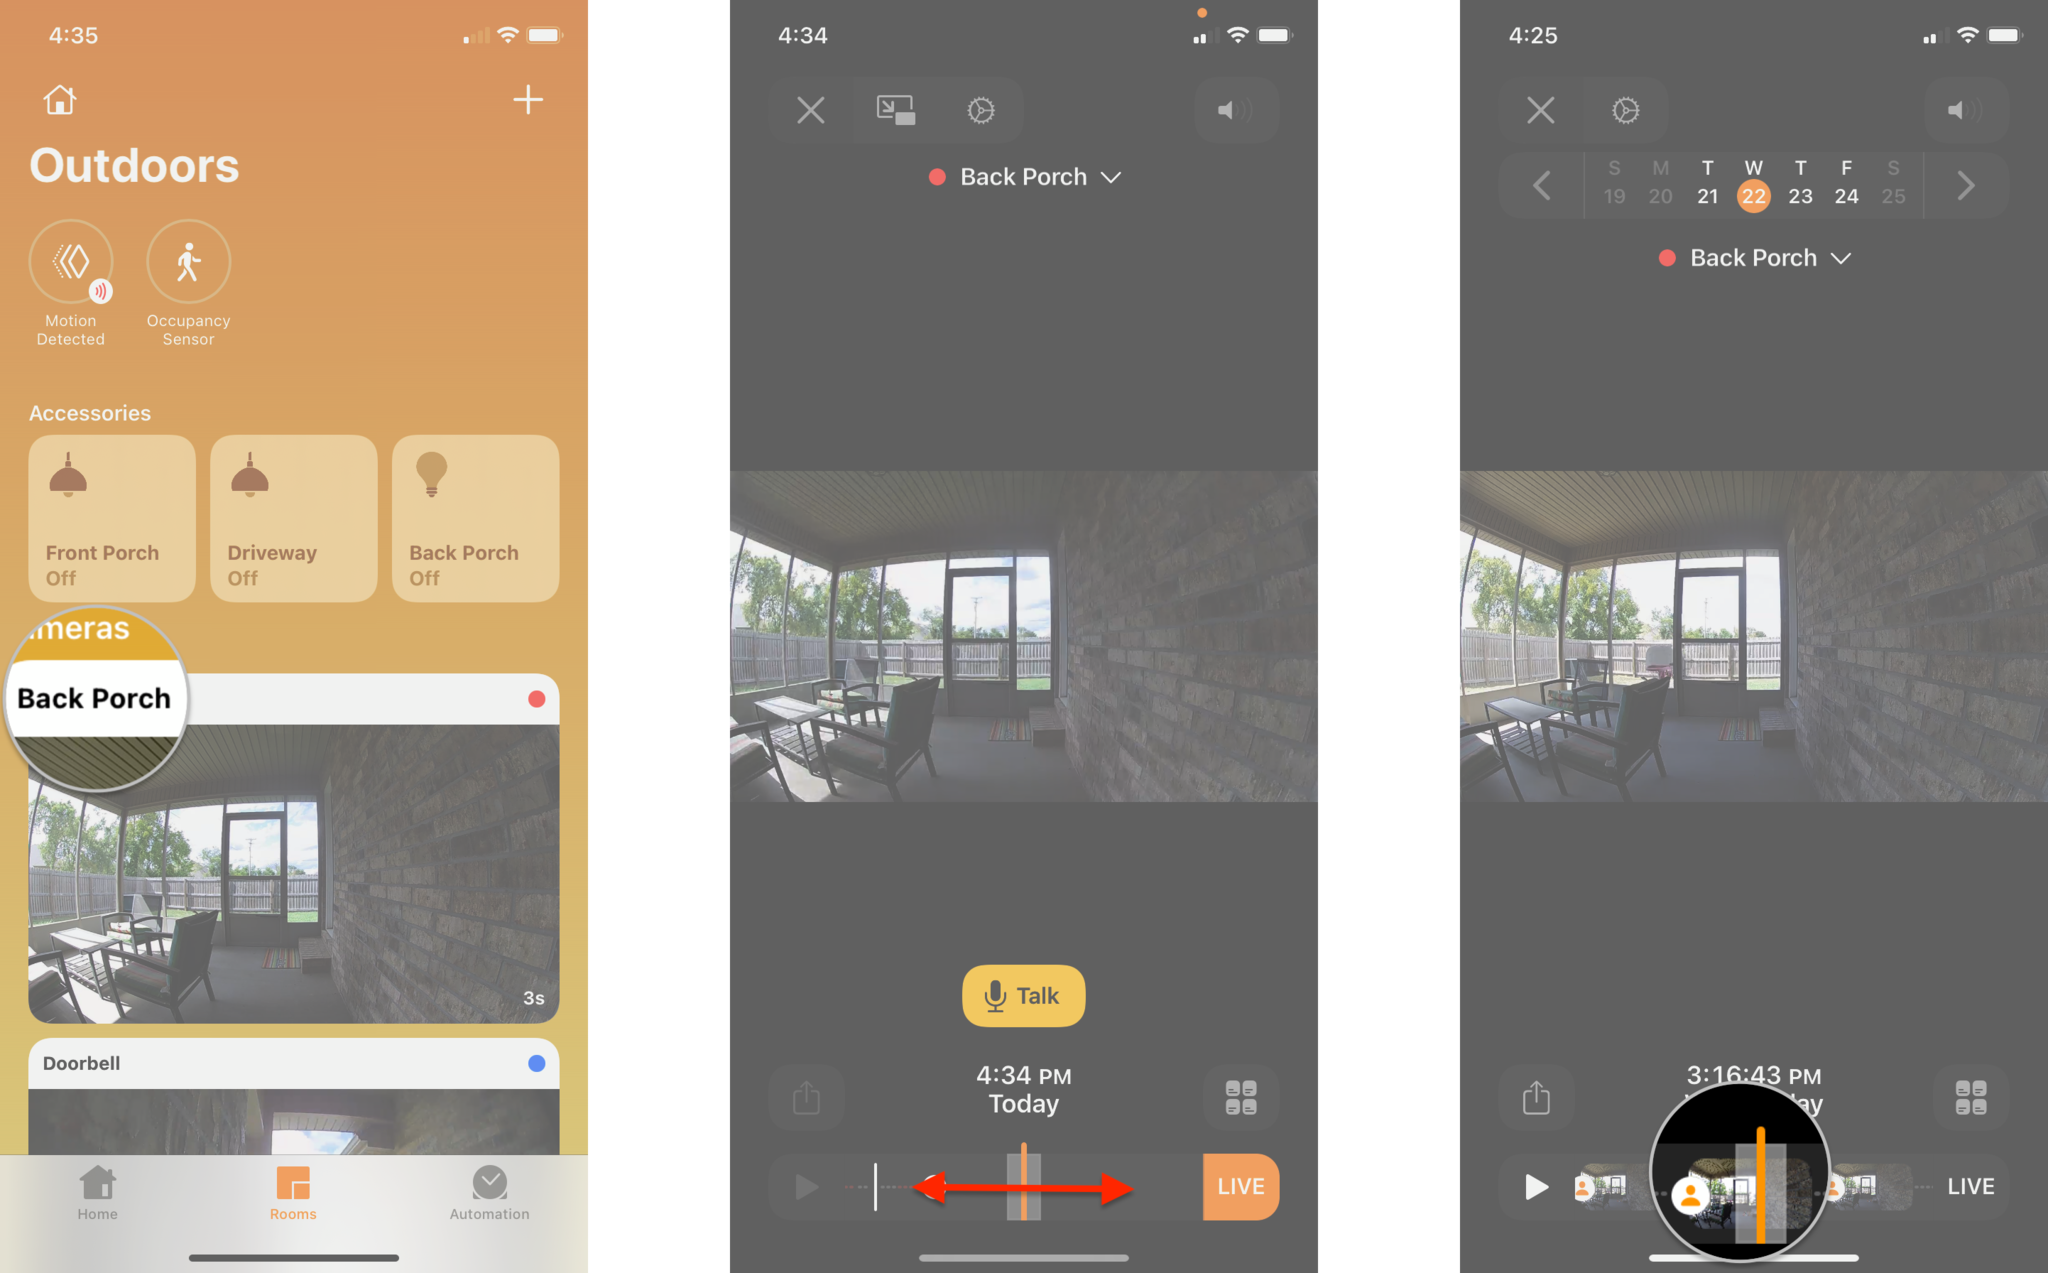
How to view recorded video in the Home app
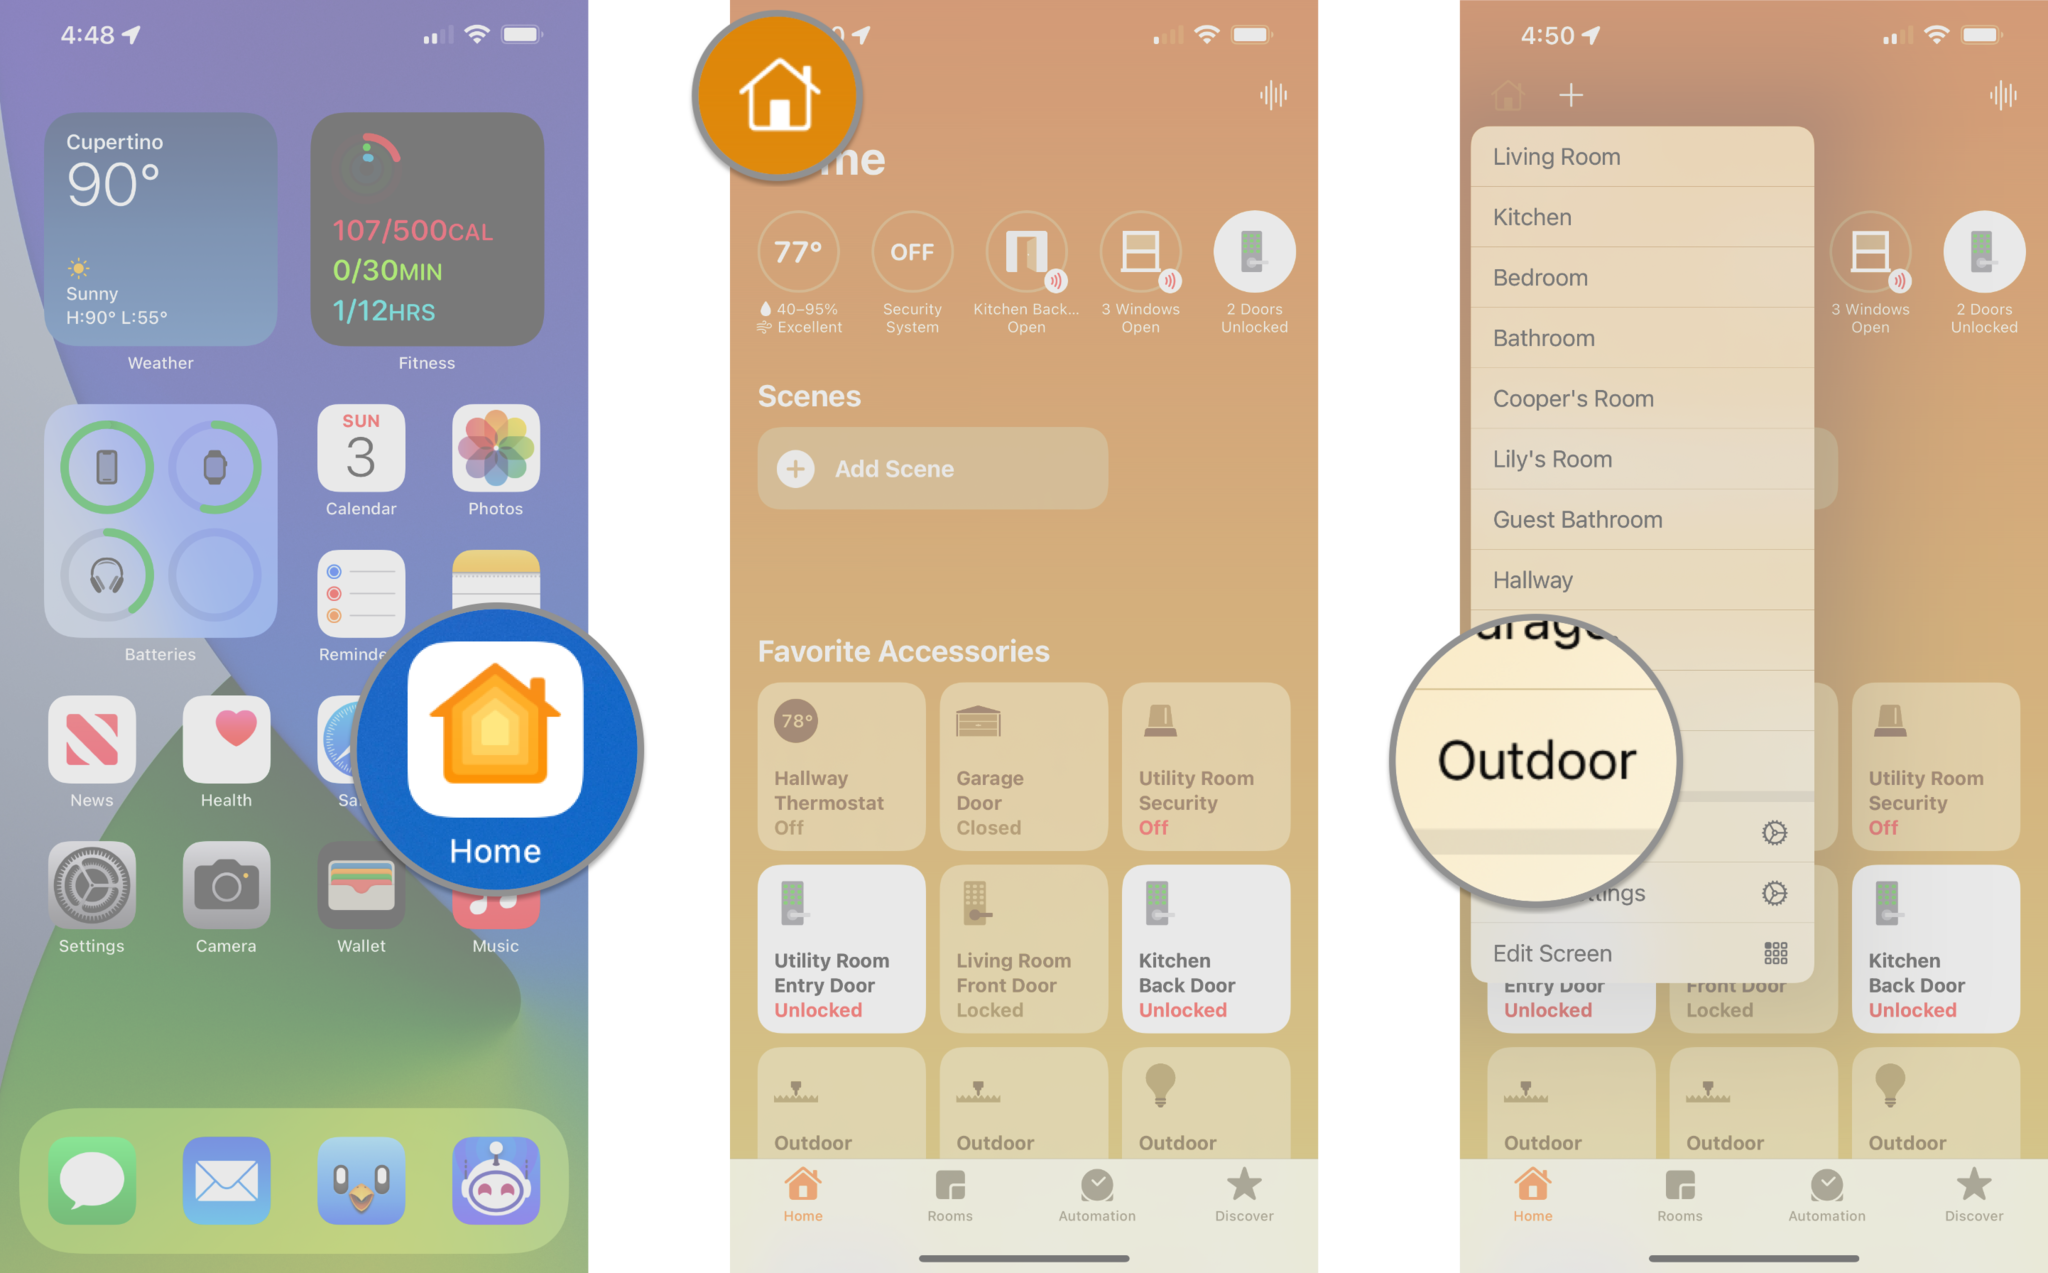
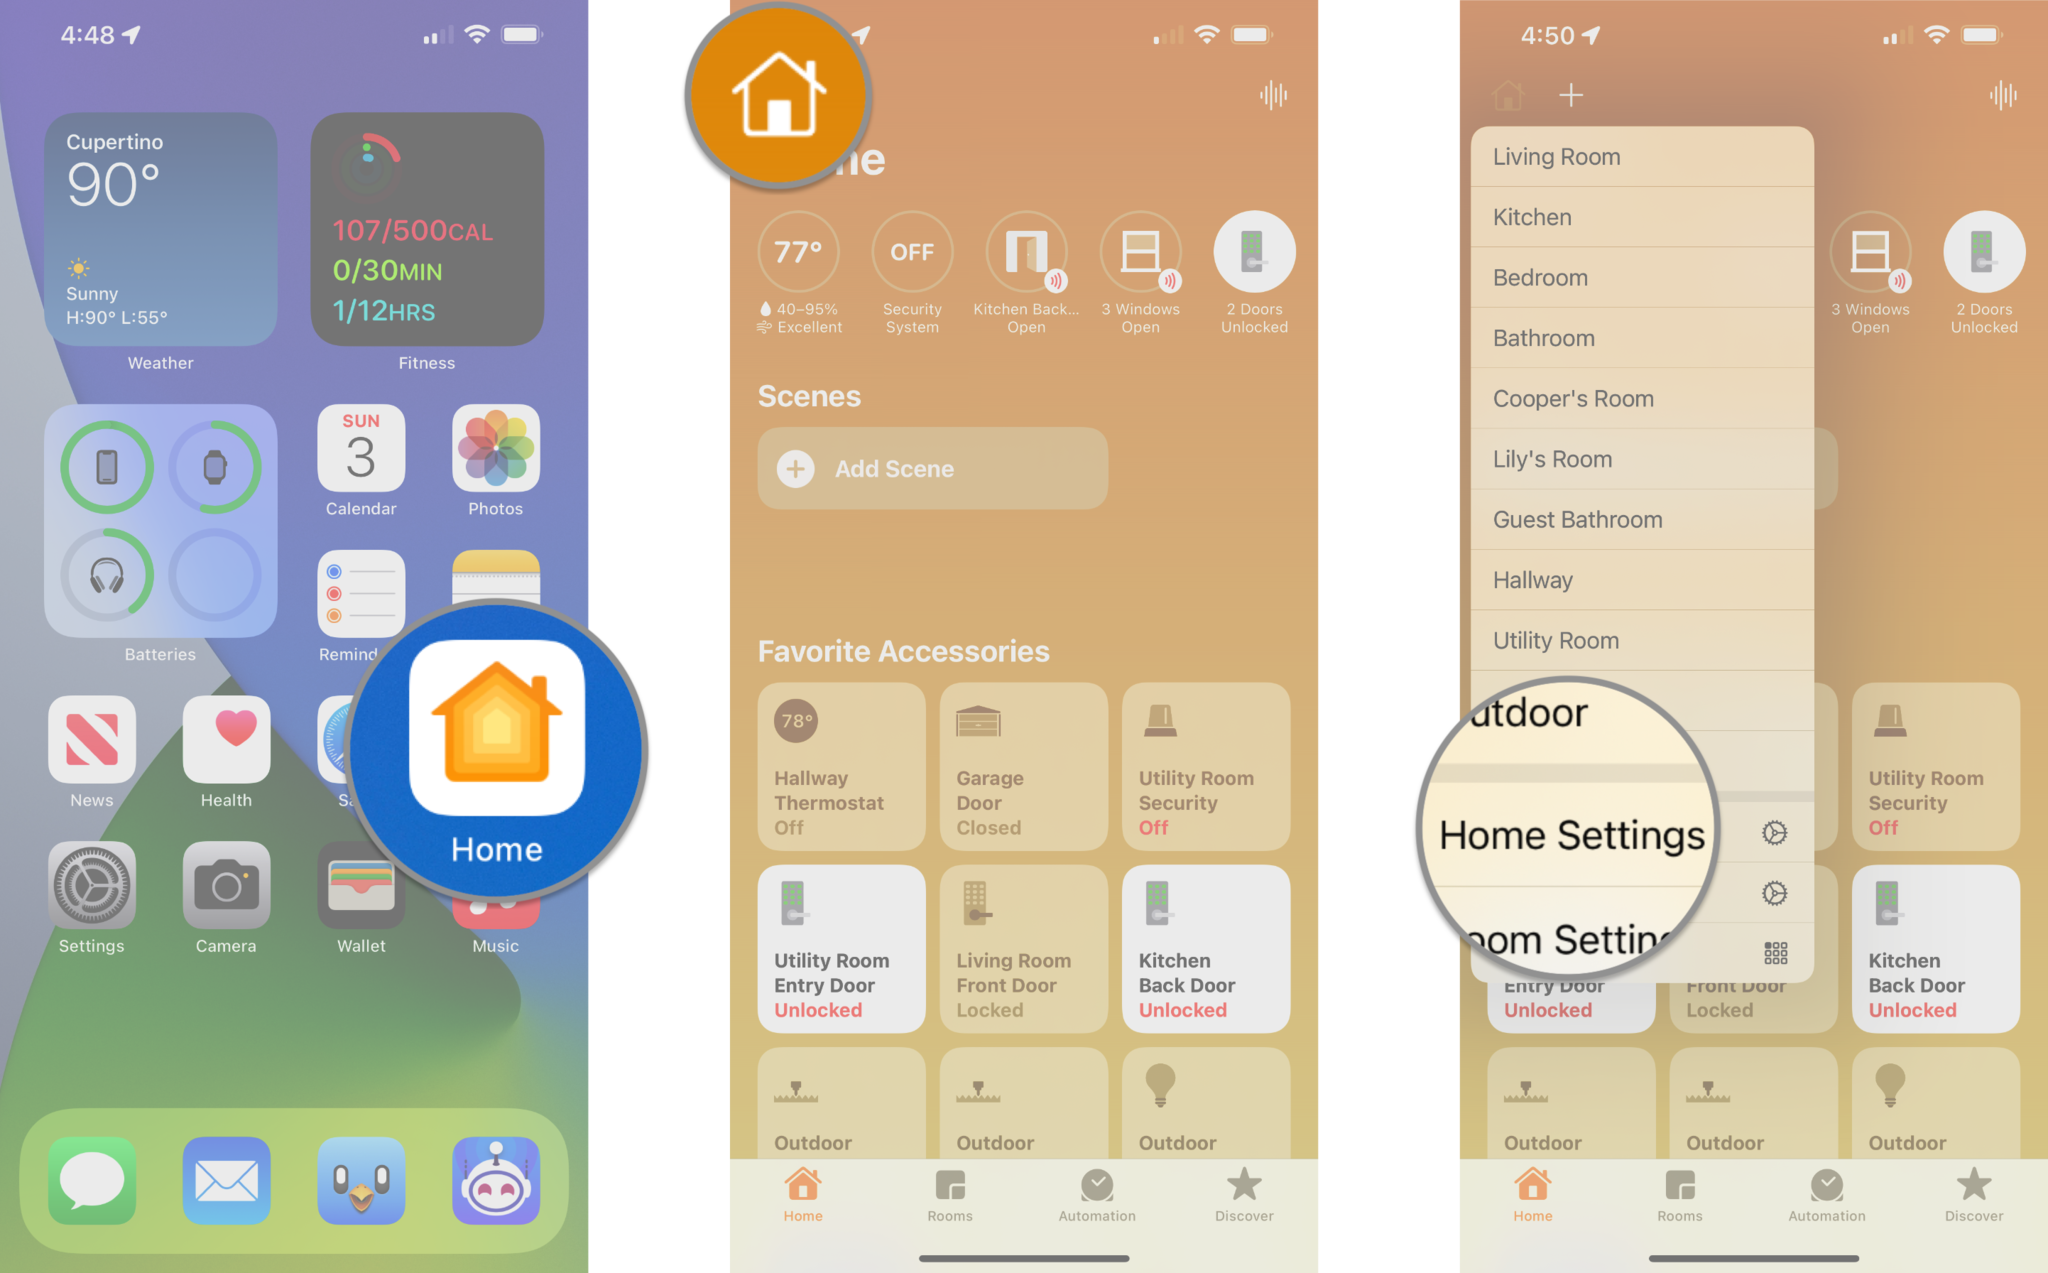
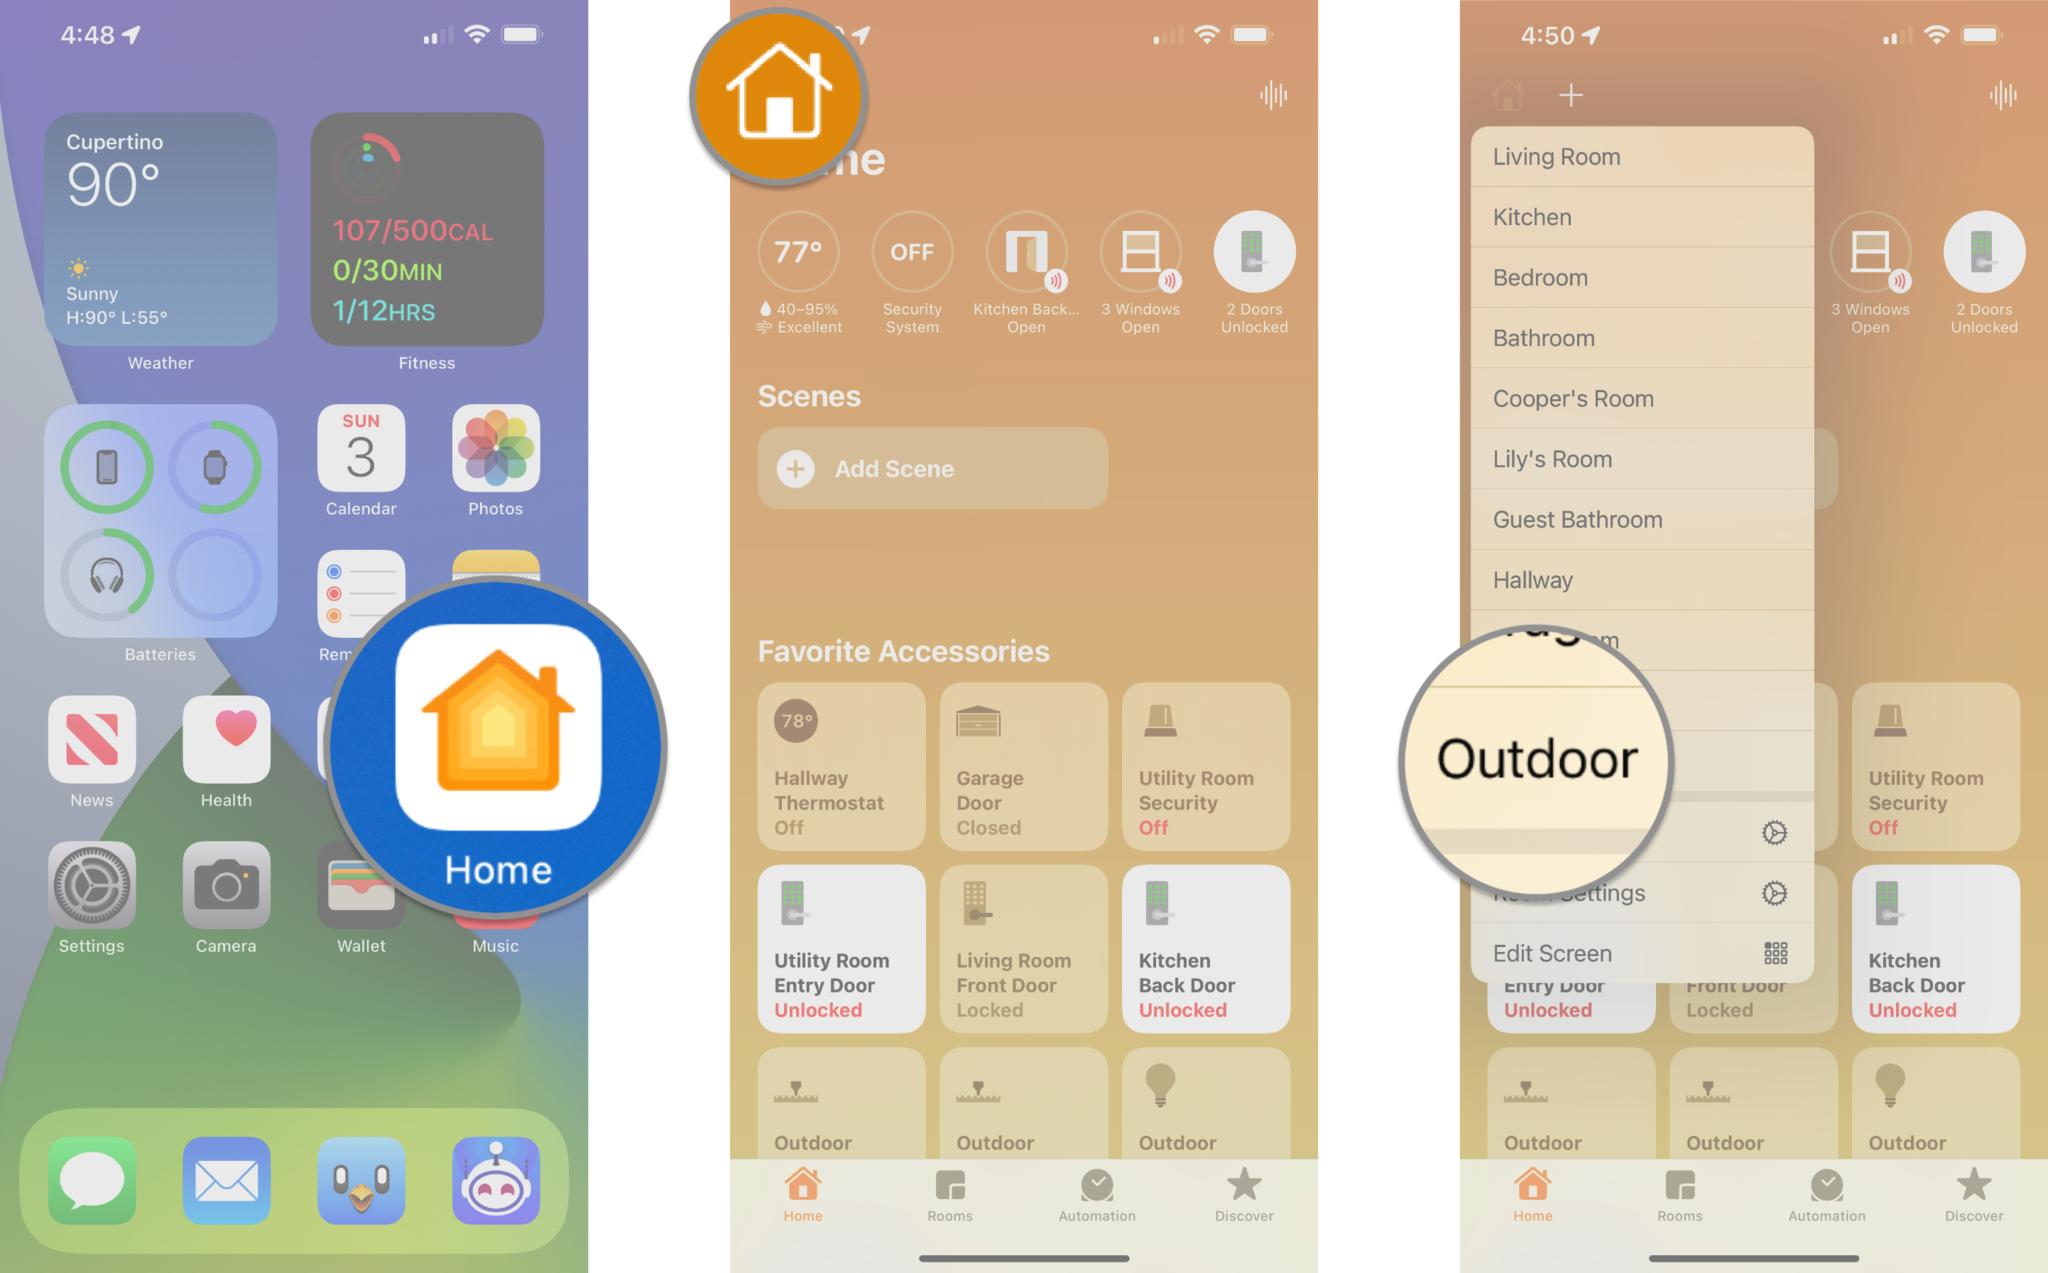
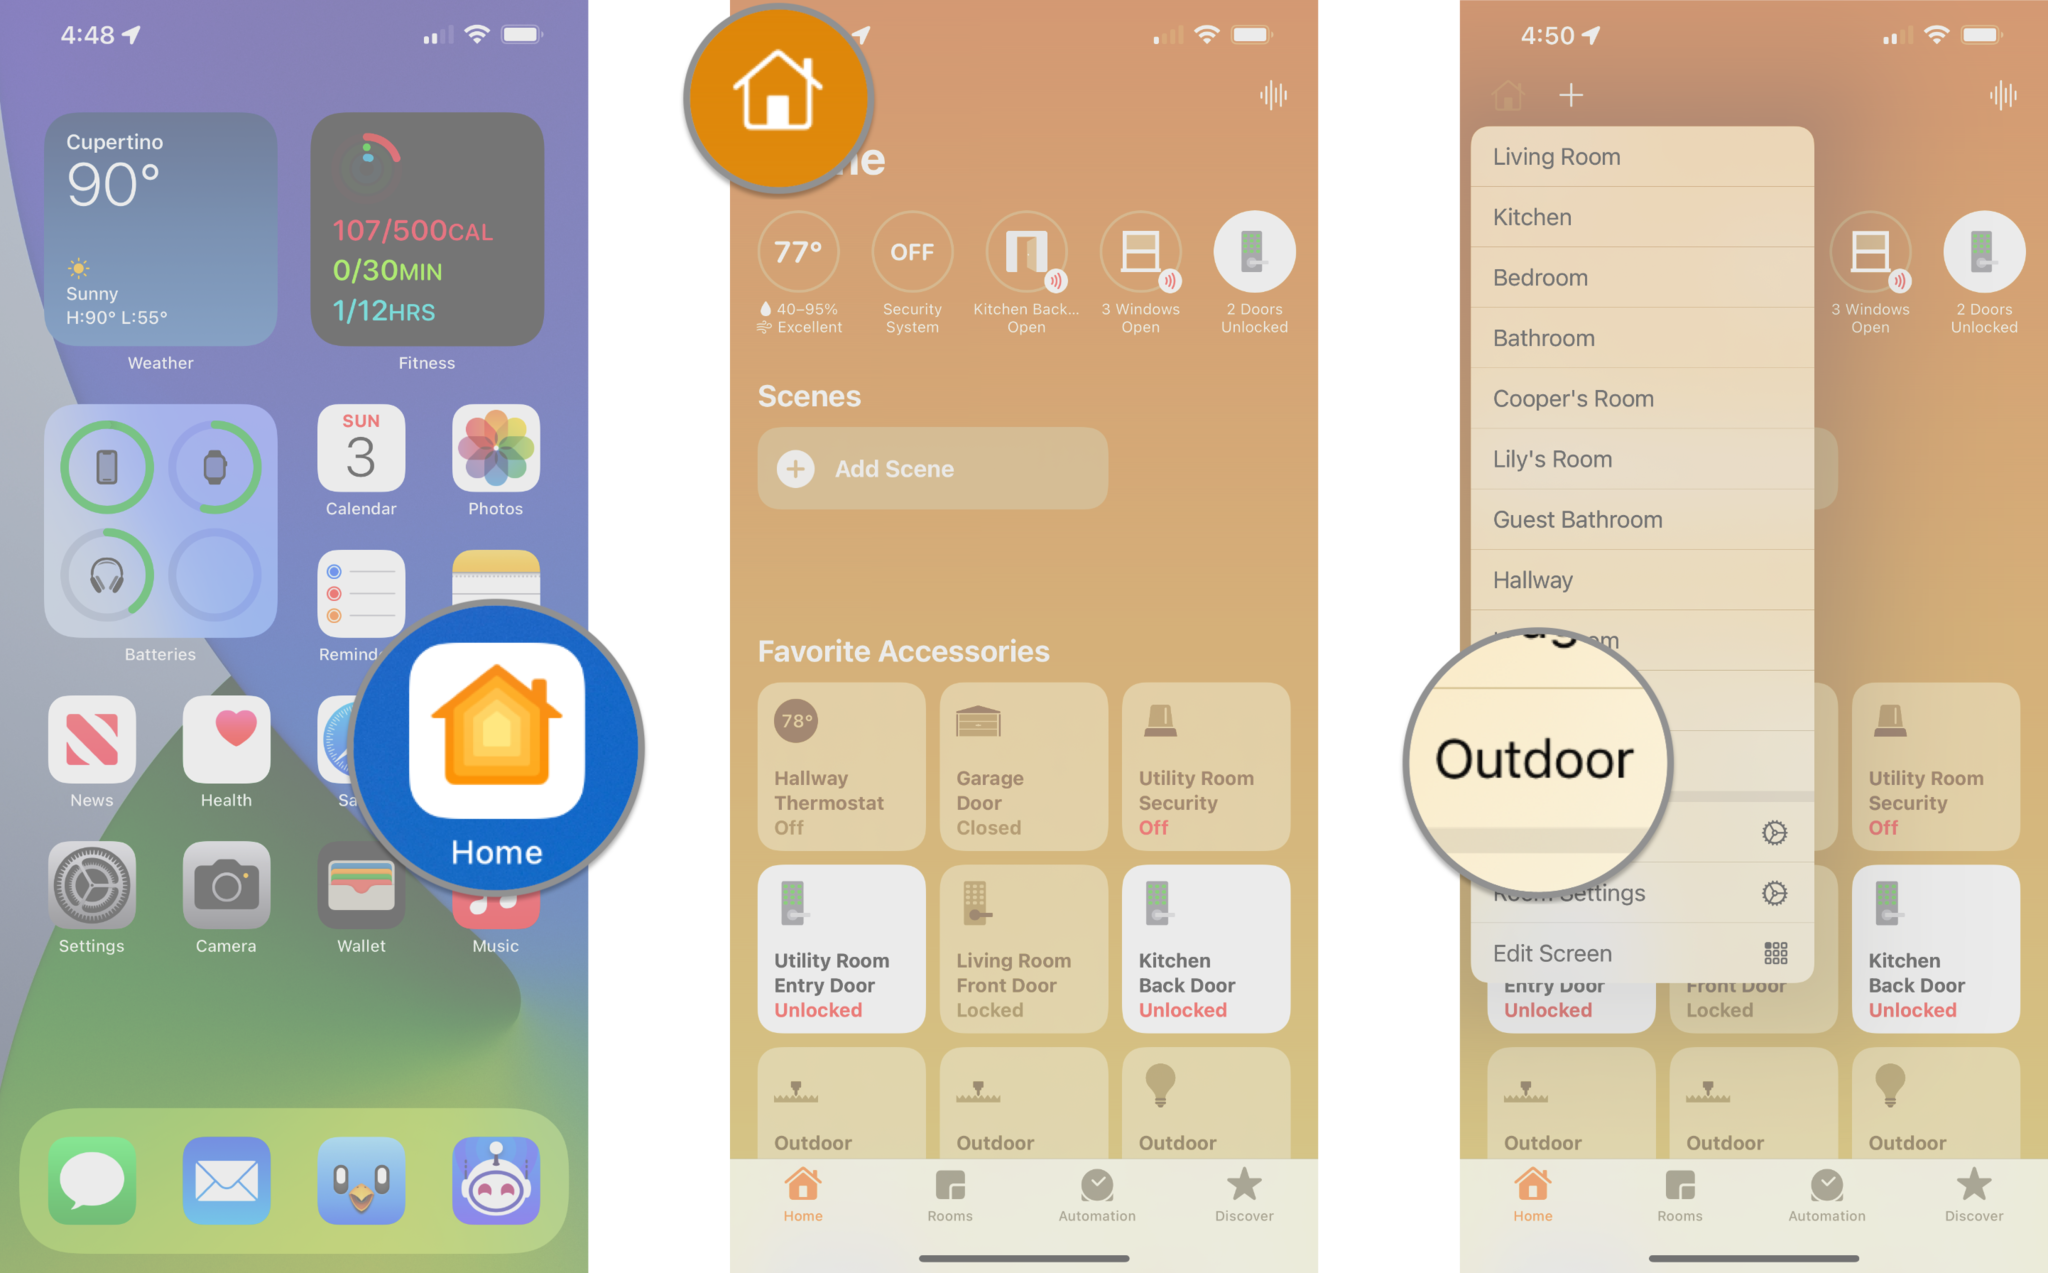
- Launch the Home app.
- Tap on the House icon.
- You can also tap directly on your camera from the Home tab if it is a favorite.
Tap the Room that your camera is within.

- Tap on the Thumbnail Image of your camera.
- Swipe to the Left or Right on the timeline located at the bottom to find a motion event.
- When swiping your timeline, a calendar timeline will appear at the top of your screen. You can use this to jump to a specific date if needed.
Tap on the desired Motion Event. Your recording will now play automatically, replacing your camera's live view.
- You can pause playback by using the control to the left of the timeline.
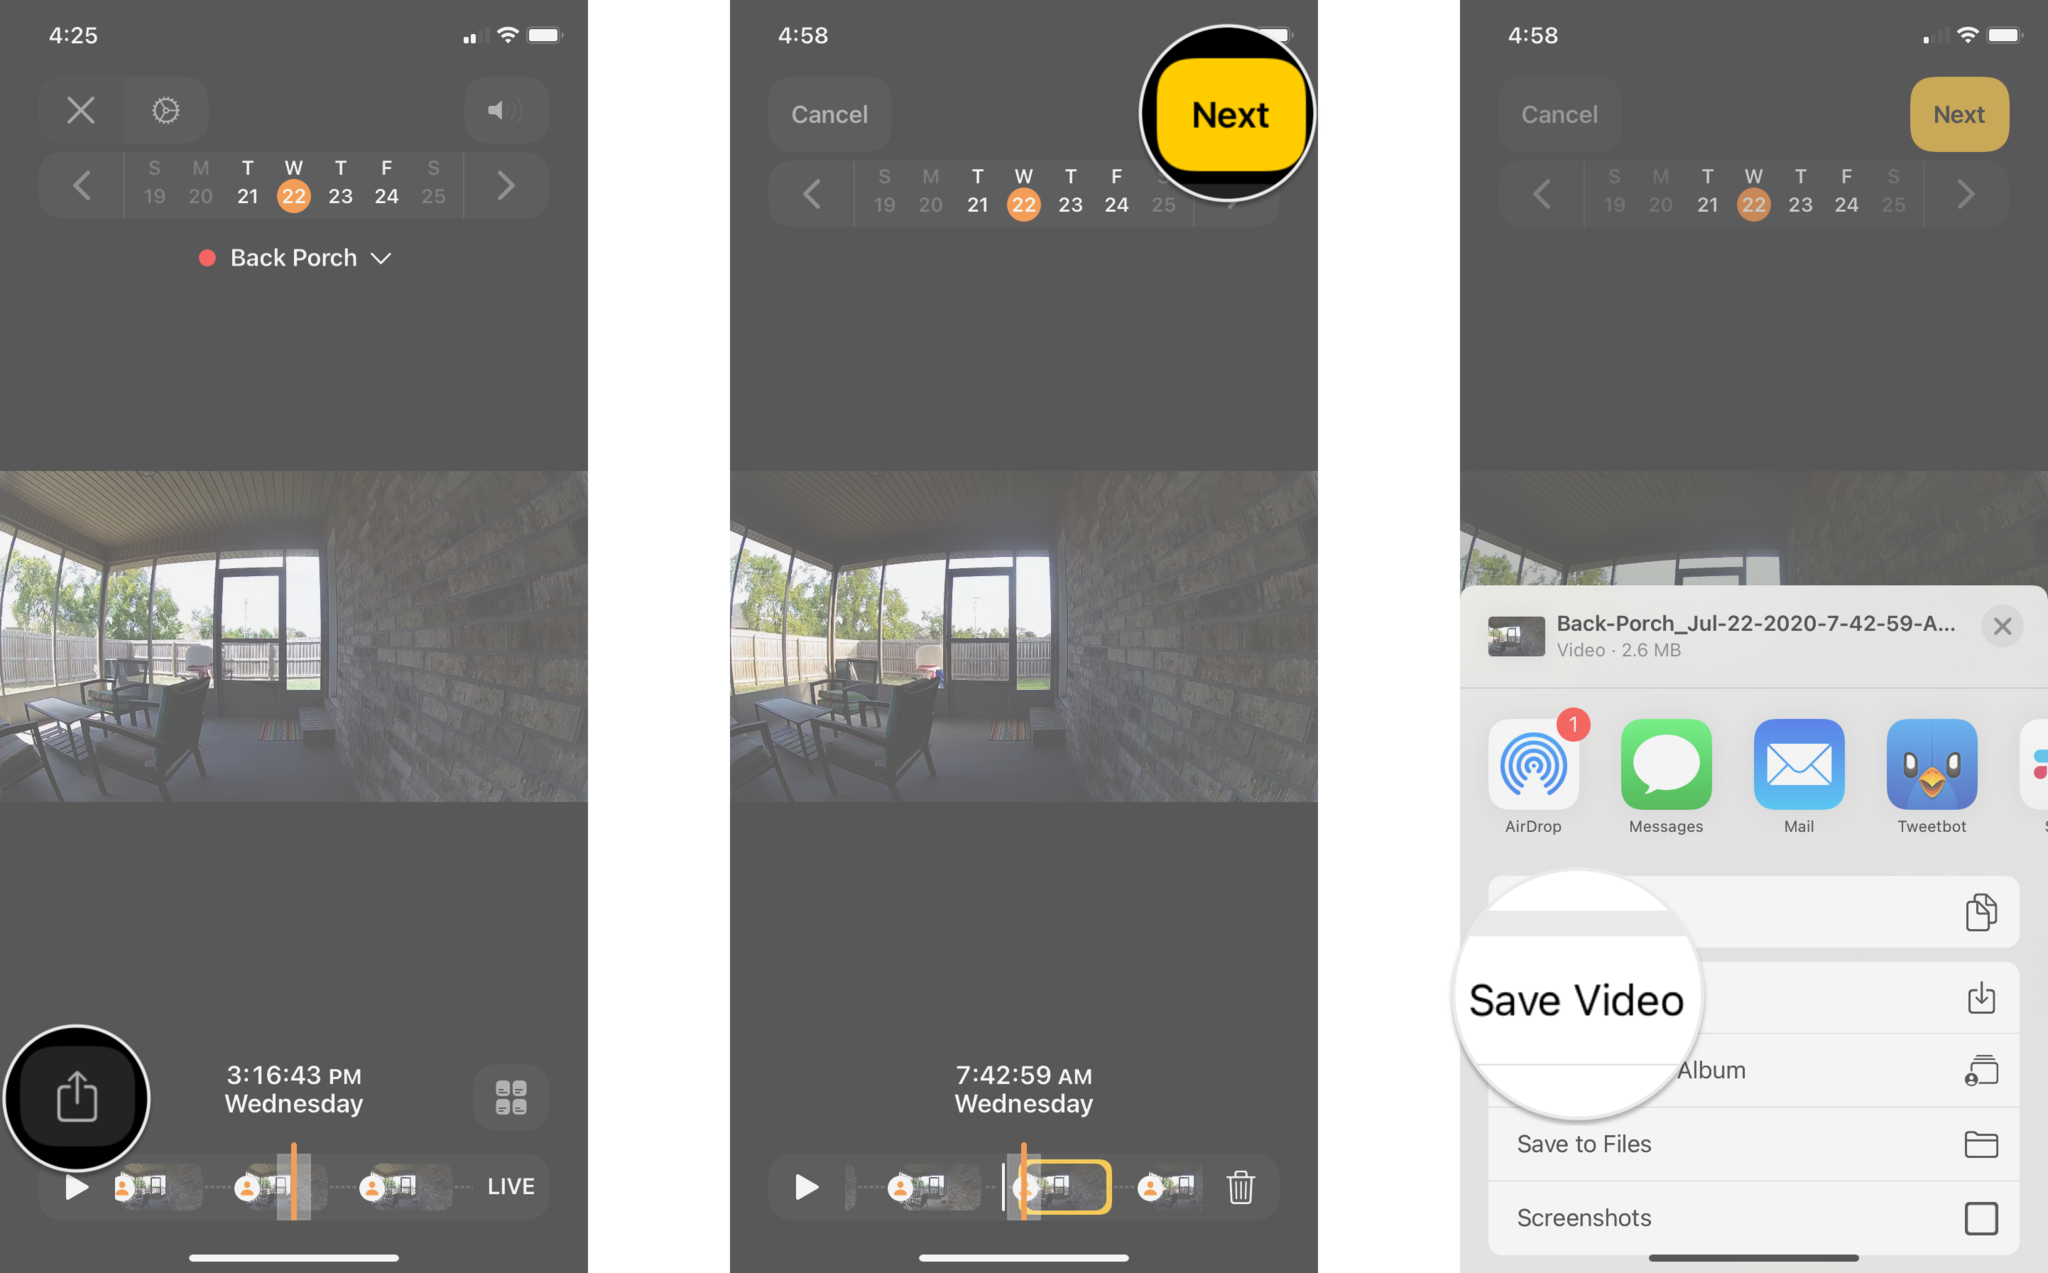
How to save recorded video in the Home app
- Launch the Home app.
- Tap on the House icon.
- You can also tap directly on your camera from the Home tab if it is a favorite.
Tap the Room that your camera is within.

- Tap on the Thumbnail Image of your camera.
- Swipe to the Left or Right on the timeline located at the bottom to find a motion event.
- When swiping your timeline, a calendar timeline will appear at the top of your screen. You can use this to jump to a specific date if needed.
Tap on the desired Motion Event.

- Tap the Share Icon located on the left.
- Tap Next near the top right corner.
Tap on Save Video. Your video will save directly to the Photos app.
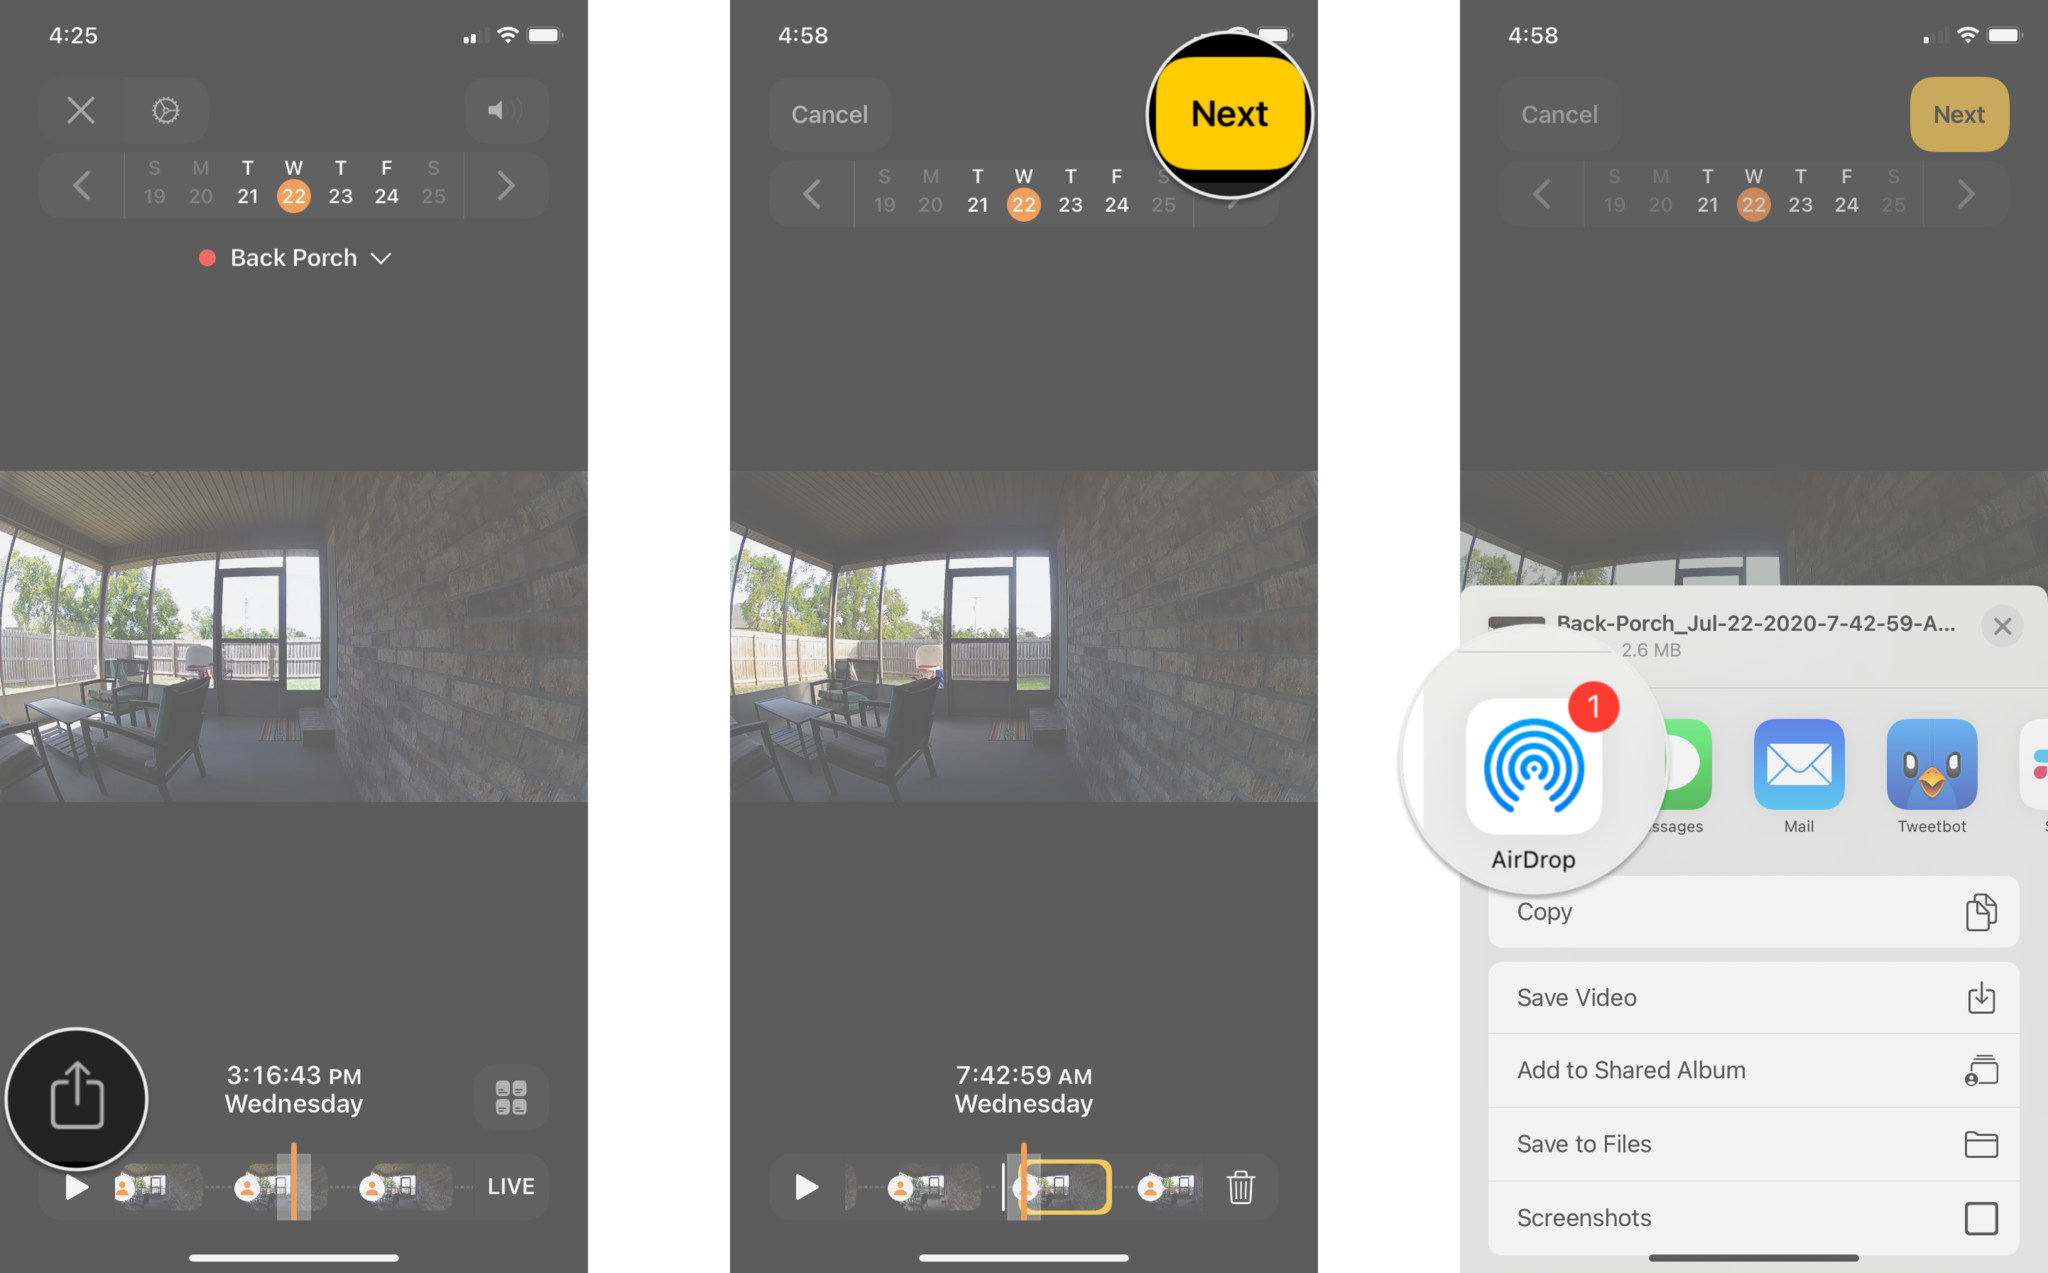
How to share recorded video in the Home app
- Launch the Home app.
- Tap on the House icon.
- You can also tap directly on your camera from the Home tab if it is a favorite.
Tap the Room that your camera is within.

- Tap on the Thumbnail Image of your camera.
- Swipe to the Left or Right on the timeline located at the bottom to find a motion event.
- When swiping your timeline, a calendar timeline will appear at the top of your screen. You can use this to jump to a specific date if needed.
Tap on the desired Motion Event.

- Tap the Share Icon located on the left.
- Tap Next near the top right corner.
Tap on the Contact that you would like to share the video with if they are a favorite at the top.
- Options for Messages, Mail, AirDrop, and 3rd party apps like Twitter should appear below your list of favorite contacts. You can tap on one of these to share your video through the app.
- An option to share your video to iCloud Shared Photo Albums should also be available in the list of choices below these apps.
How to delete recordings in the Home app
- Launch the Home app.
- Tap on the House icon.
- You can also tap directly on your camera from the Home tab if it is a favorite.
Tap the Room that your camera is within.
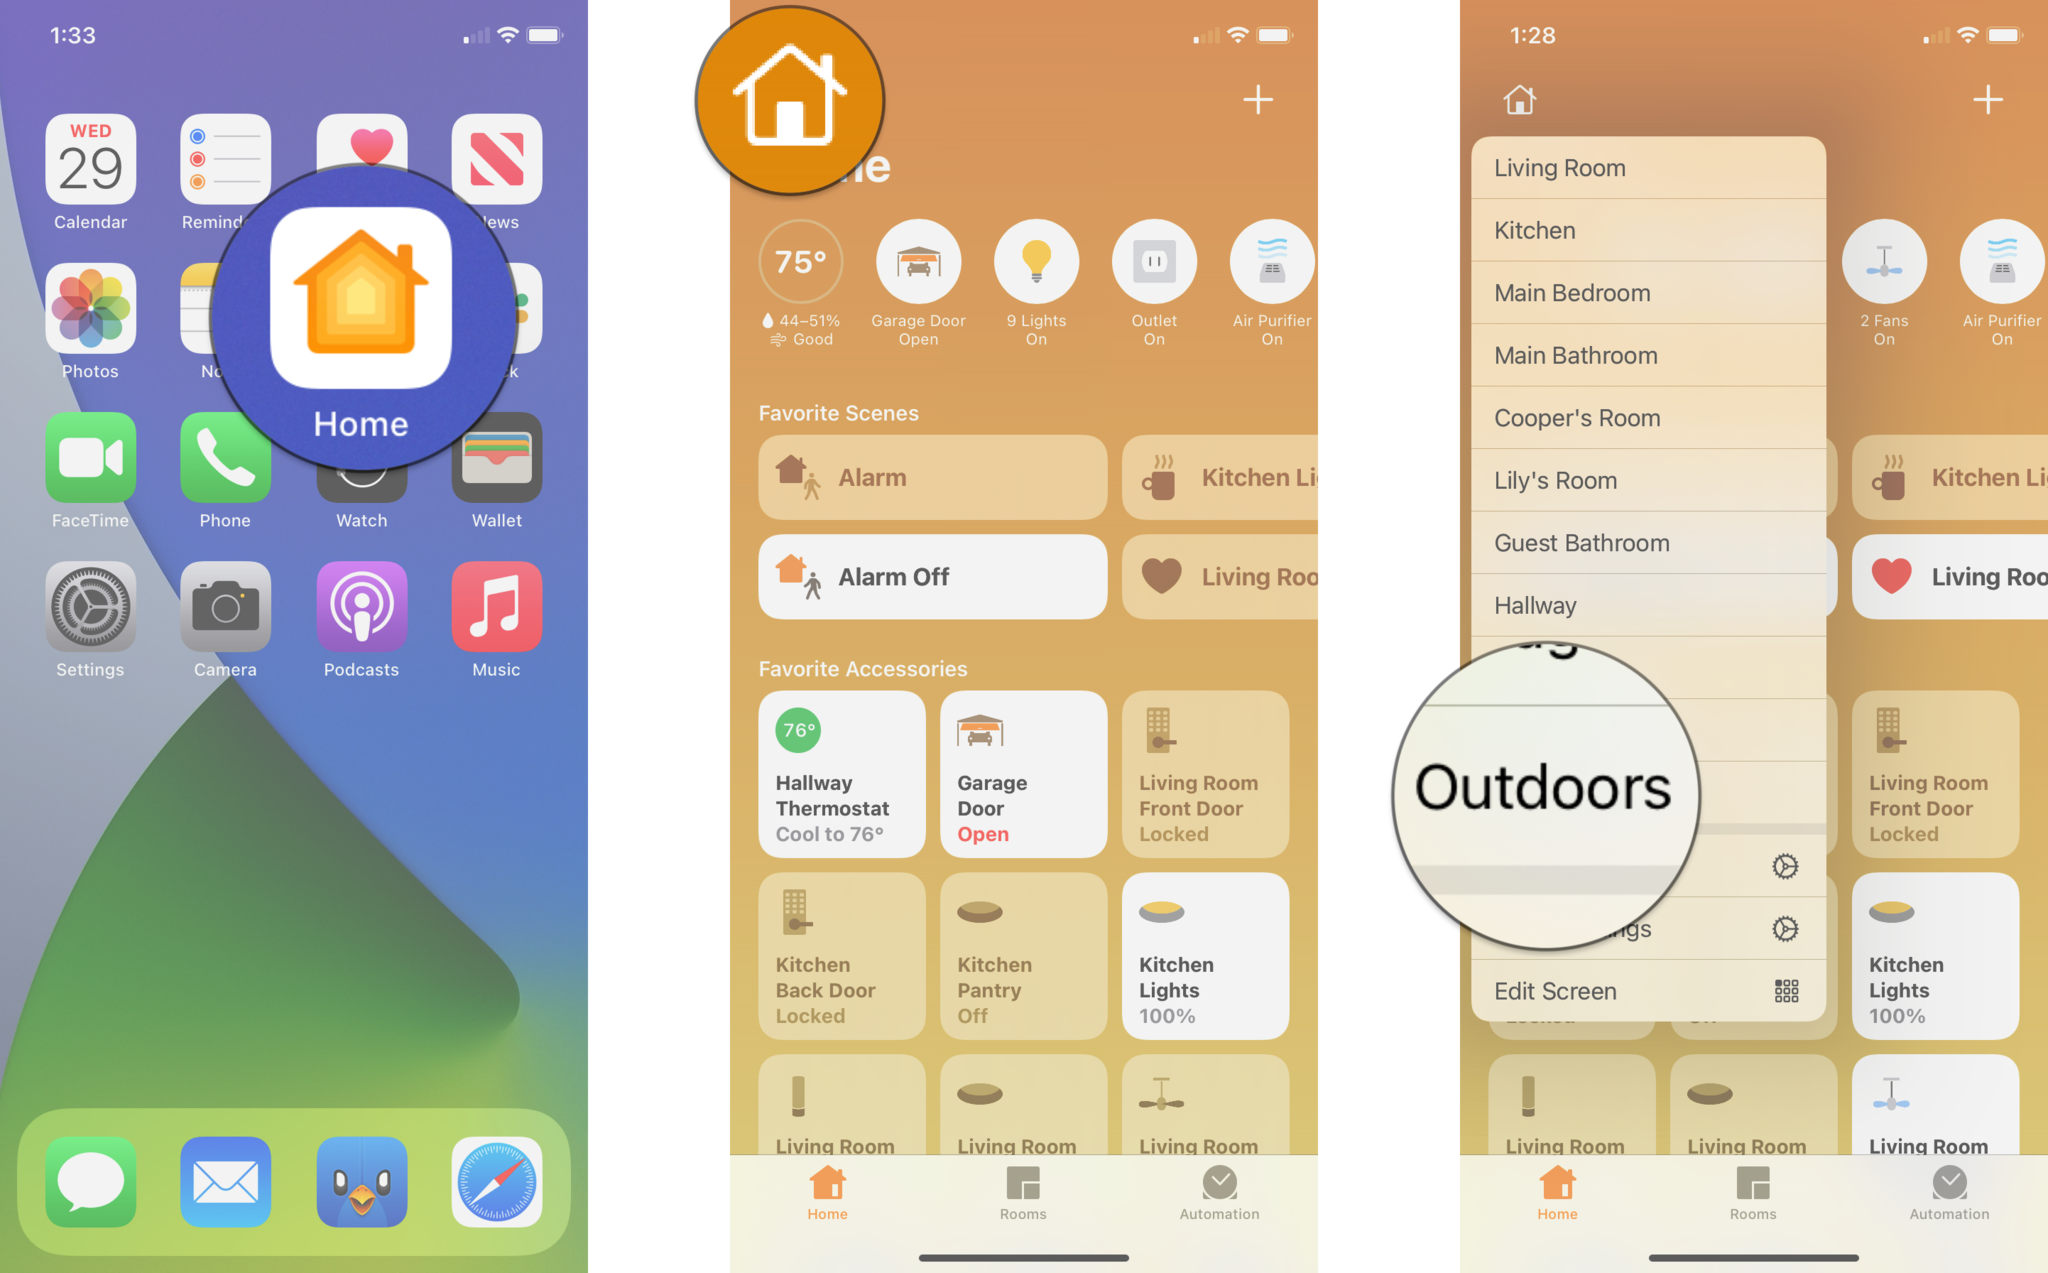
- Tap on the Thumbnail Image of your camera.
- Swipe to the Left or Right on the timeline located at the bottom to find a motion event.
- When swiping your timeline, a calendar timeline will appear at the top of your screen. You can use this to jump to a specific date if needed.
Tap on the desired Motion Event.

- Tap the Share Icon located on the left.
- Tap on the Trash Icon to the right of the timeline.
Tap on Delete Clip when the prompt appears.
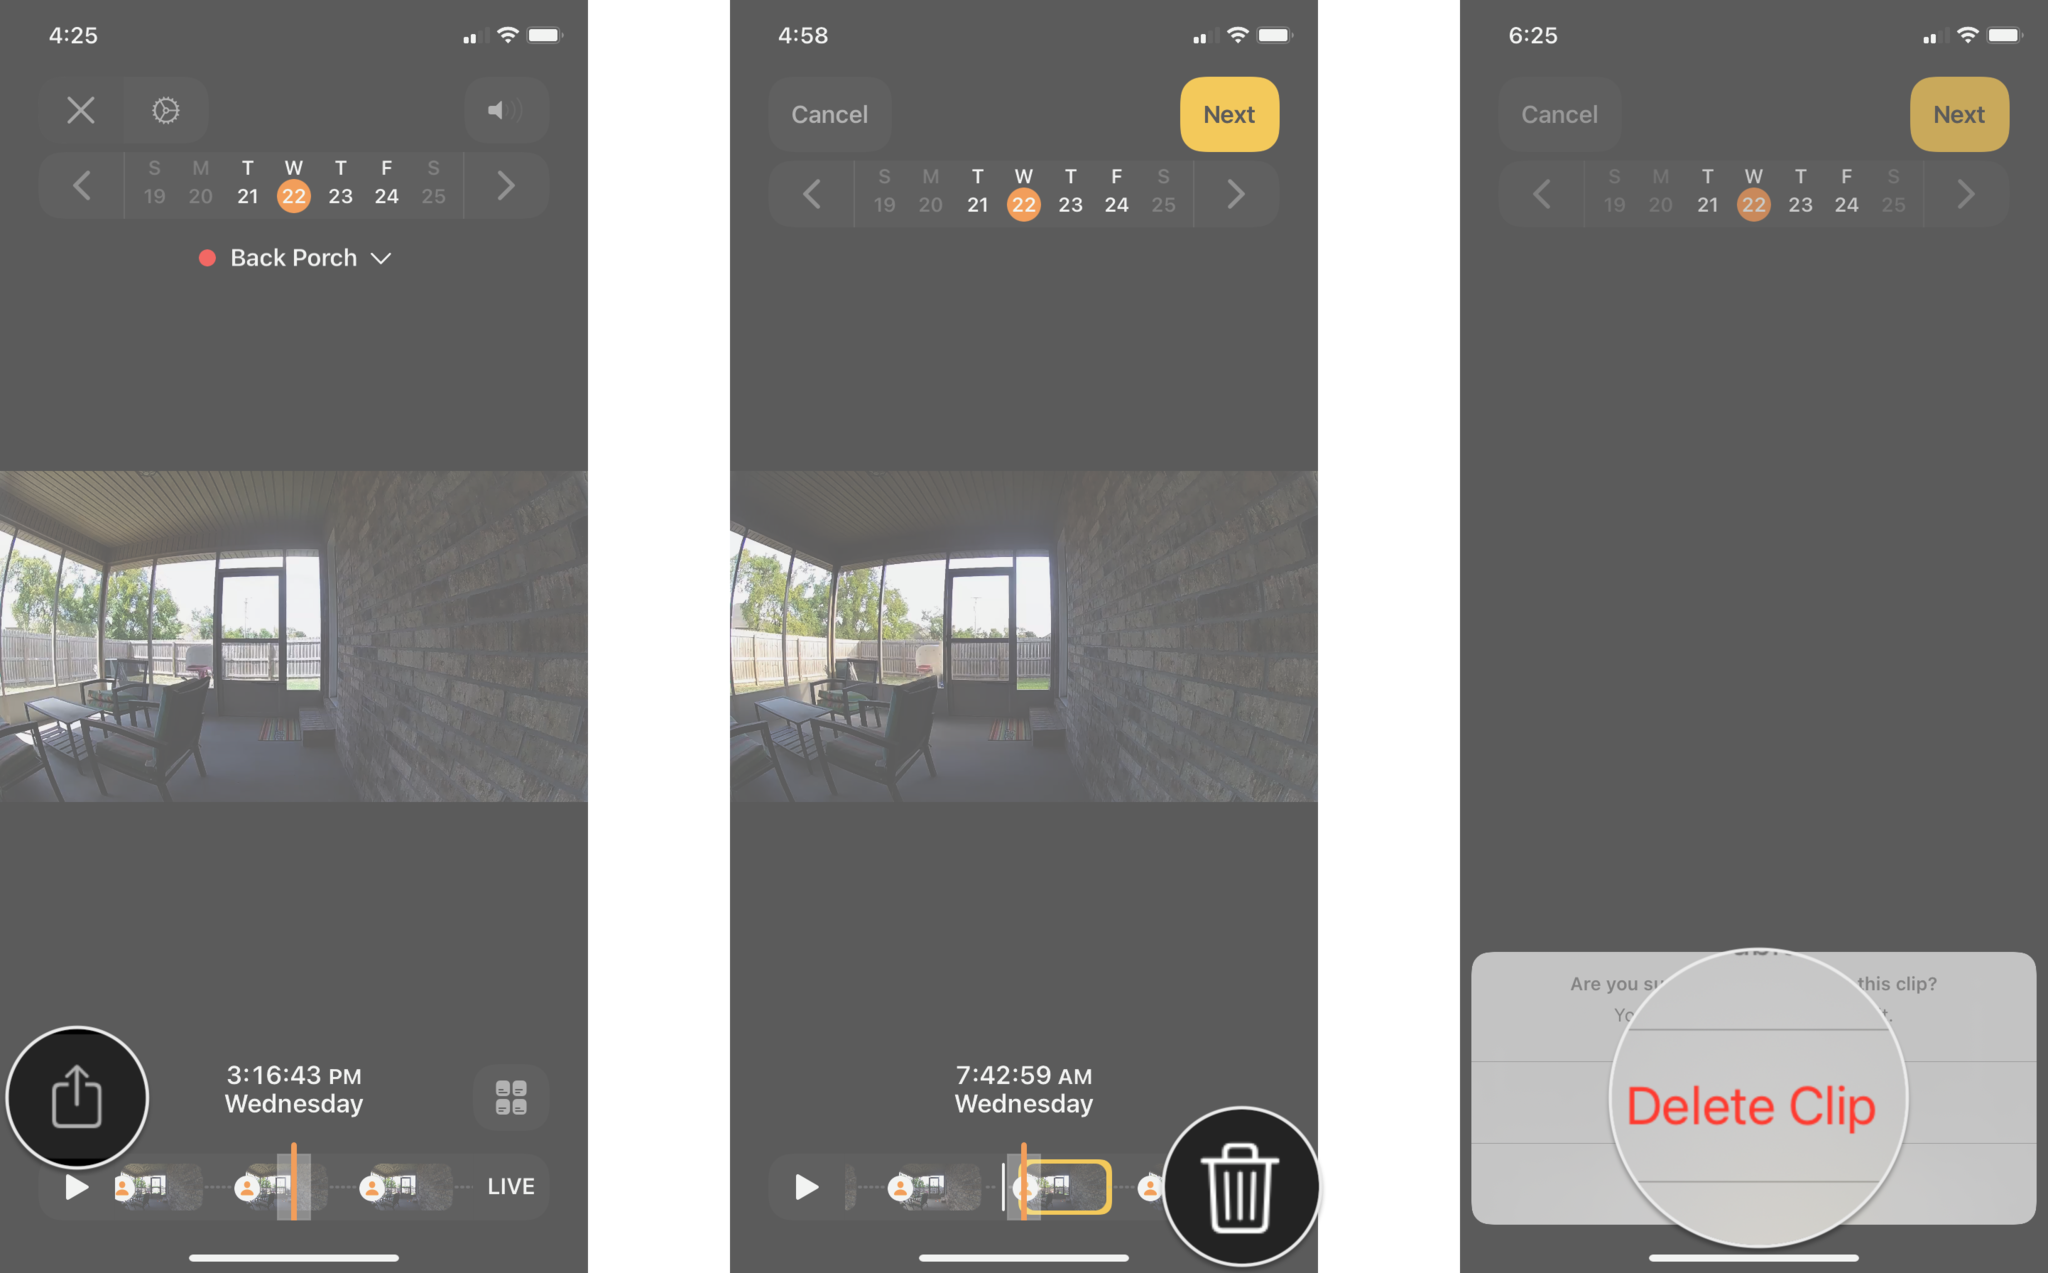
The HomeKit Secure Video feature automatically saves the last ten days of recordings if you have an iCloud storage subscription. While handy, keep in mind that you will need to save any footage using the above steps before time expires. If you use the delete recording option, there is no way to recover it.
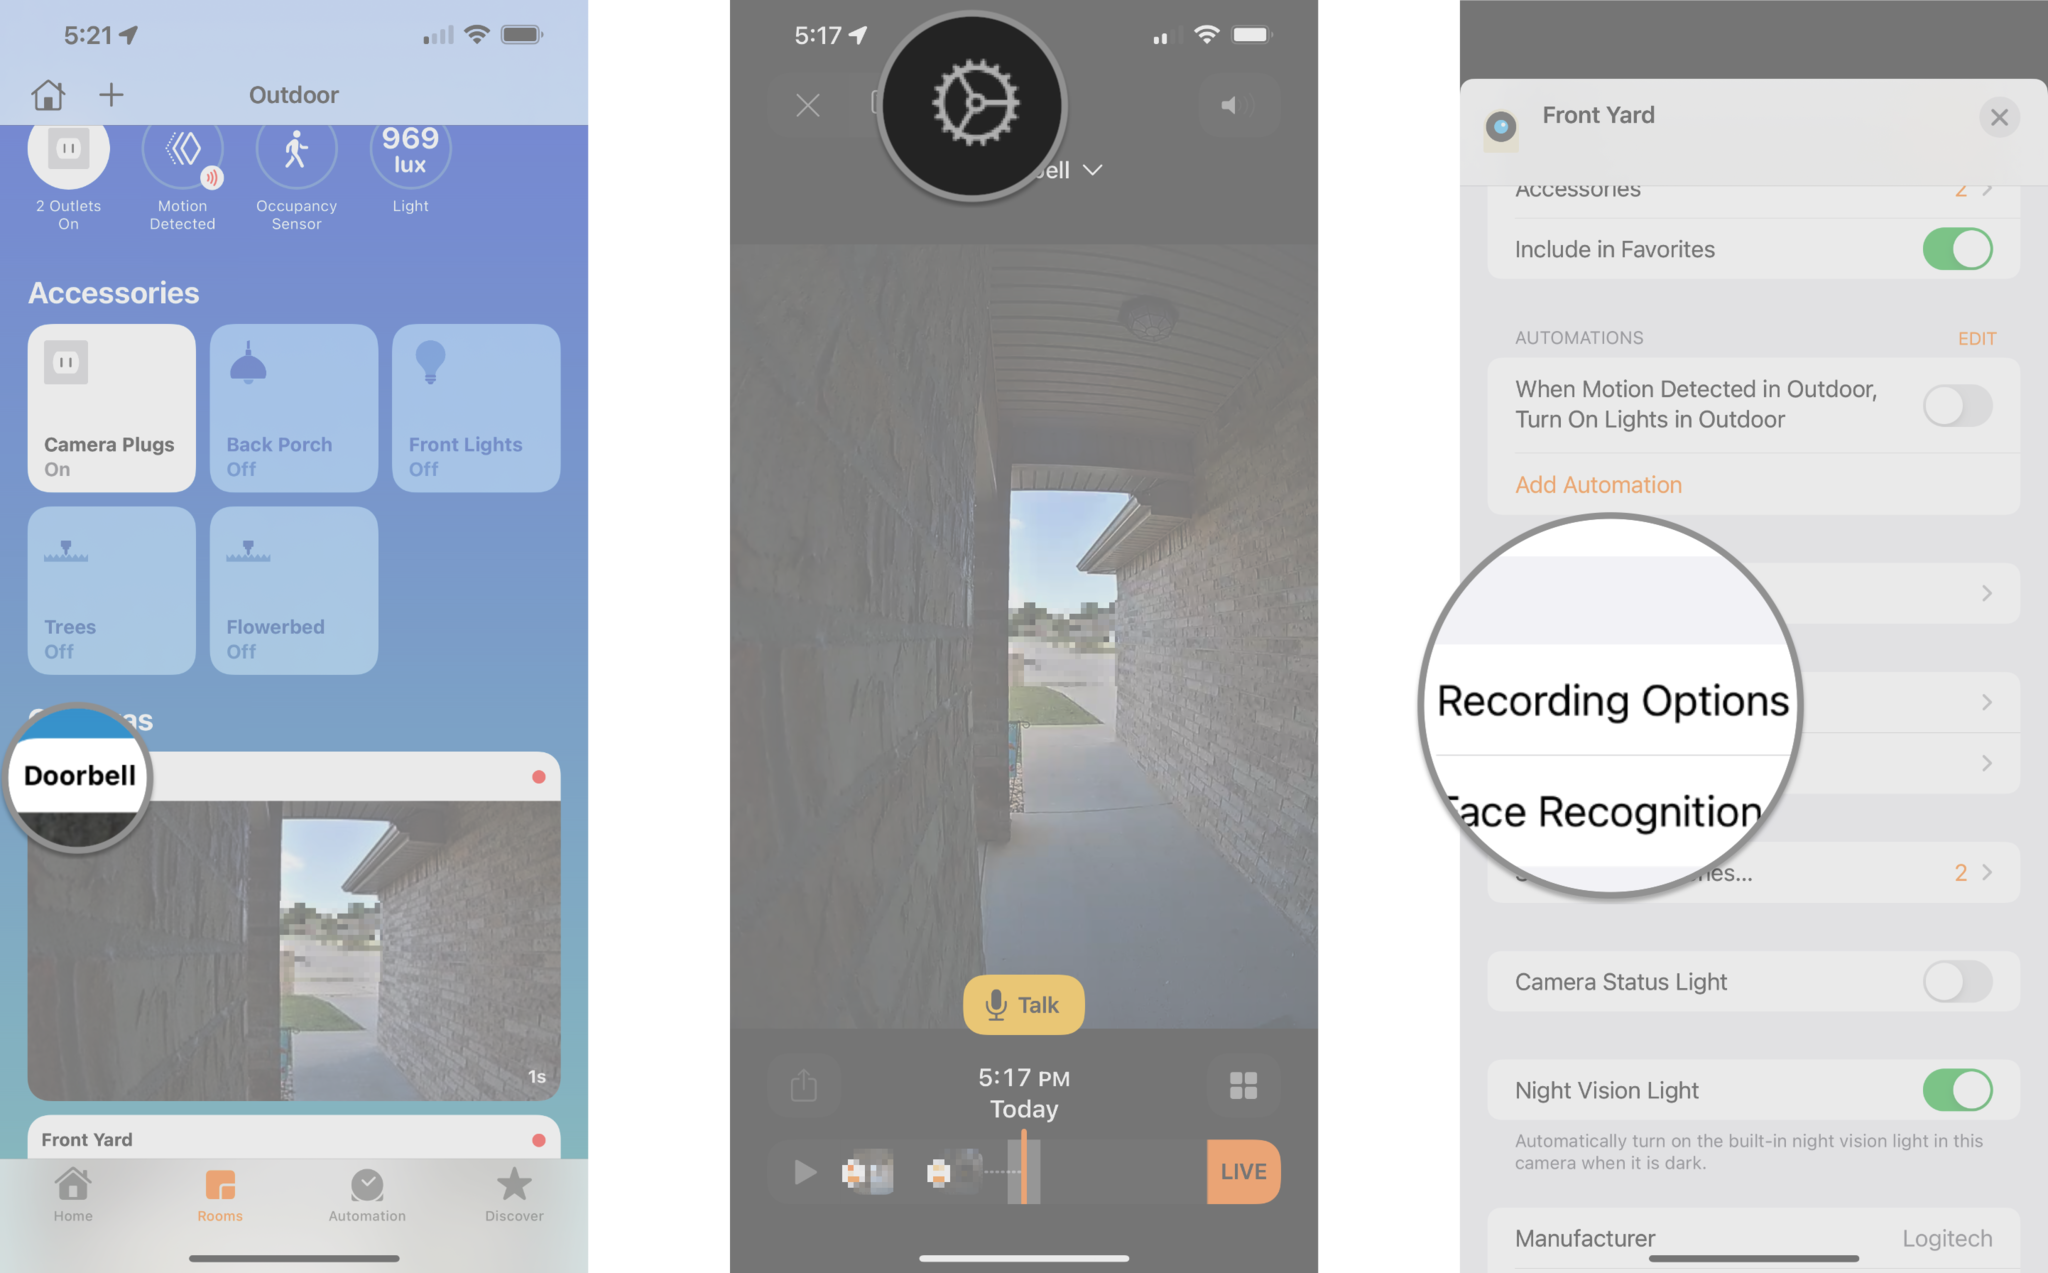
How to enable camera recording options in the Home app
- Launch the Home app.
- Tap on the House icon.
- You can also tap directly on your camera from the Home tab if it is a favorite.
Tap the Room that your camera is within.
- Tap on the Thumbnail Image of your camera.
- Tap on the Settings icon located near the top of the app.
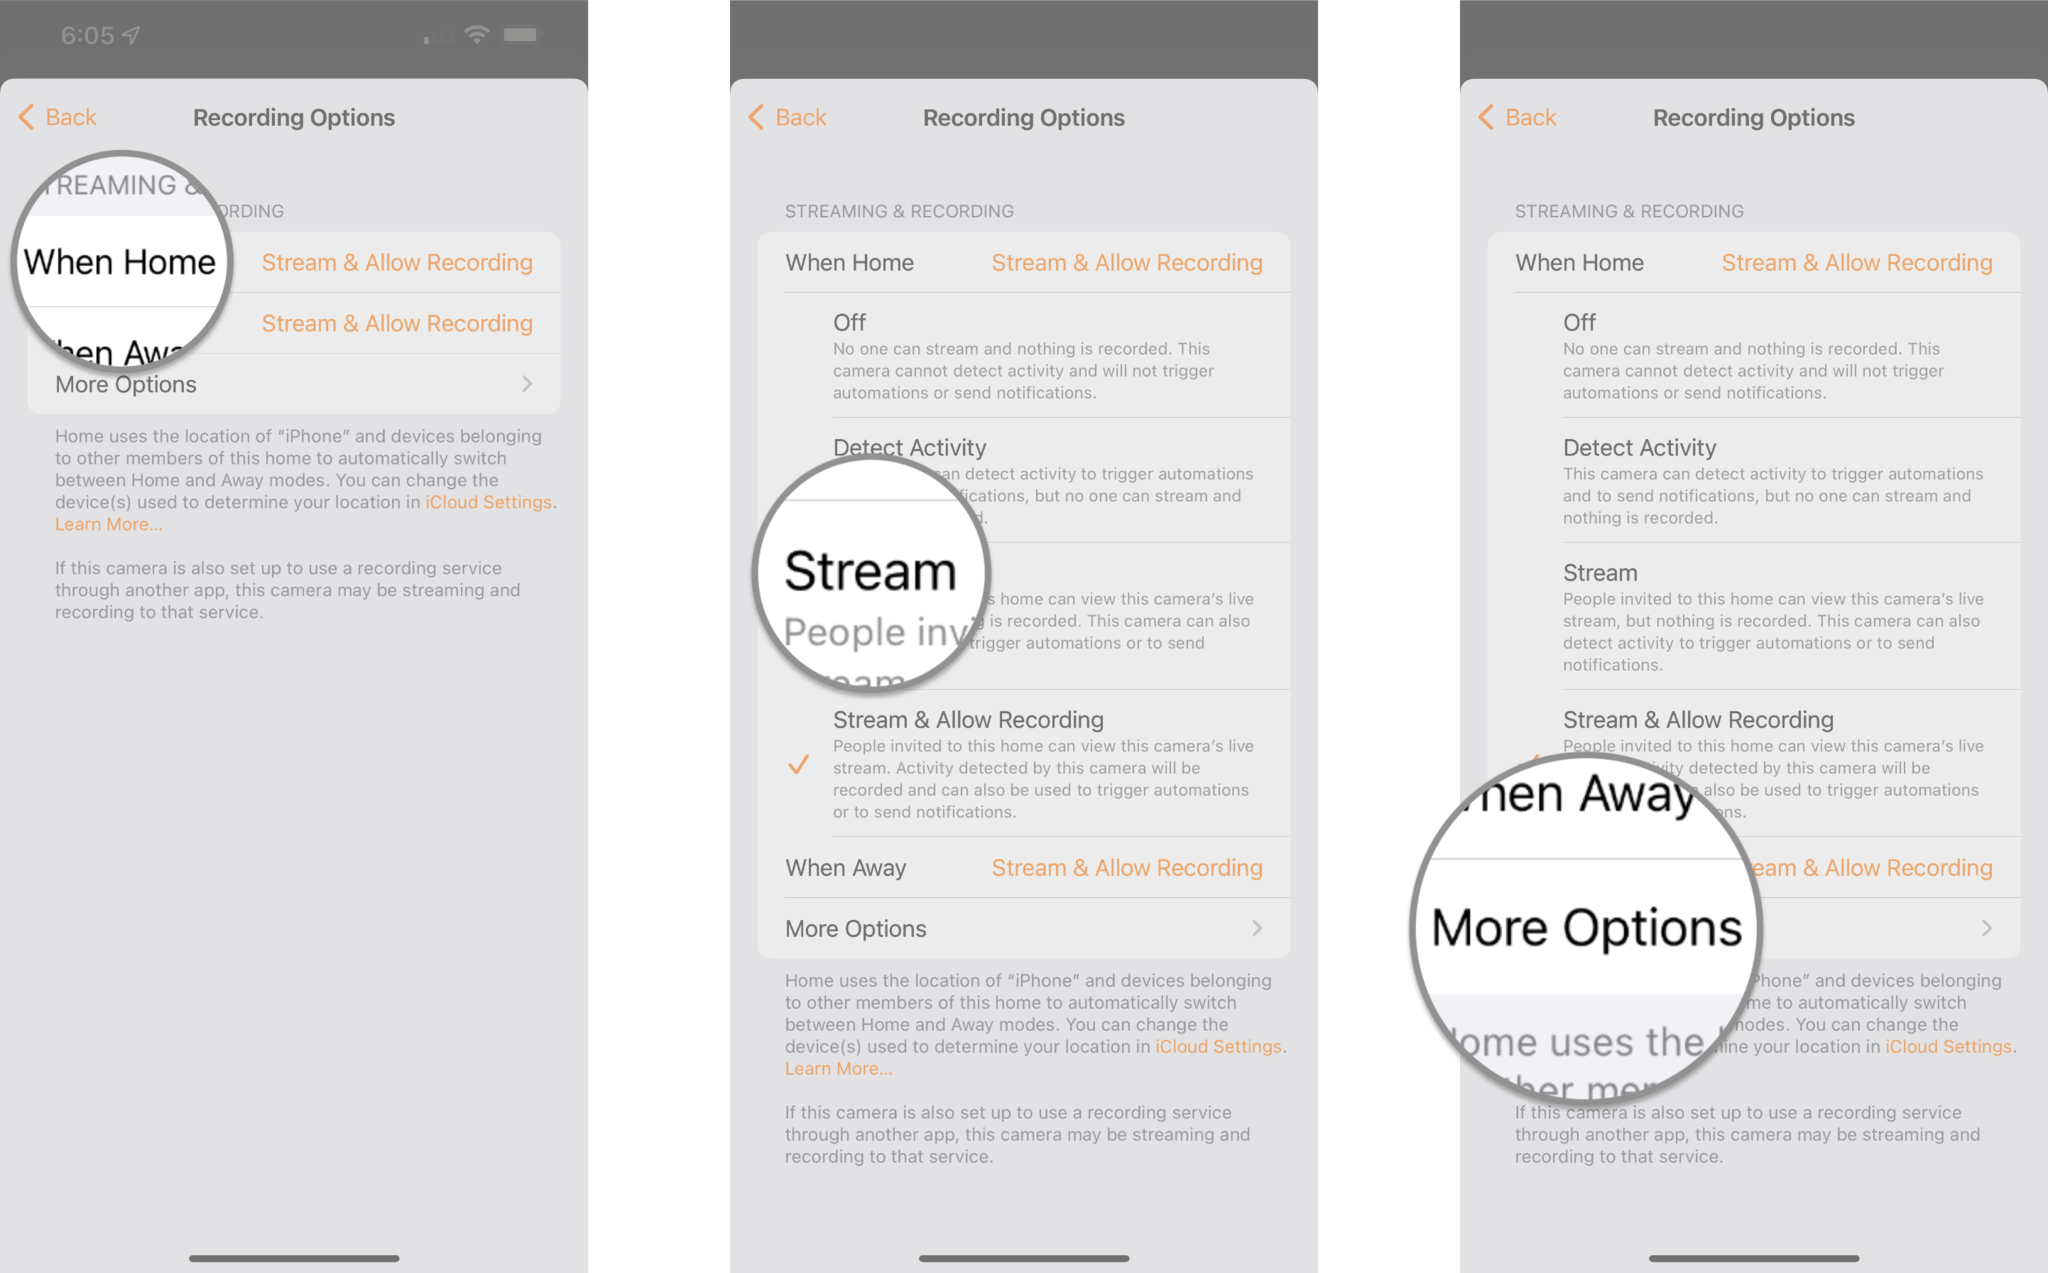
Tap Recording Options

- Tap When Home or When Away.
- Tap a Recording Option.
- Off turns your camera off. You will not be able to view your camera's live view, and it will not record activity.
- Detect Activity will send notifications for motion events, but you will not be able to access the live view, and it will not record activity.
- Stream allows you to view your camera's live feed, and it will notify you of motion events, but it will not record.
- Stream & Allow Recording enables live camera feed streaming, activity notifications, and recording.
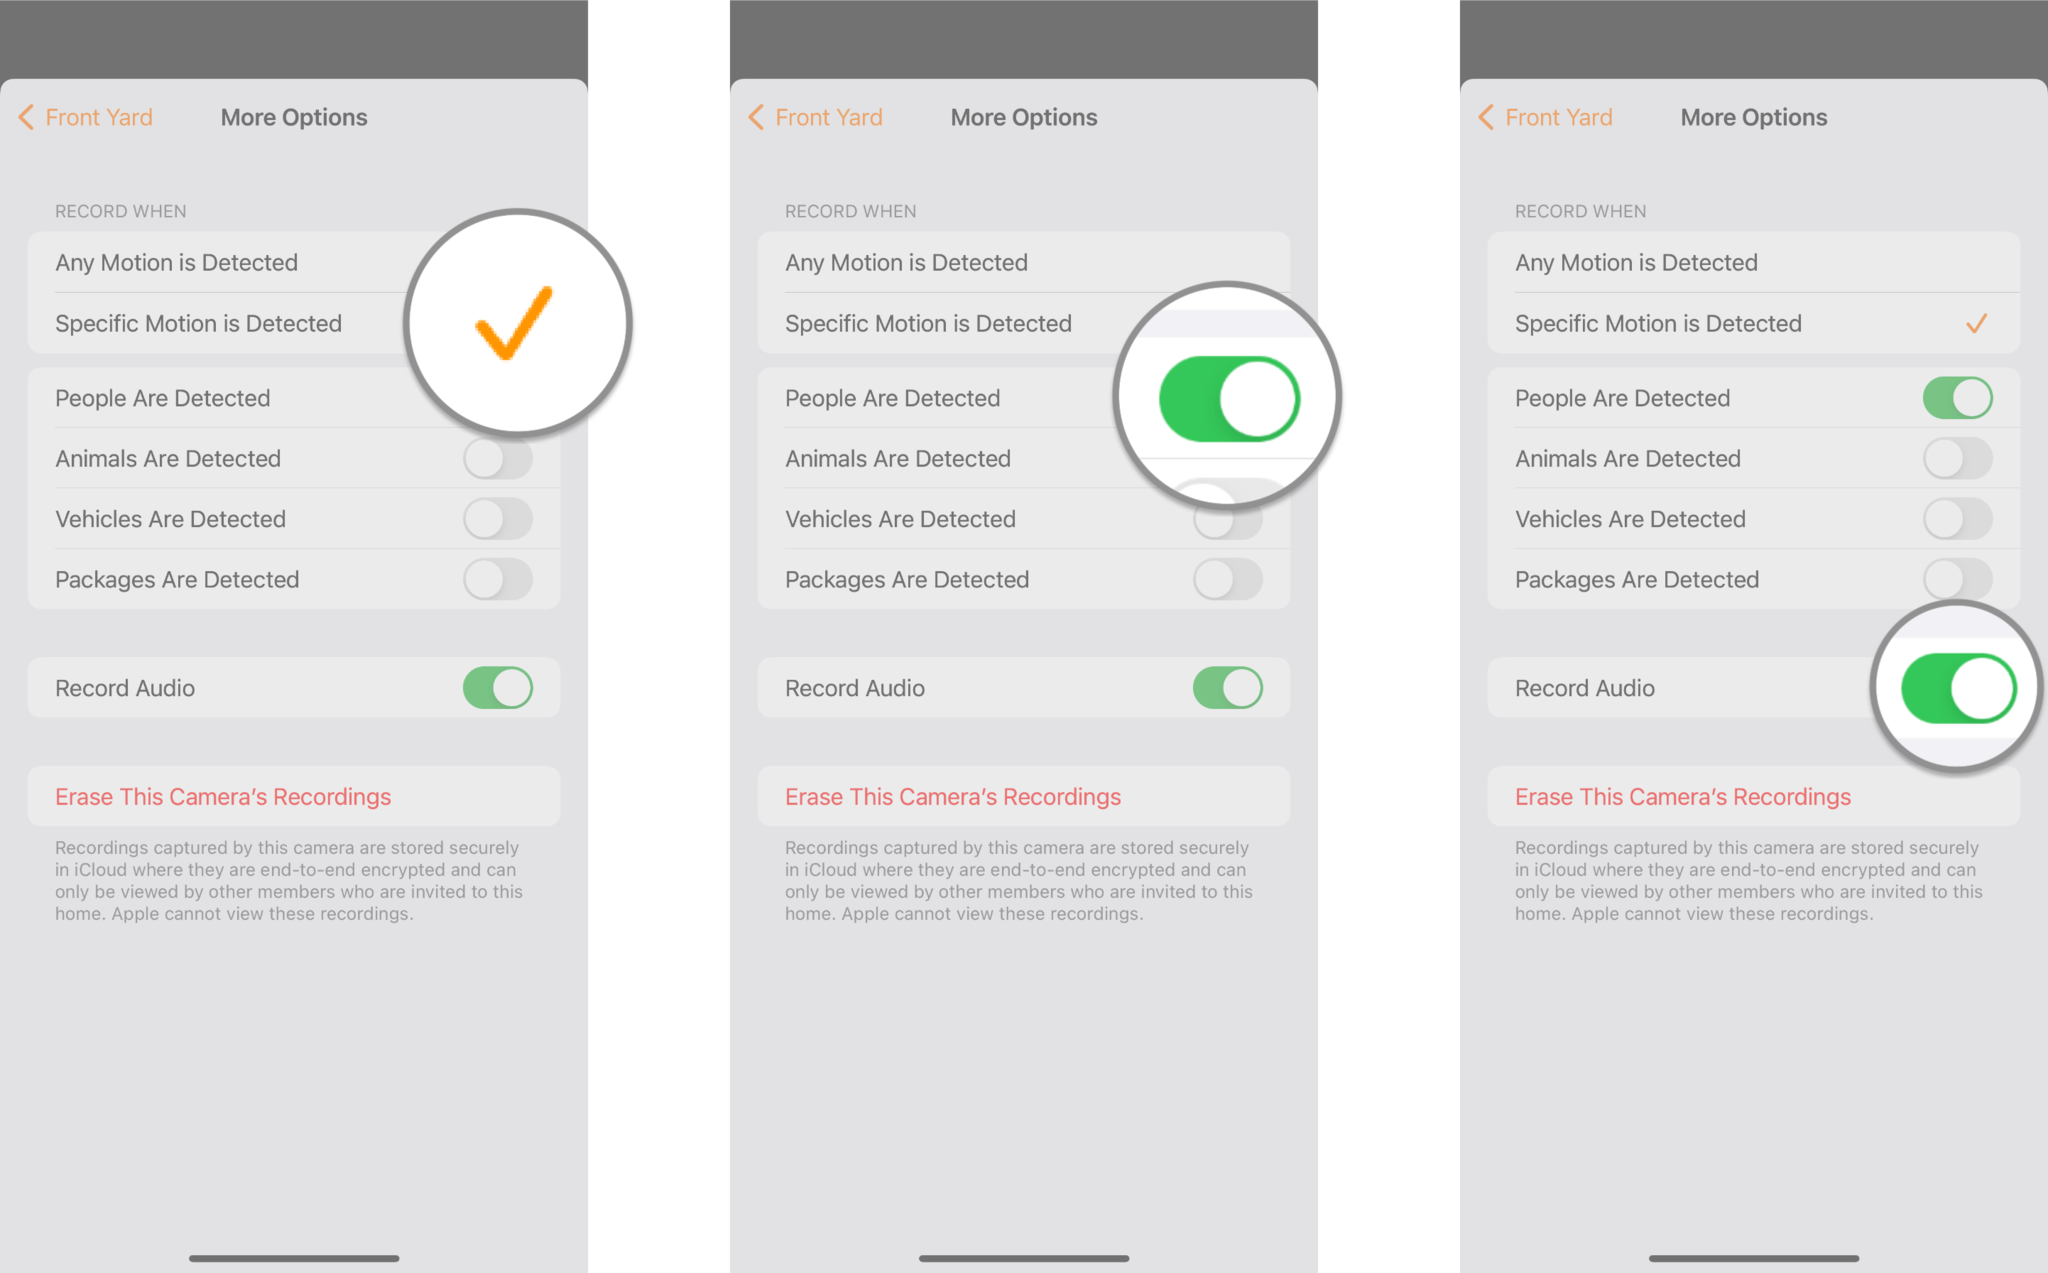
Tap More Options.

- Tap Any Motion Is Detected or Specific Motion is Detected.
- Tap a Motion type.
- Motion types include detection for people, animals, vehicles, and packages. Your camera will send alerts and record these activities based on your preferences.
Tap Record Audio.

How to disable camera recording options in the Home app
- Launch the Home app.
- Tap on the House icon.
- You can also tap directly on your camera from the Home tab if it is a favorite.
Tap the Room that your camera is within.

- Tap on the Thumbnail Image of your camera.
- Tap on the Settings icon located near the top of the app.
Tap Recording Options
- Tap When Home or When Away.
- Tap a Recording Option.
- Off turns your camera entirely off. As a result, you will not be able to view your camera's live view, and it will not record activity.
- Detect Activity will send notifications for motion events, but you will not be able to access the live view, and it will not record activity.
- Stream allows you to view your camera's live feed, and it will notify you of motion events, but it will not record.
- Stream & Allow Recording enables live camera feed streaming, activity notifications, and recording.
Tap More Options.
- Tap Any Motion Is Detected or Specific Motion is Detected.
- Tap a Motion type to disable.
- Motion types include detection for people, animals, vehicles, and packages. Your camera will send alerts and record these activities based on your preferences.
Tap Record Audio to disable.
How to enable camera notifications in the Home app
- Launch the Home app.
- Tap on the House icon.
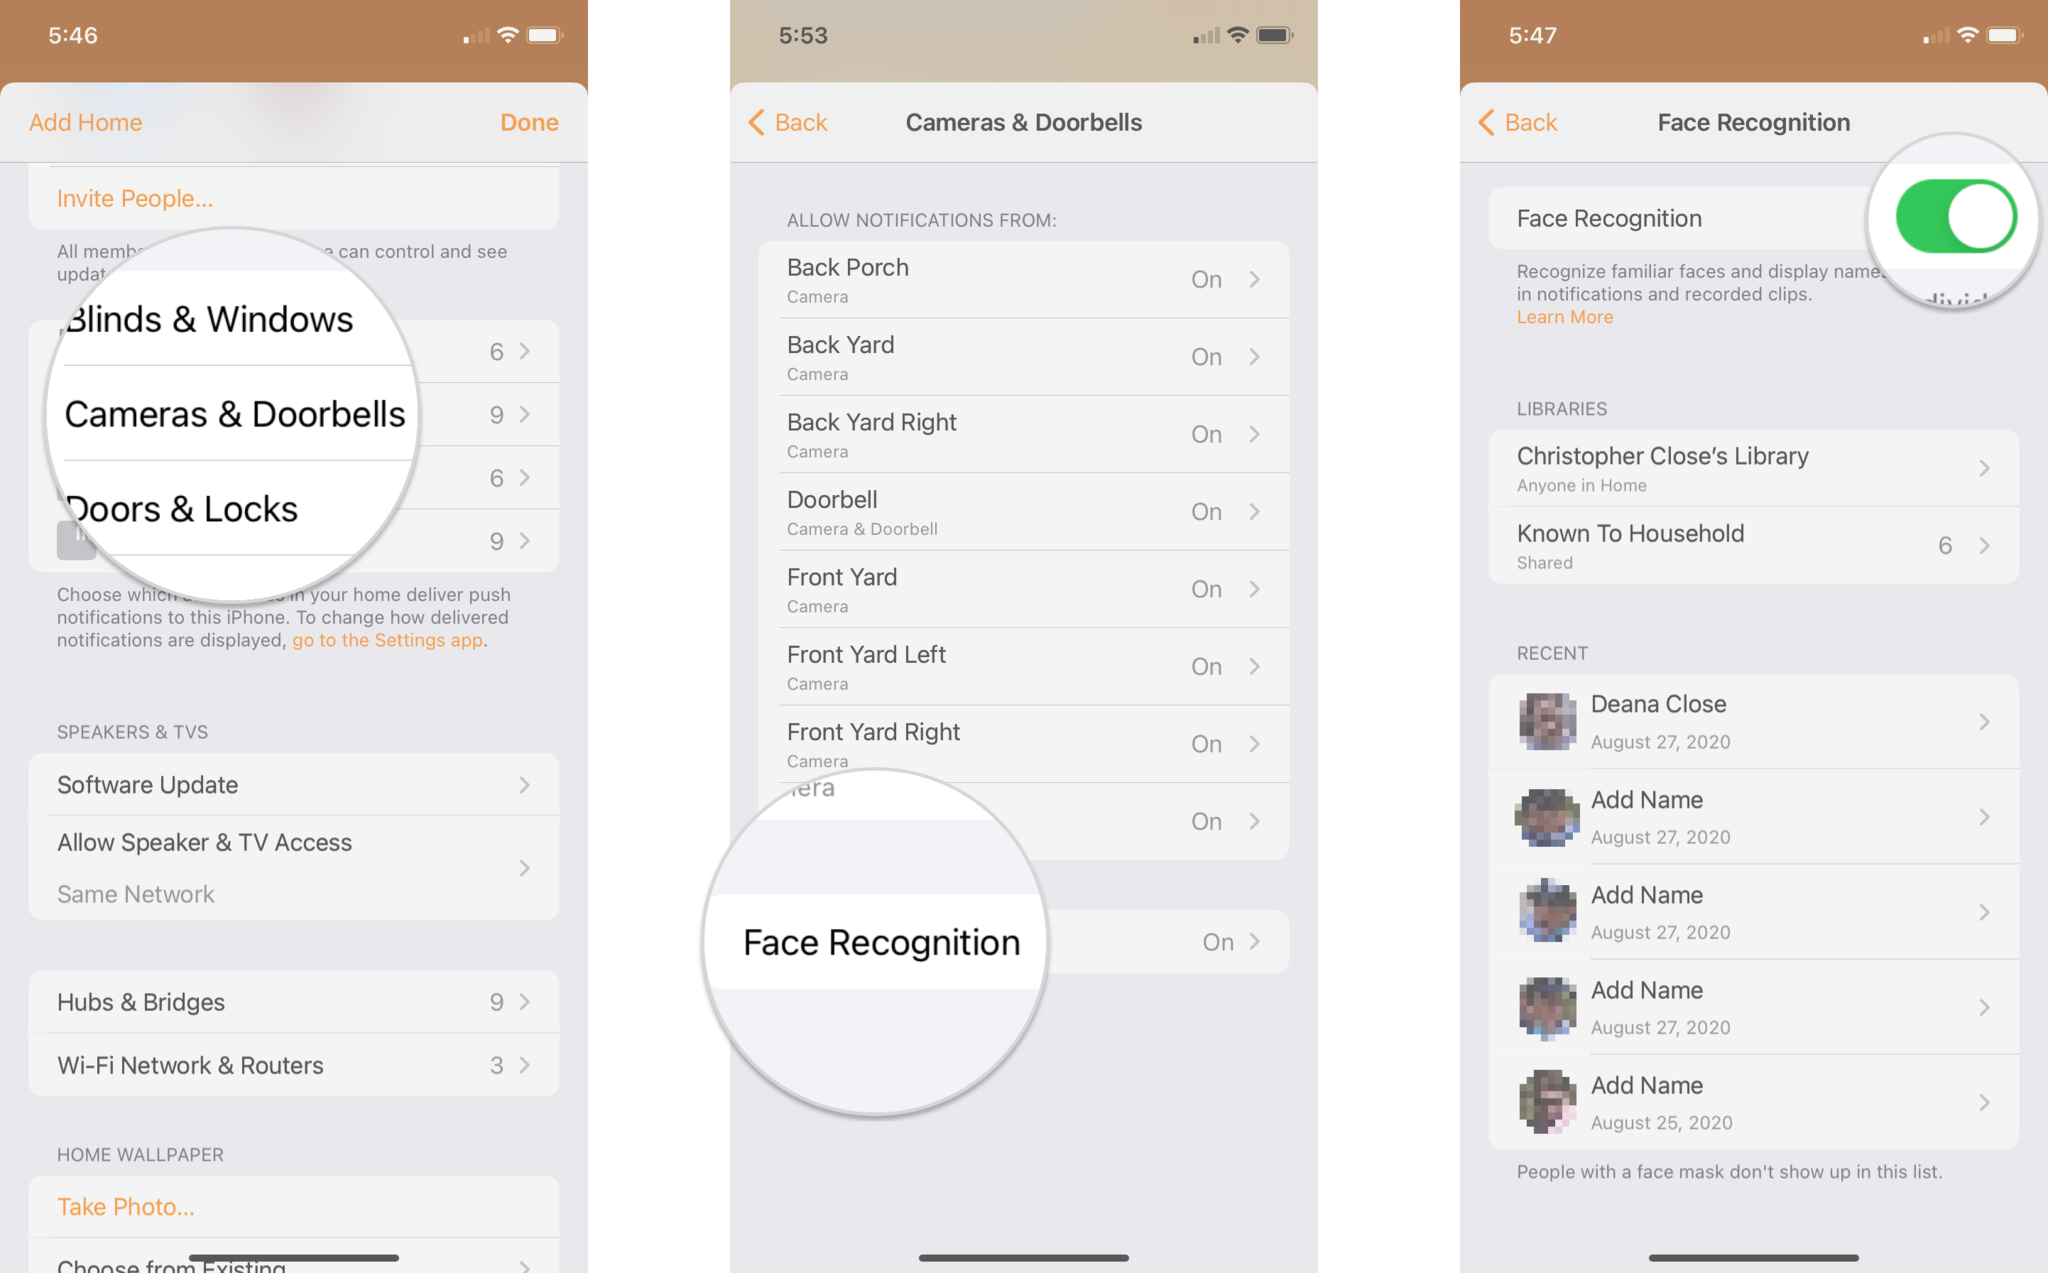
Tap Home Settings.

- Tap Cameras & Doorbells.
- Tap the name of the Camera that you want to manage.
Tap the toggle for each Notification setting that you wish to enable.
- Activity Notifications are alerts for all motion events.
- Status Change Notifications are for when your camera changes recording modes.
- Notify When Camera Goes Offline is for when your camera loses its connection.
- Allow Snapshots in Notifications adds a preview image to motion alerts.

How to disable camera notifications in the Home app
- Launch the Home app.
- Tap on the House icon.
Tap Home Settings.
- Tap Cameras & Doorbells.
- Tap the name of the Camera that you want to manage.
Tap the toggle for each Notification setting that you wish to disable.
- Activity Notifications are alerts for all motion events.
- Status Change Notifications are for when your camera changes recording modes.
- Notify When Camera Goes Offline is for when your camera loses its connection.
- Allow Snapshots in Notifications adds a preview image to motion alerts.

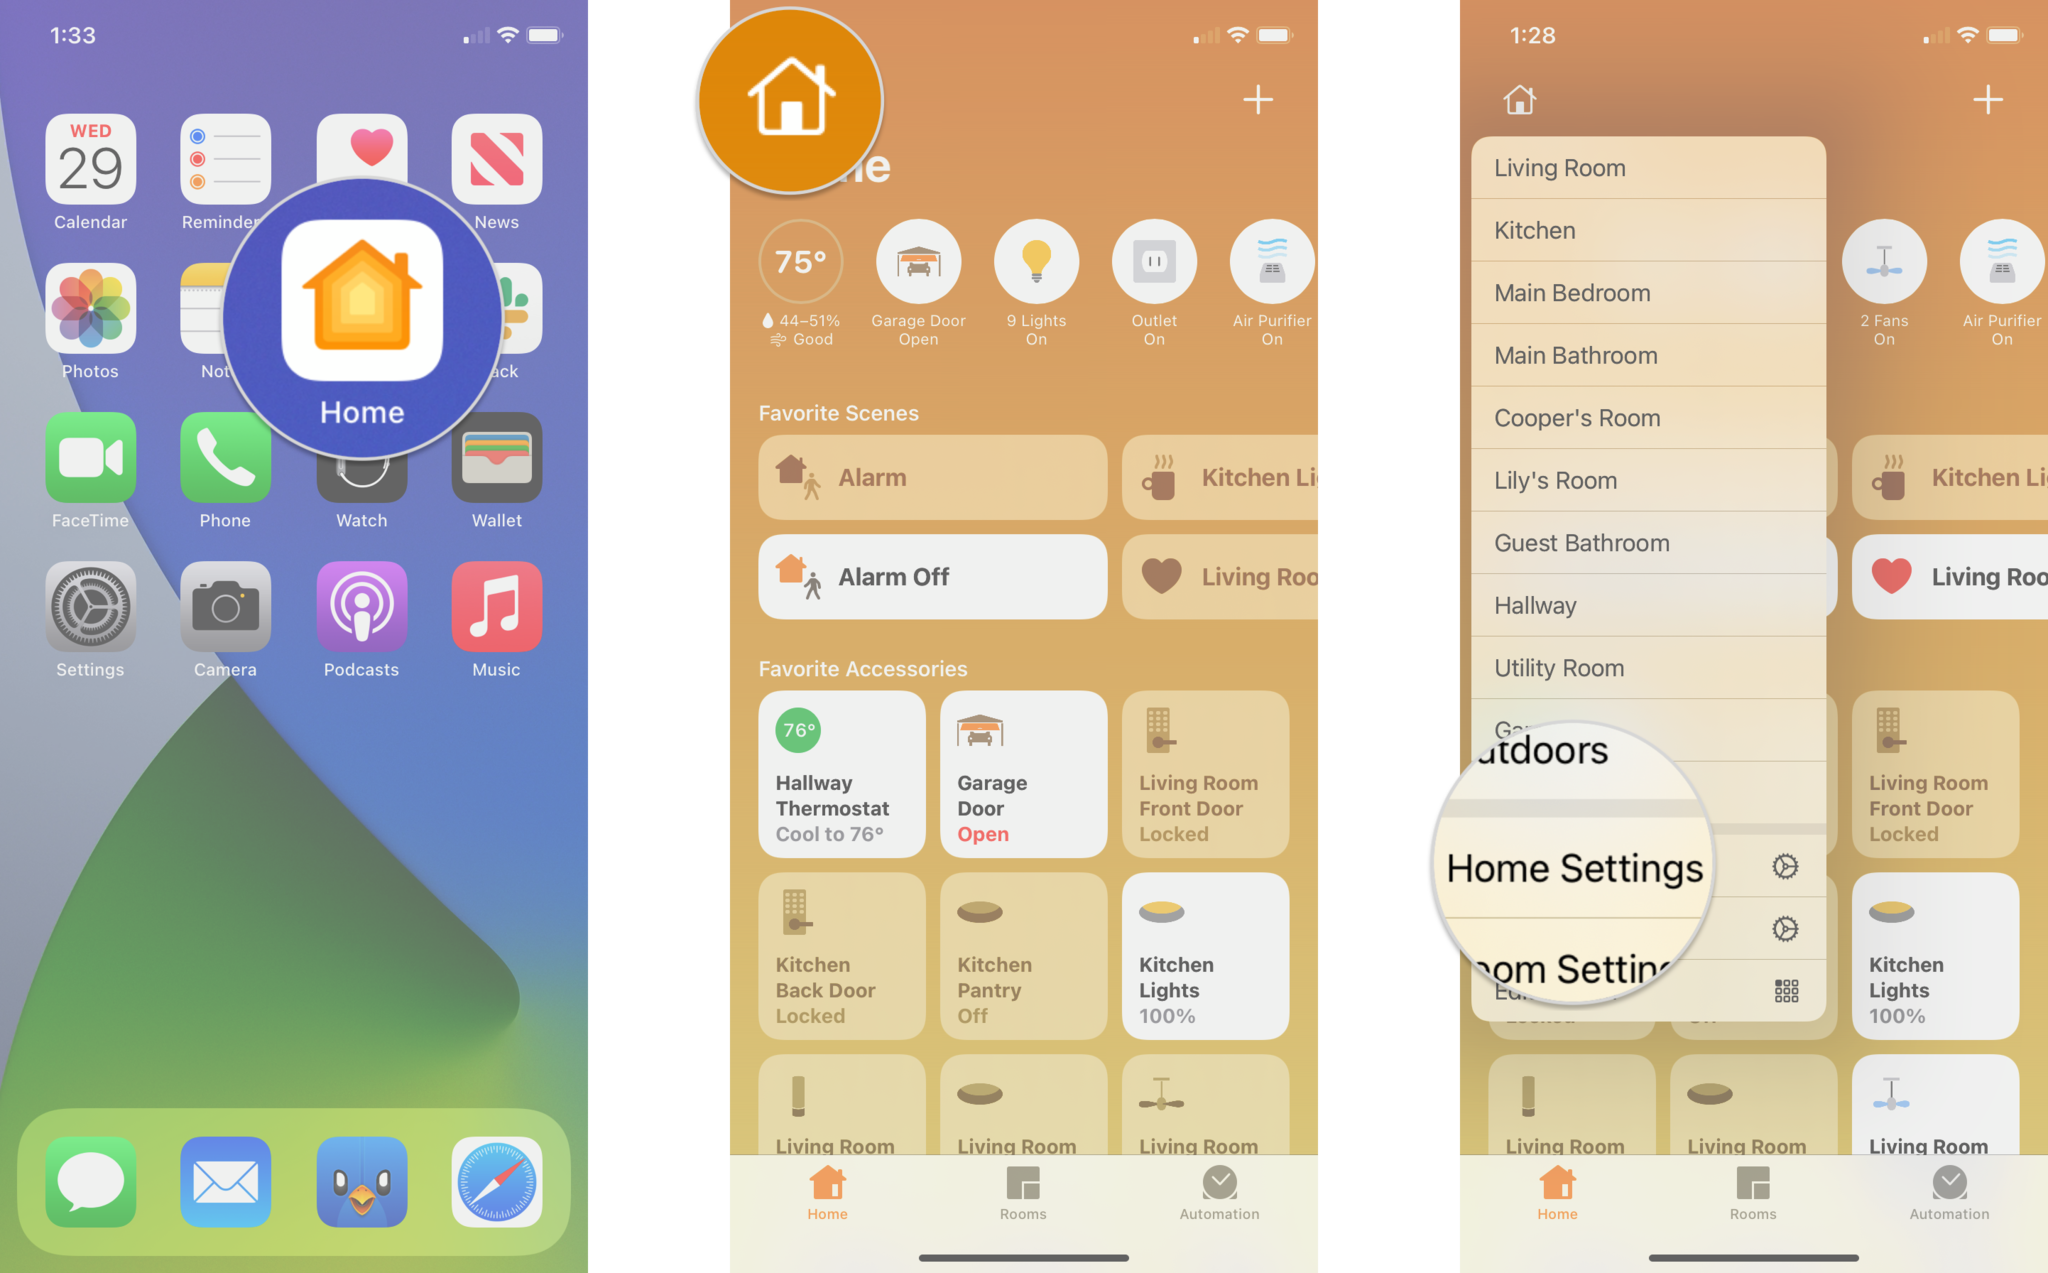
How to enable Face Recognition in the Home app
- Launch the Home app.
- Tap on the House icon.
Tap Home Settings.

- Tap on Cameras & Doorbells.
- Tap Face Recognition.
Tap the toggle for Face Recognition to enable.
- Options for sharing your face library with others in the home are available by tapping on your Name under Libraries.
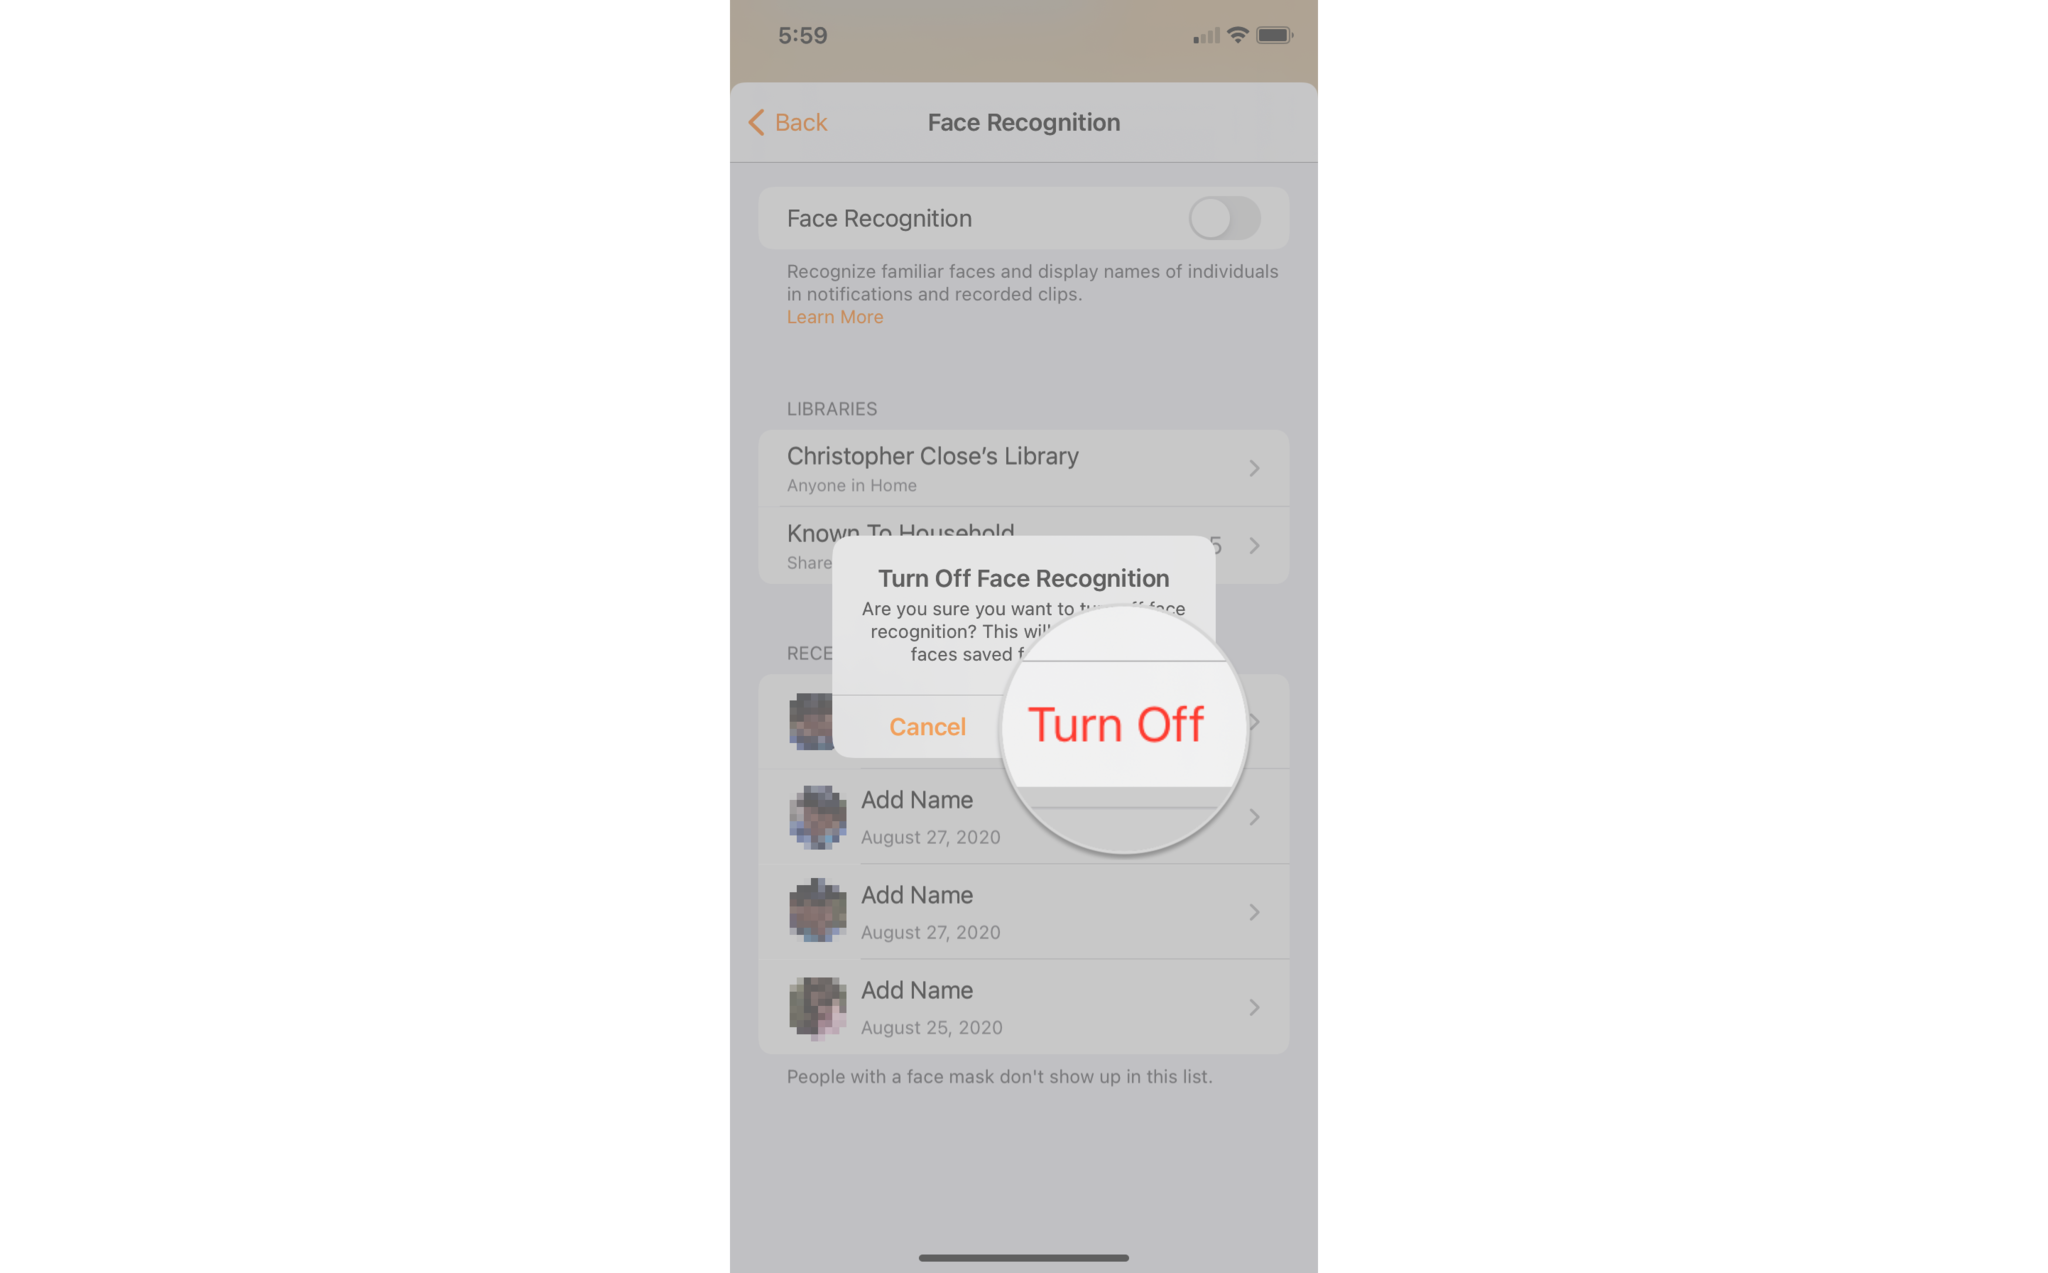
How to disable Face Recognition in the Home app
- Launch the Home app.
- Tap on the House icon.
Tap Home Settings.

- Tap on Cameras & Doorbells.
- Tap Face Recognition.
Tap the toggle for Face Recognition.

Tap Turn Off.
- This will remove all recognized faces from the Home. If enabled again, you may need to re-assign faces that the Home app was unable to determine.
How to manage recognized faces in the Home app
- Launch the Home app.
- Tap on the House icon.
Tap Home Settings.
- Tap on Cameras & Doorbells.
- Tap Face Recognition.
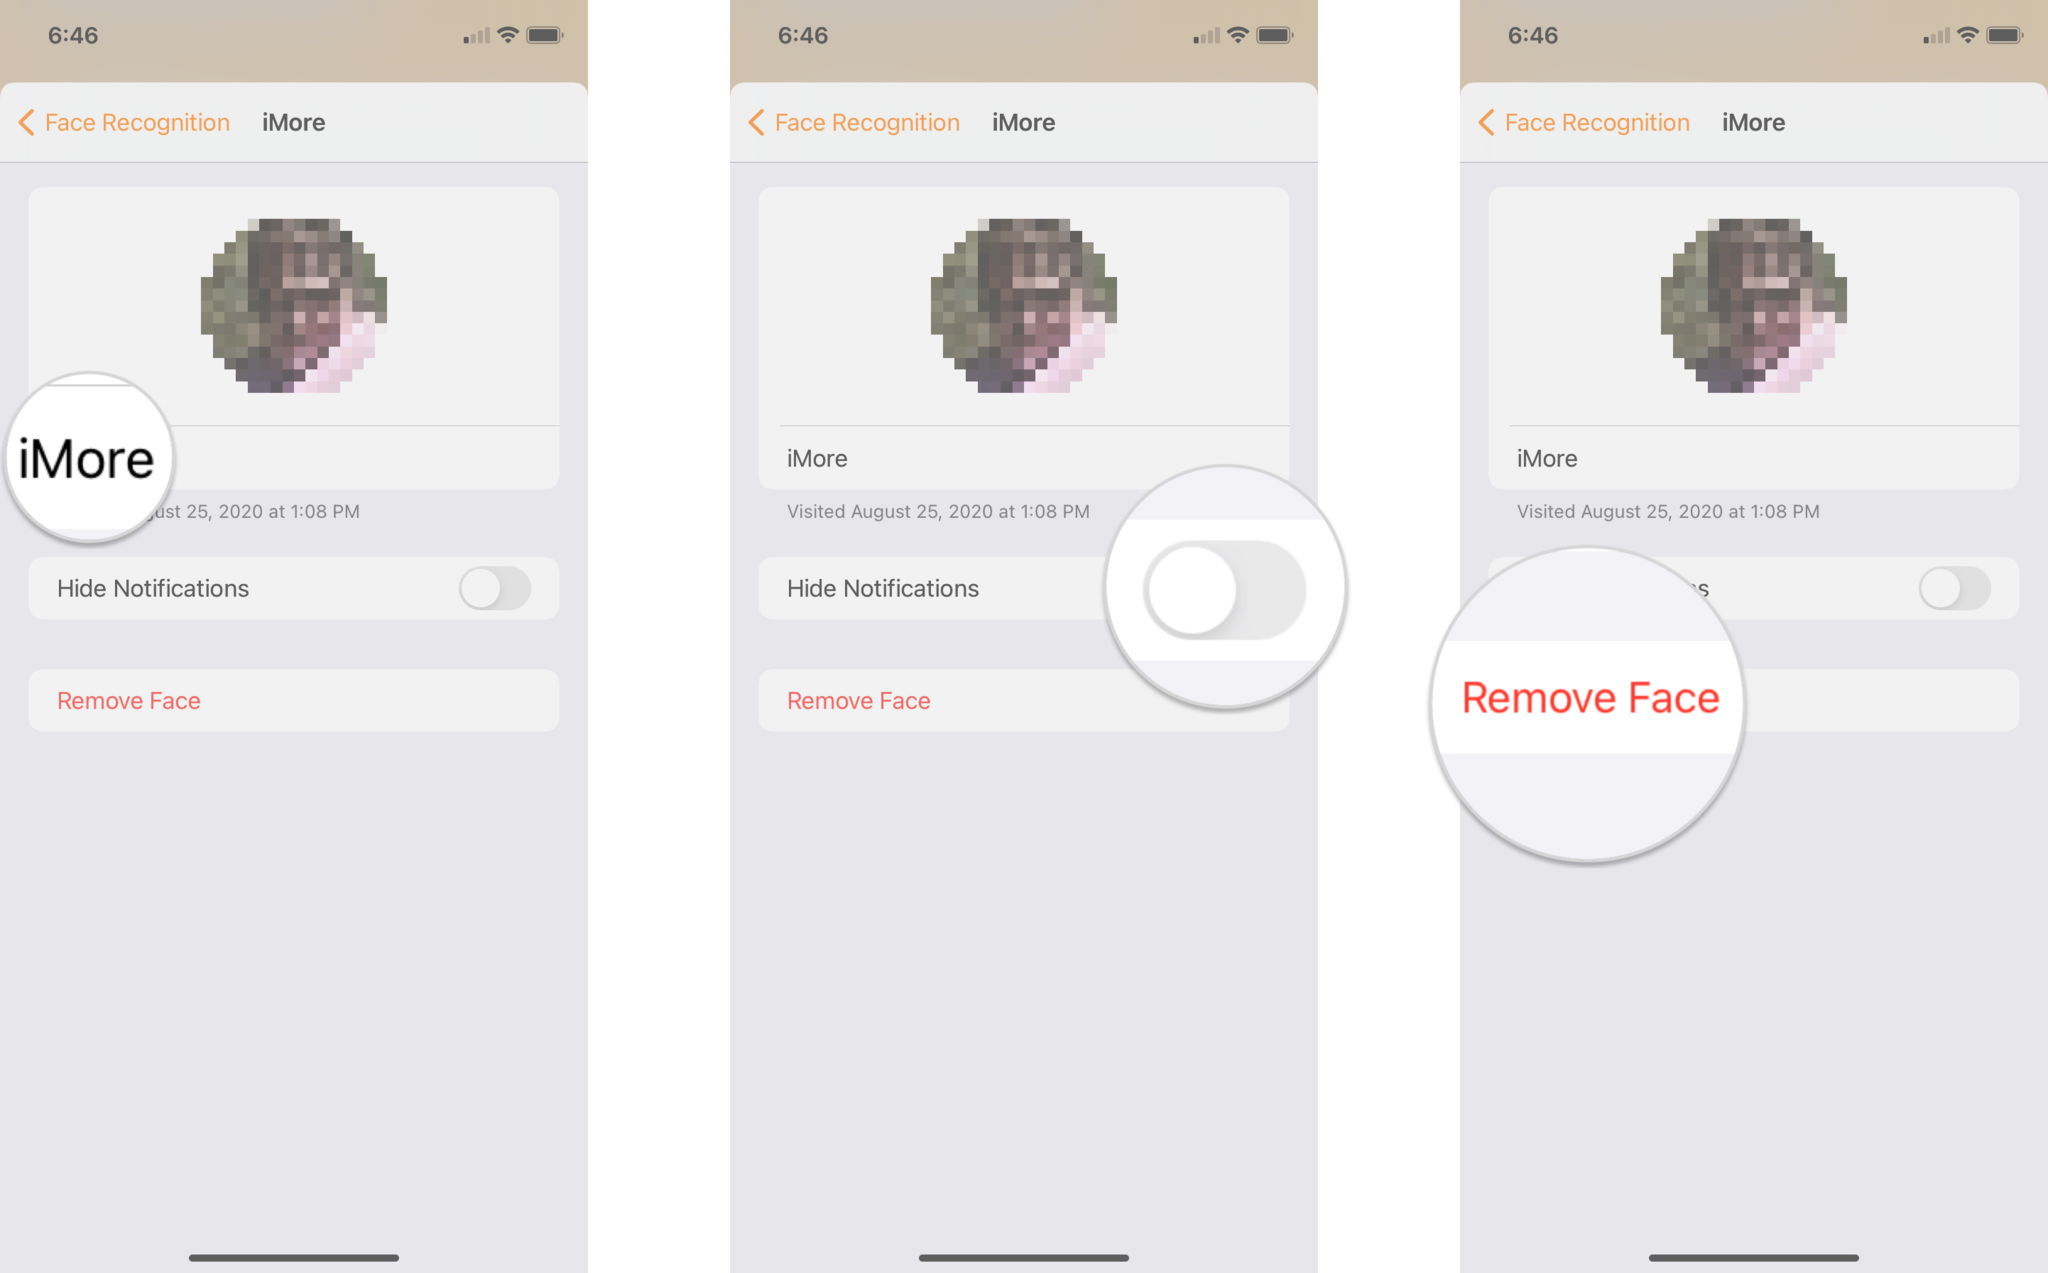
Tap on the Name of the person you wish to manage.
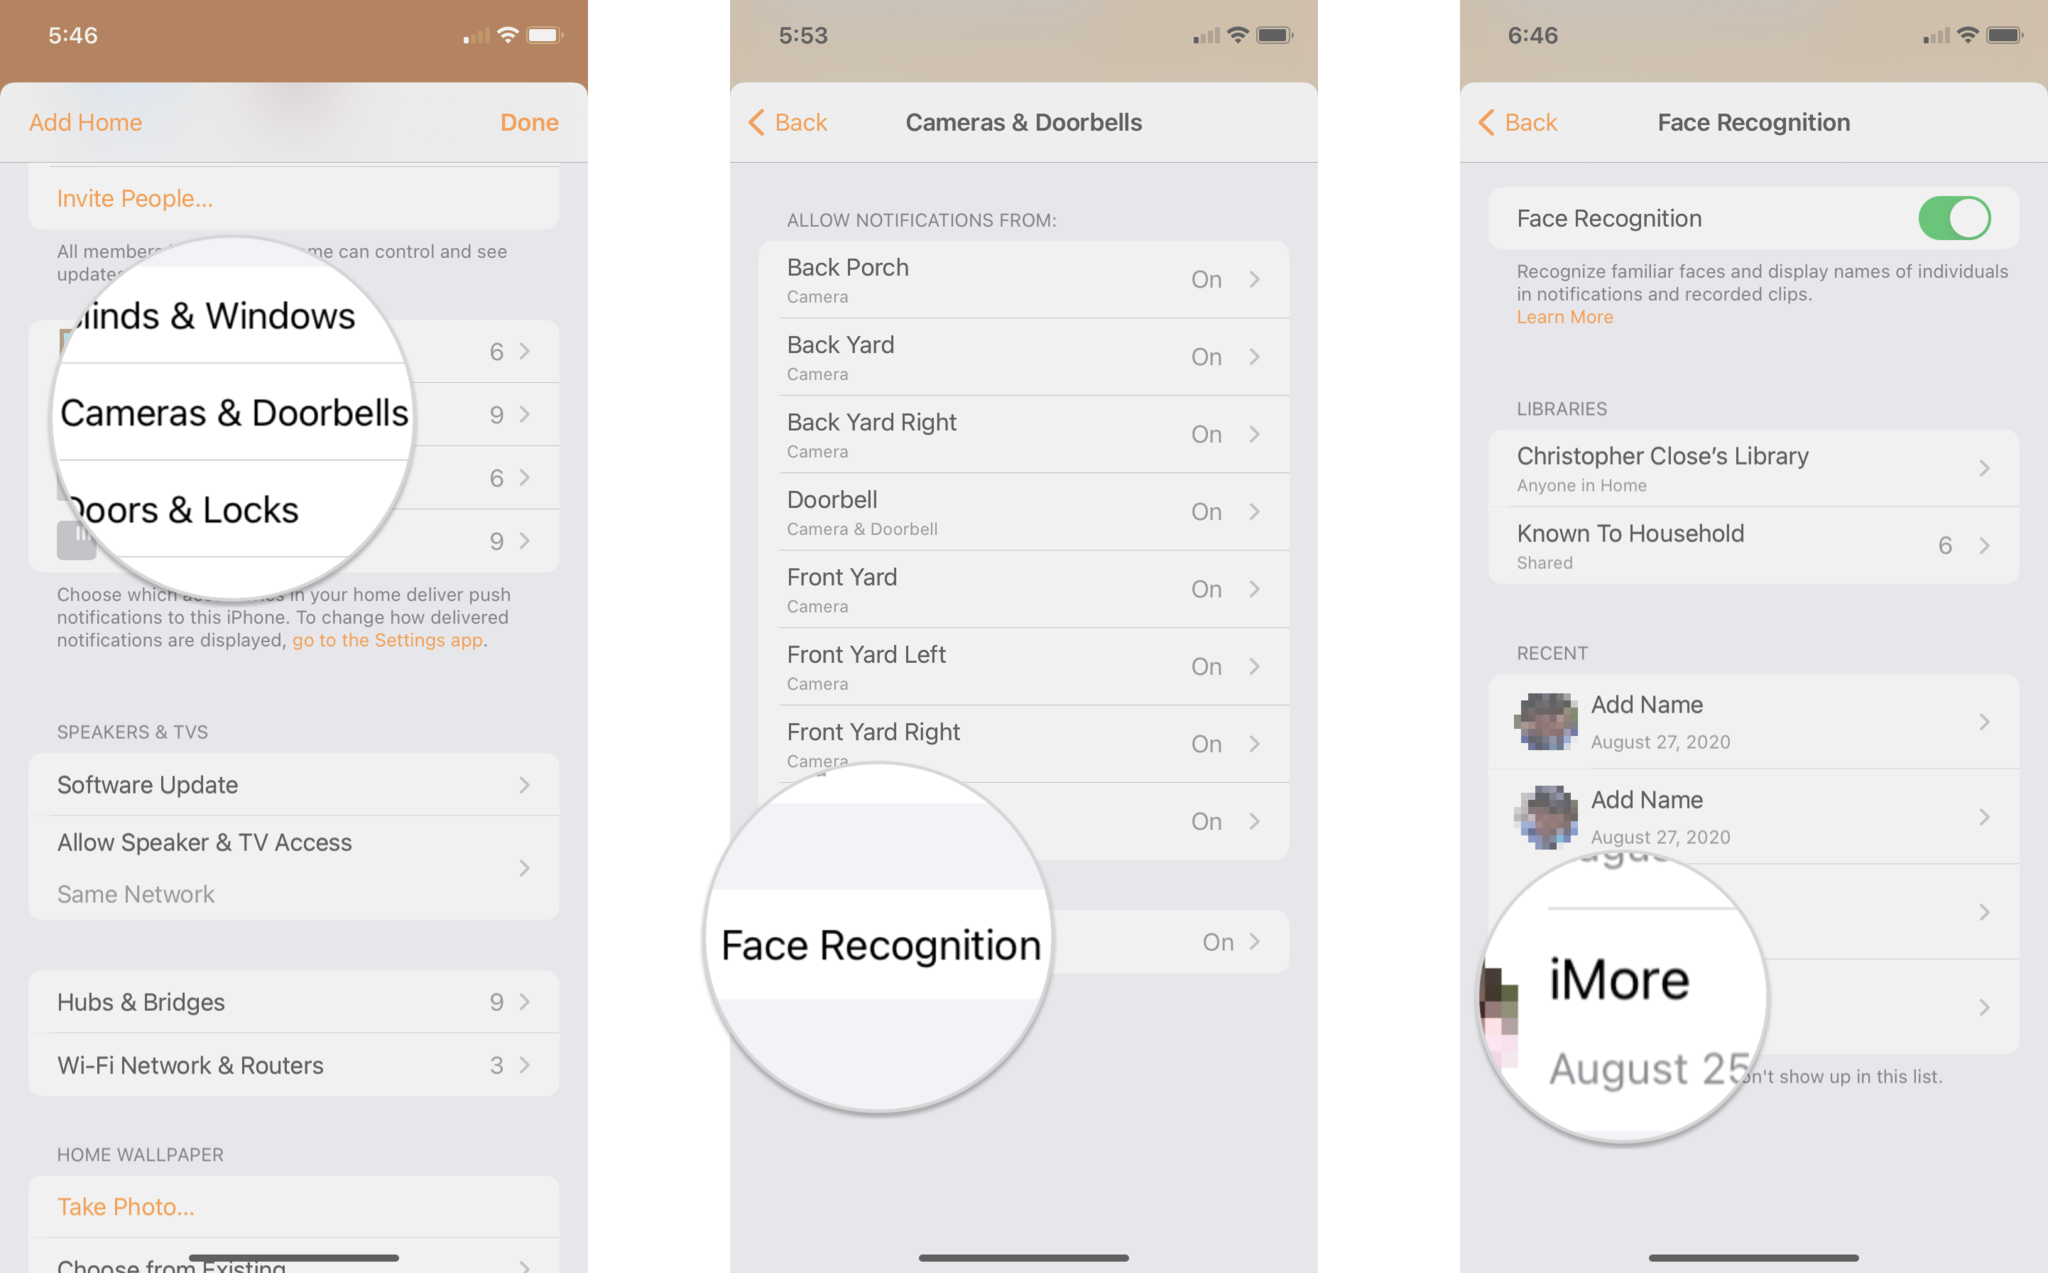
Tap on the person's Name to provide a new name.
- Tap Hide Notifications to prevent the Home app from sending activity notifications when this person is within your camera's view.
Tap Remove Face to remove the face from the list of recognized faces.
How to manage unknown faces in the Home app
- Launch the Home app.
- Tap on the House icon.
Tap Home Settings.

- Tap on Cameras & Doorbells.
- Tap Face Recognition.
Tap on an entry that is listed as Add Name.
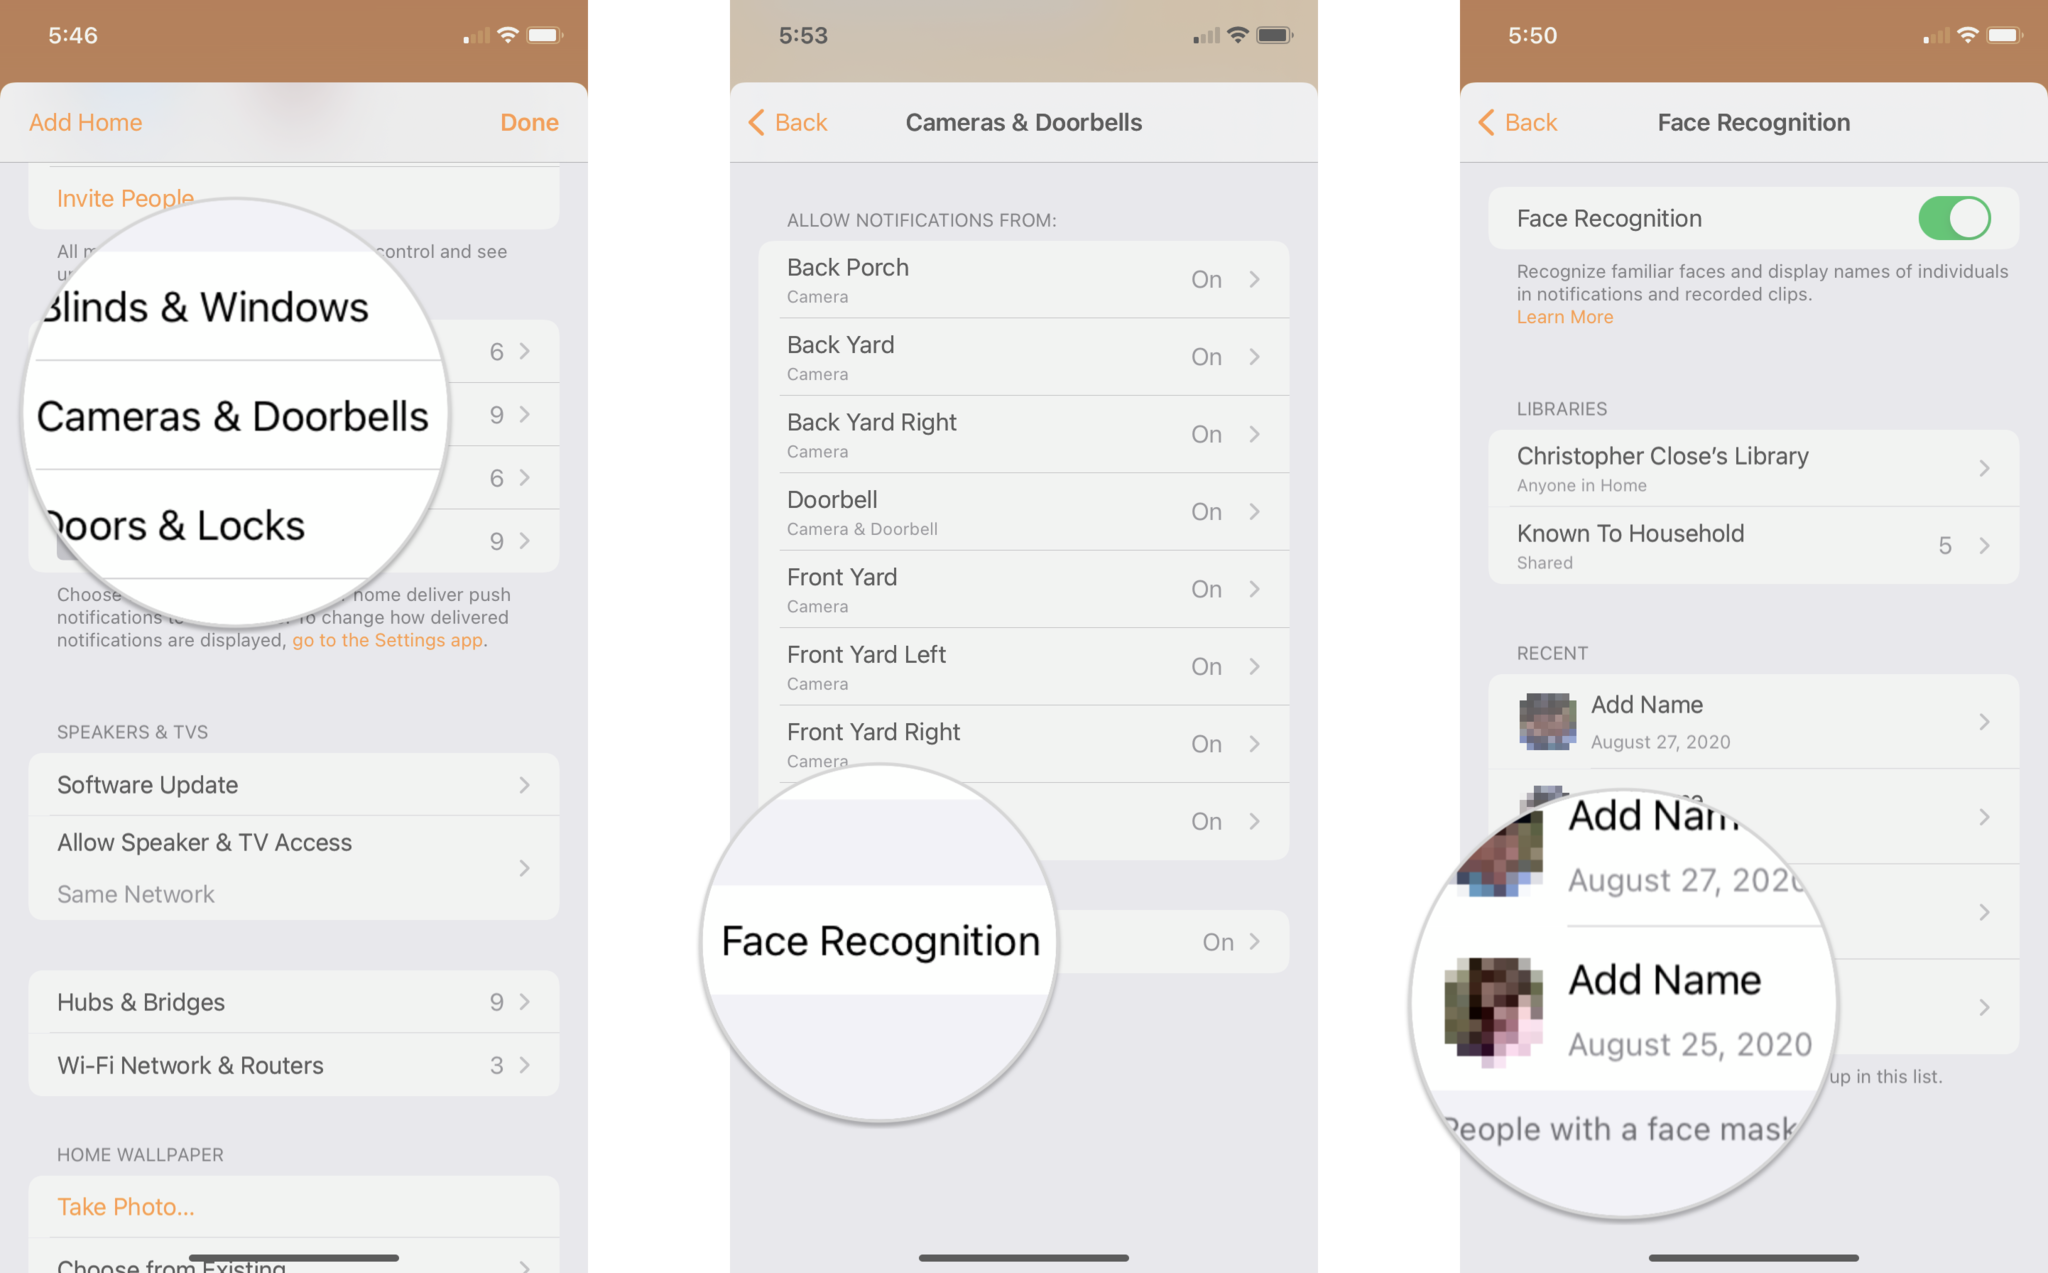
Tap Add Name.
- Tap Remove Face if the thumbnail image is someone you do not wish to recognize.
- Type in the Name of the person you wish to recognize.
Tap Done to confirm the face.
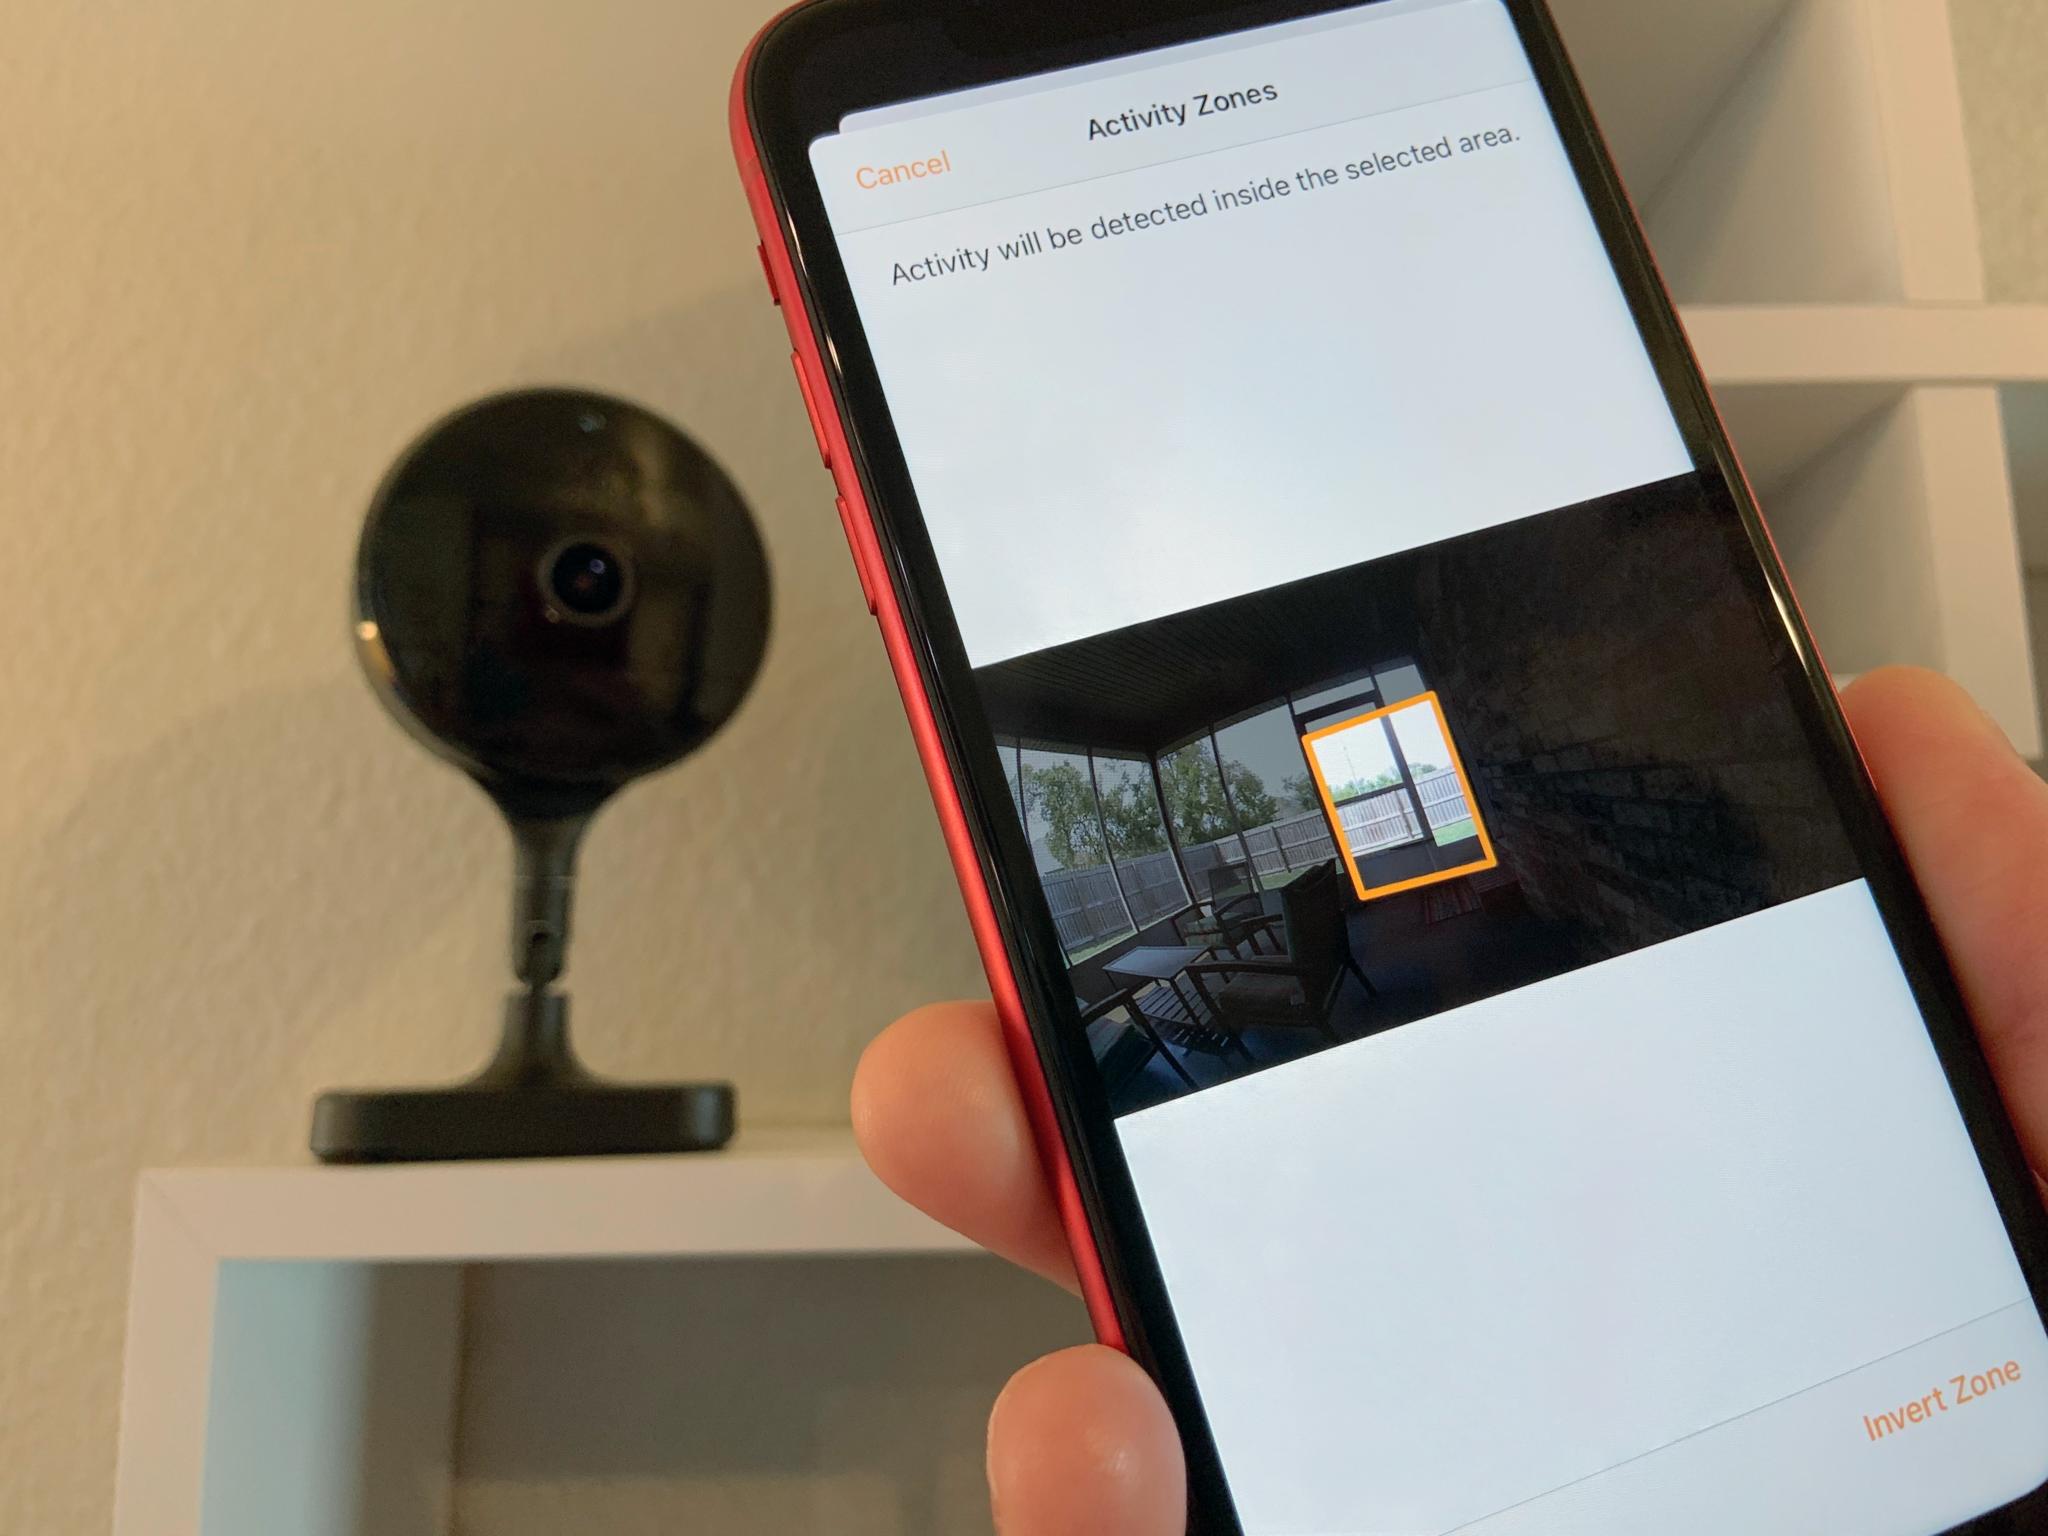
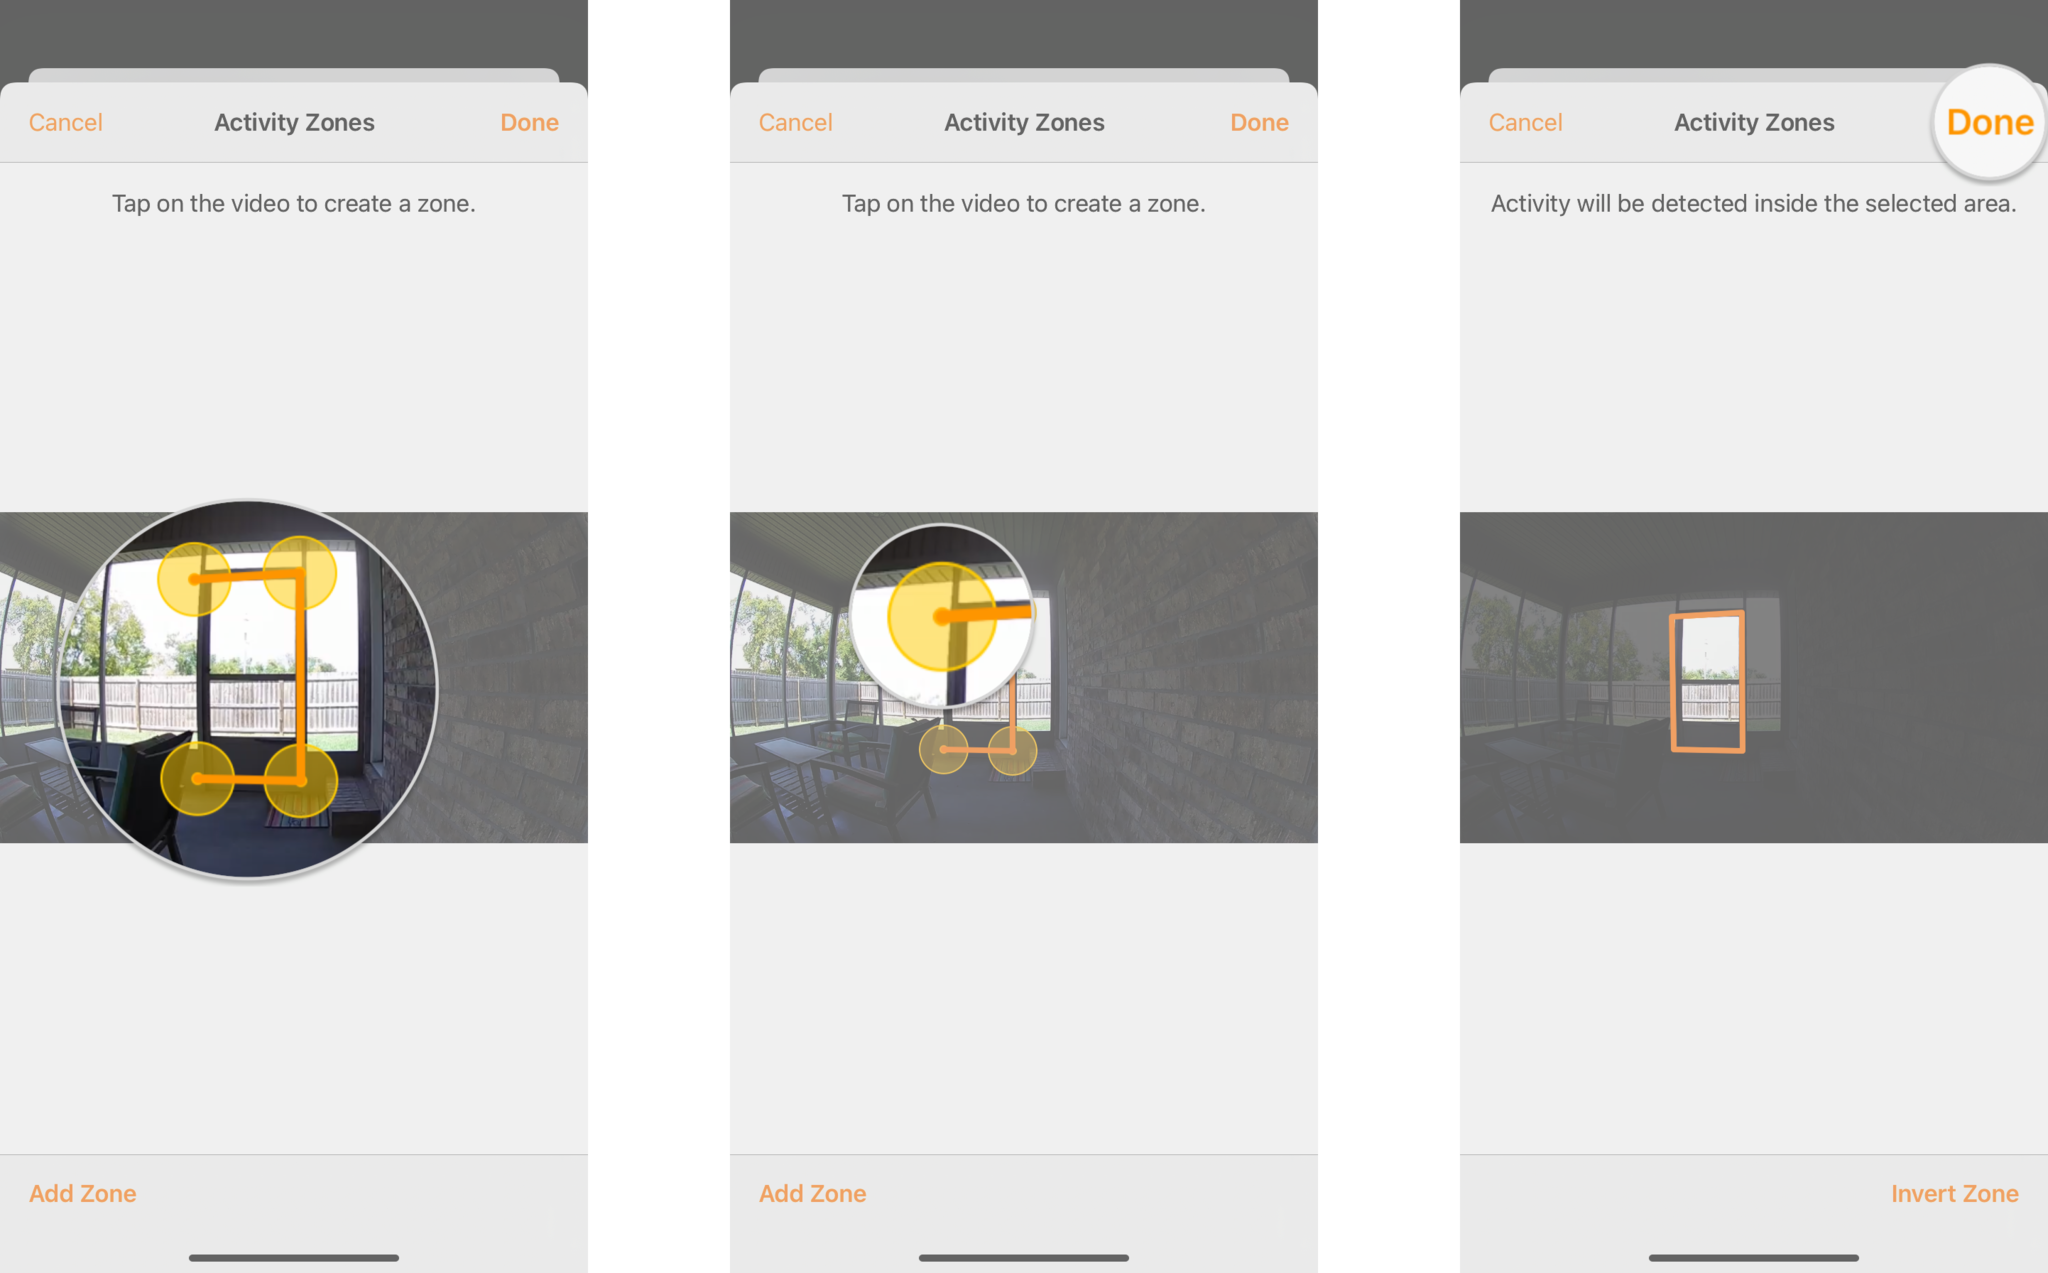
How to create an Activity Zone in the Home app
For this example, we will be creating a four-point Activity Zone. You can always make more complex designs to suit your needs better, although it involves additional steps for adding zone points.
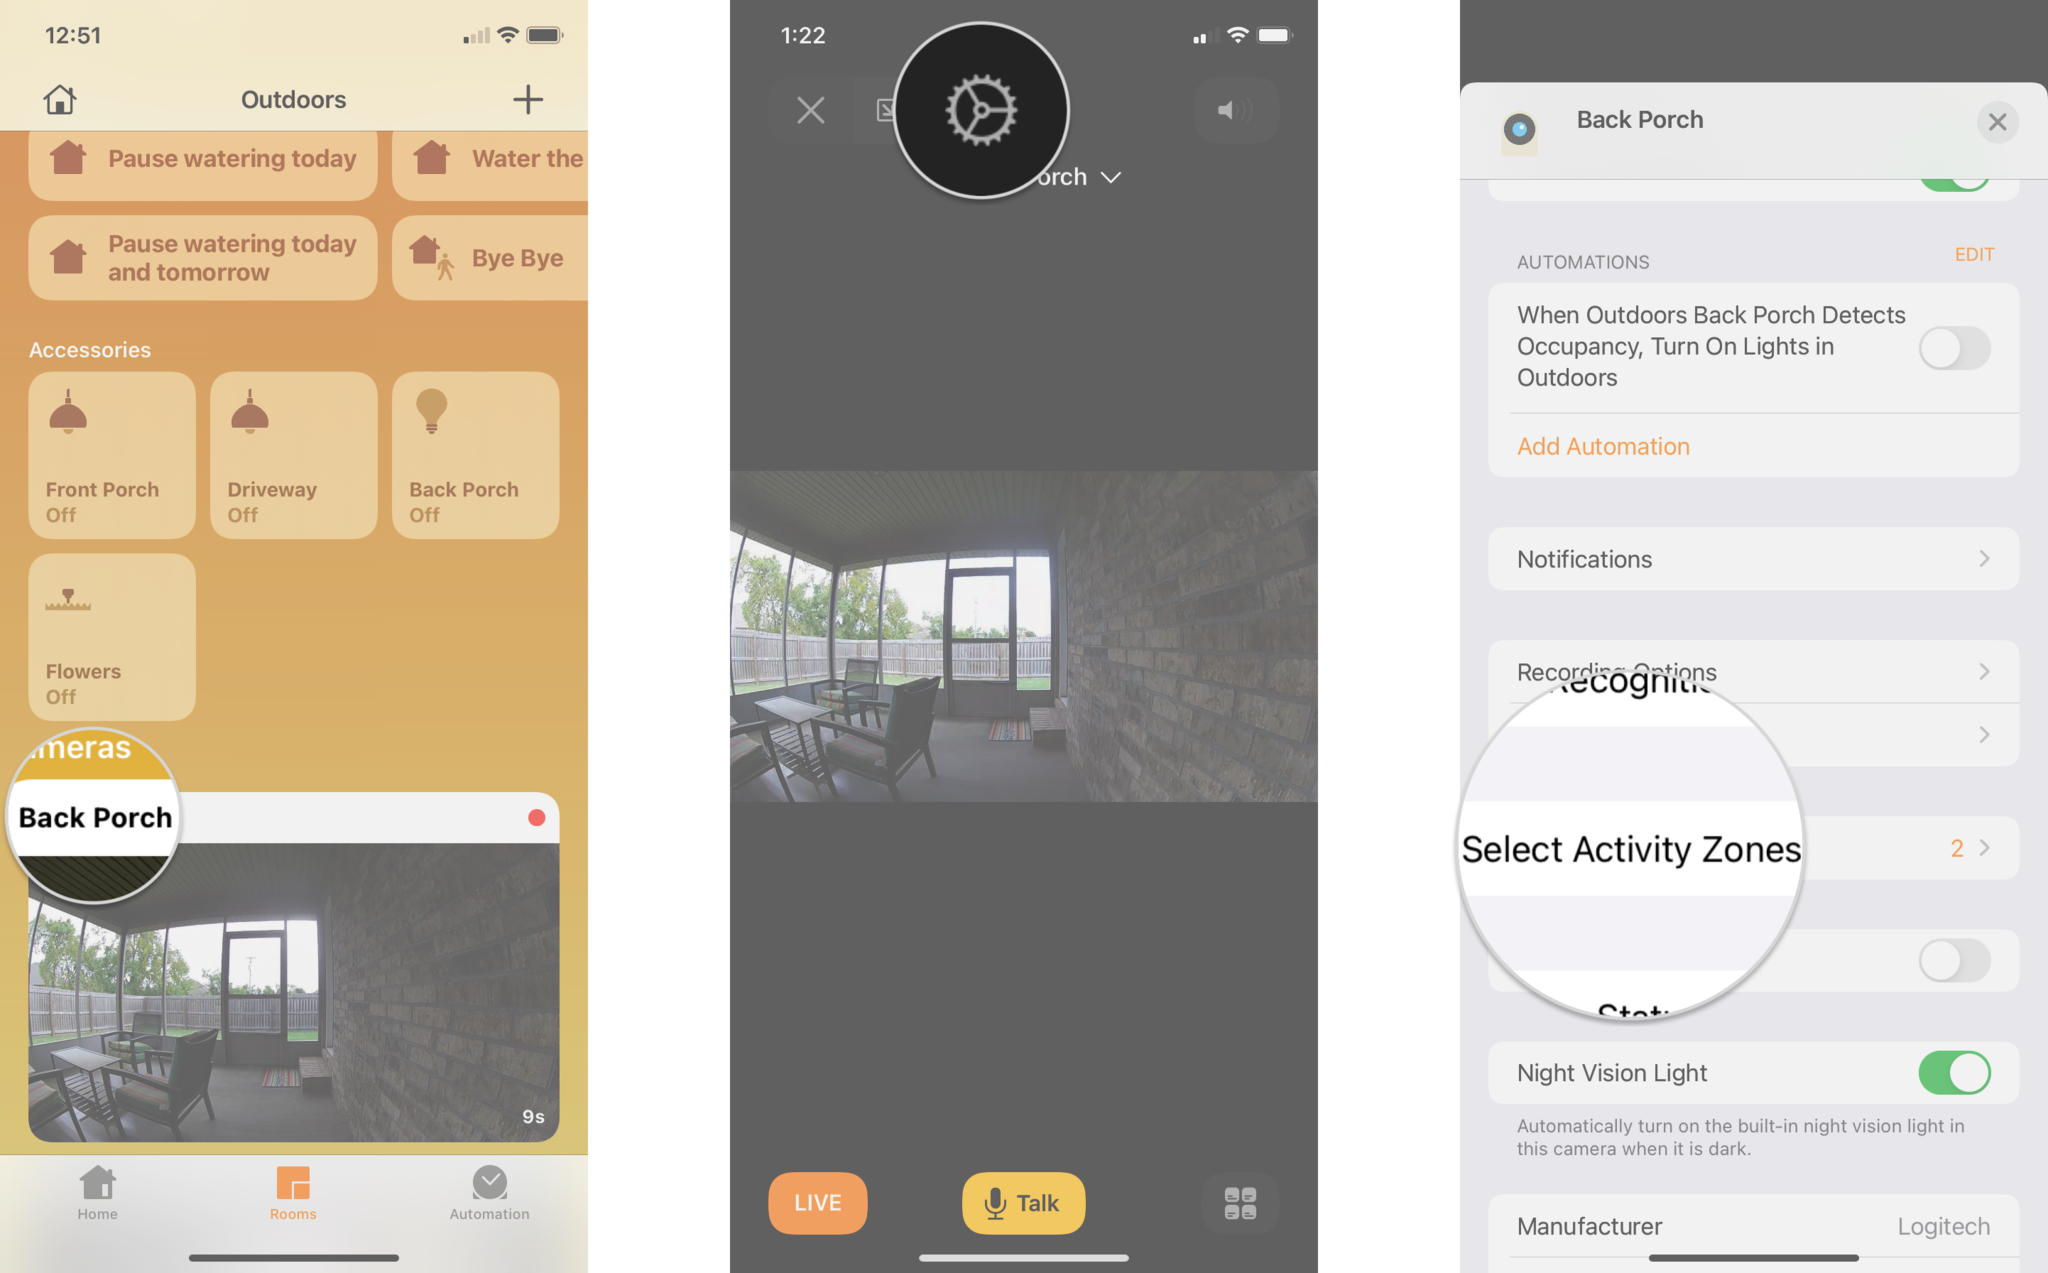
- Launch the Home app.
- Tap on the House icon (on iPad, skip to the next step).
- You can also tap directly on your camera from the Home tab if it is a favorite.
Tap on the name of the Room that your camera is within.
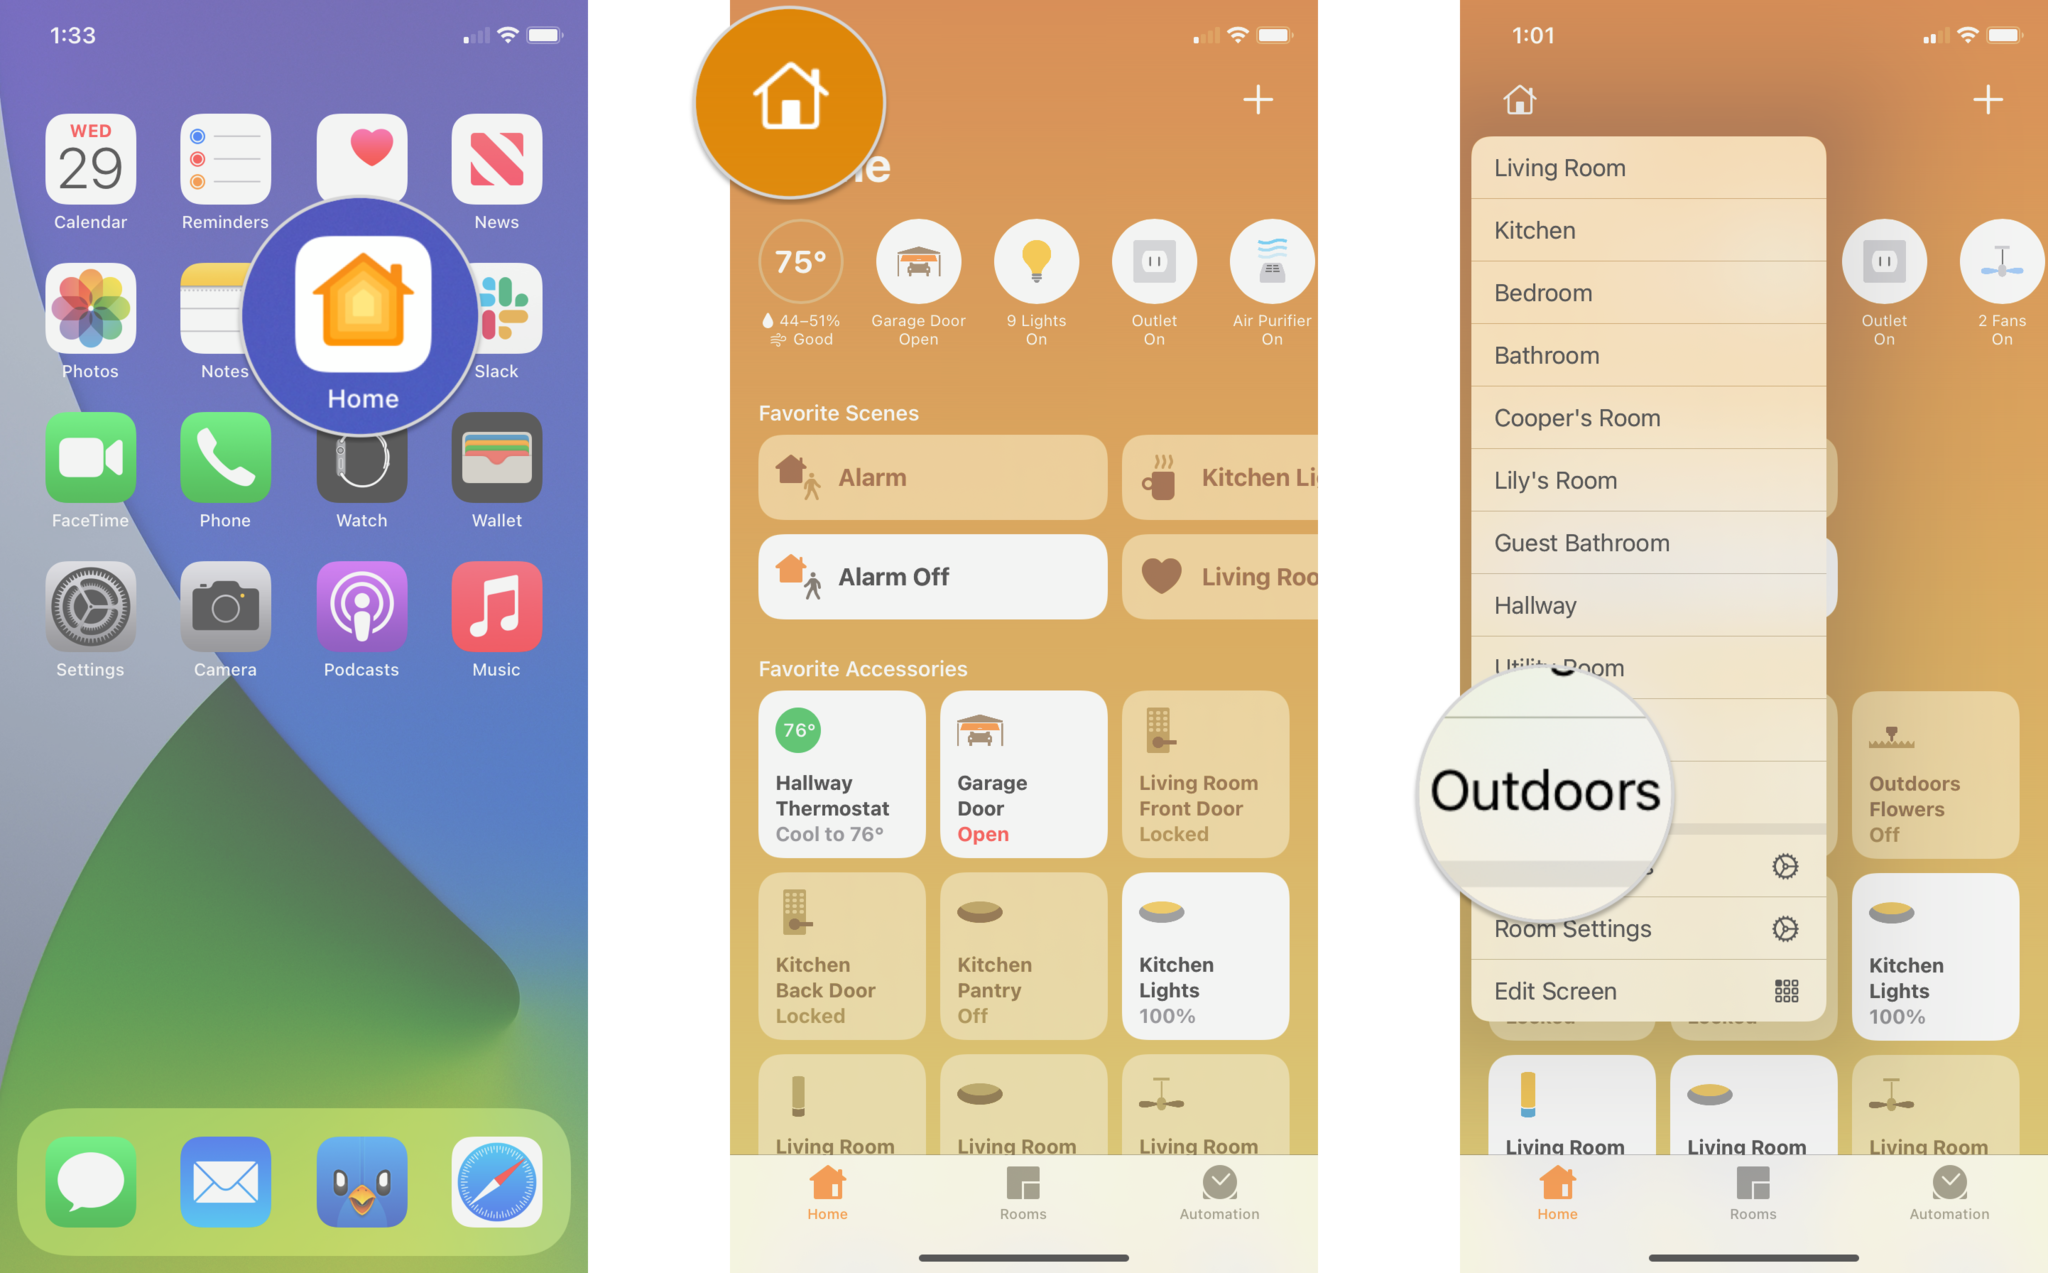
- Tap on the Thumbnail image of your camera.
- Tap on the Settings icon located near the app's top.
Tap Select Activity Zones....

- Tap anywhere on the Camera view to set your first Activity Zone point.
- Tap in another spot on the Camera view to set a second zone point.
- After setting your second point, a line will appear connecting your points
Tap in another spot on the Camera view to establish a third point.
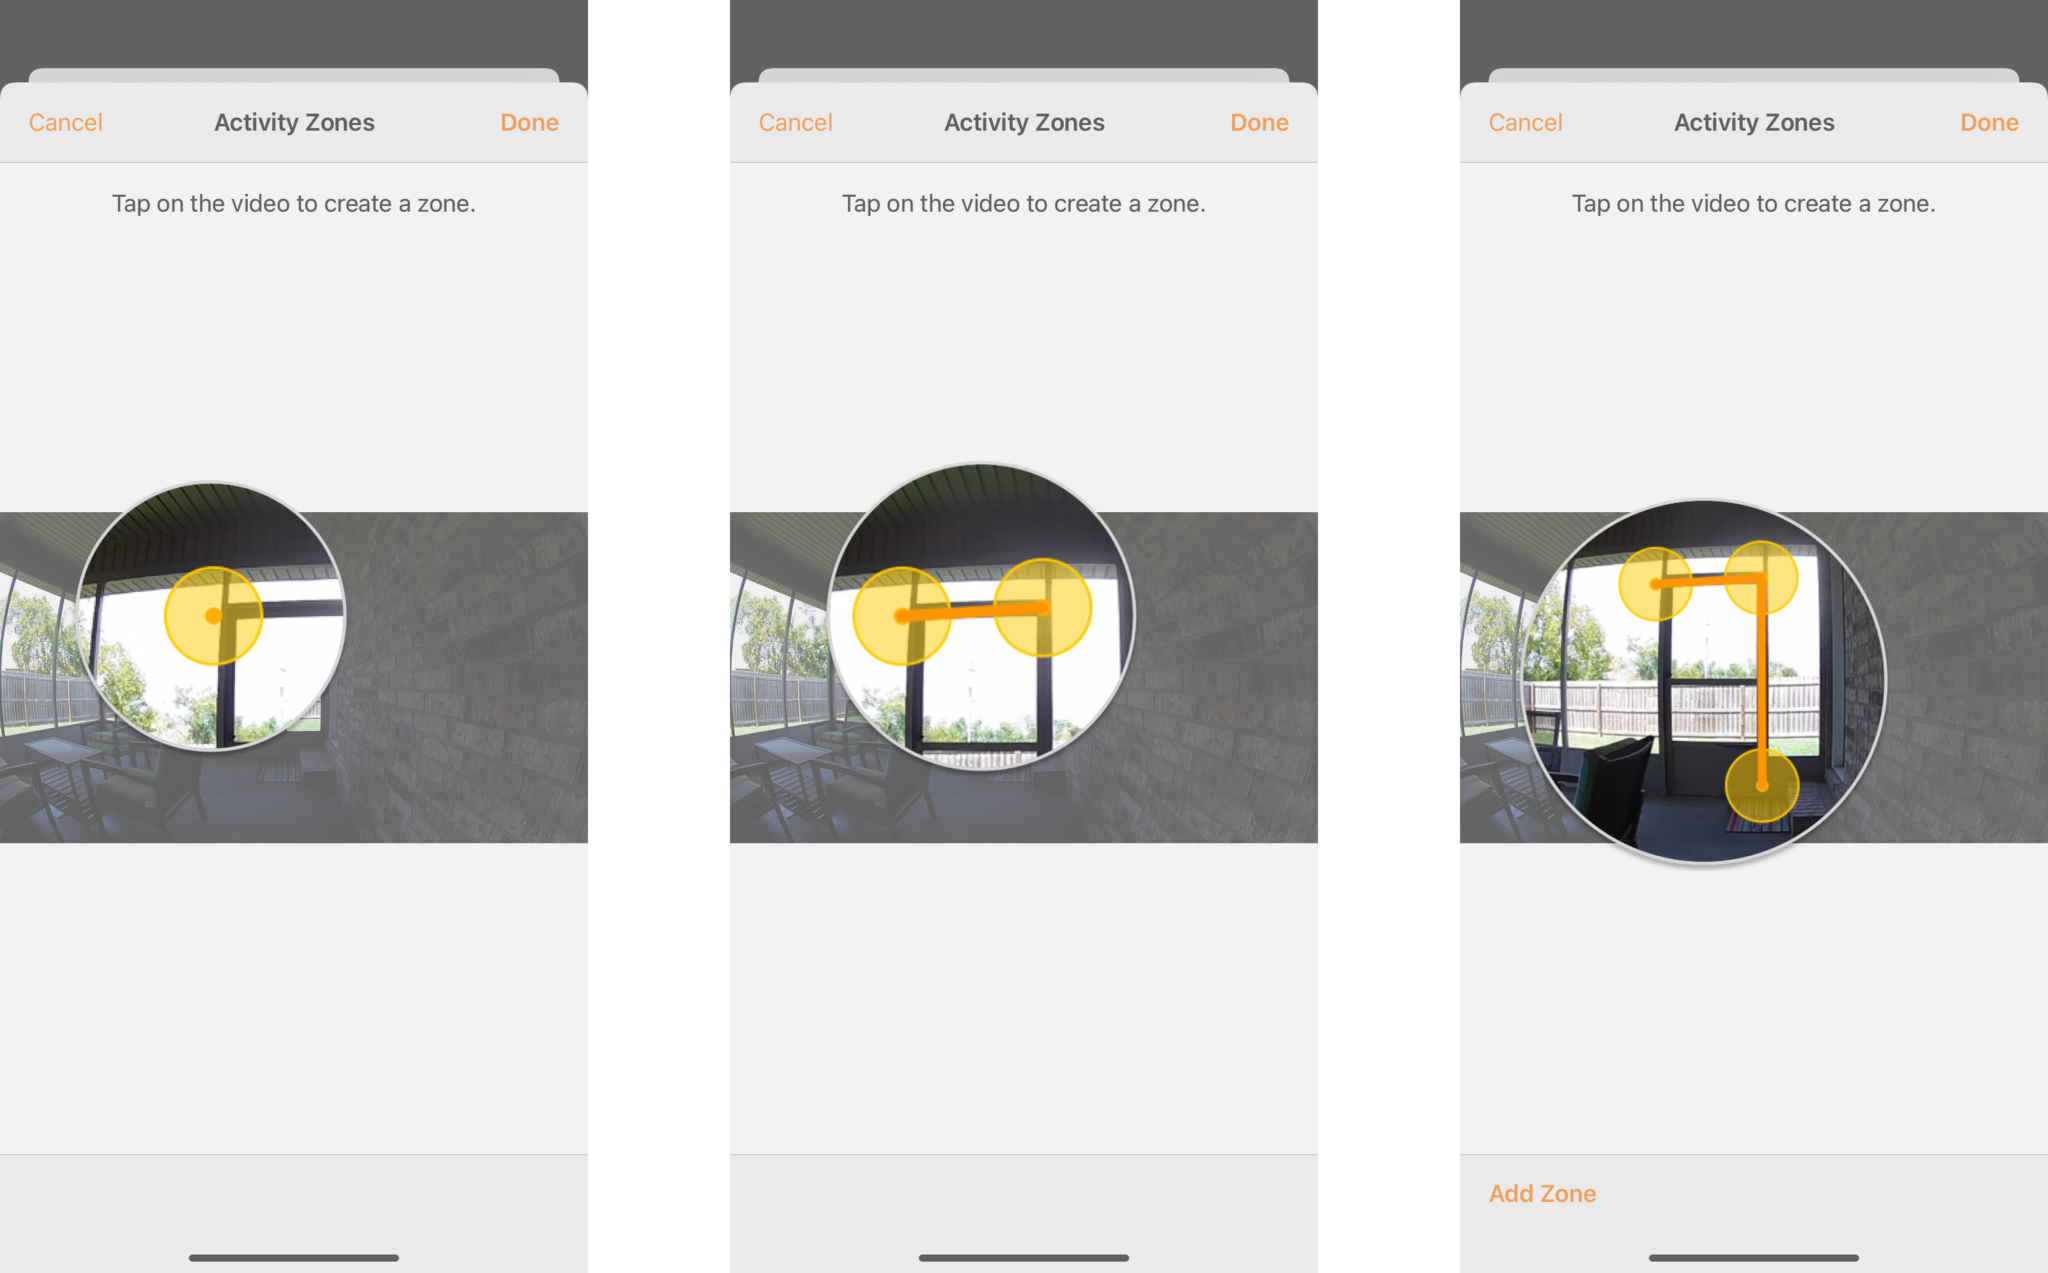
- Tap again on the Camera view to set up the fourth point.
- If you are making a more complex zone, continue adding points before moving to the next step.
- Tap on the first Activity Zone Point that you created to finish your zone.
- All of your points should now connect in the shape you have created.
- To create another zone before saving, tap Add Zone, then repeat this process to make any additional zones as needed.
- To establish a zone for the entire area outside of the zone you just created, tap on Invert Zone.
Tap Done to save your Activity Zone.
How to edit an Activity Zone in the Home app
- Launch the Home app.
- Tap on the House icon (on iPad, skip to the next step).
- You can also tap directly on your camera from the Home tab if it is a favorite.
Tap on the name of the Room that your camera is within.

- Tap on the Thumbnail image of your camera.
- Tap on the Settings icon located near the app's top.
Tap Select Activity Zones....
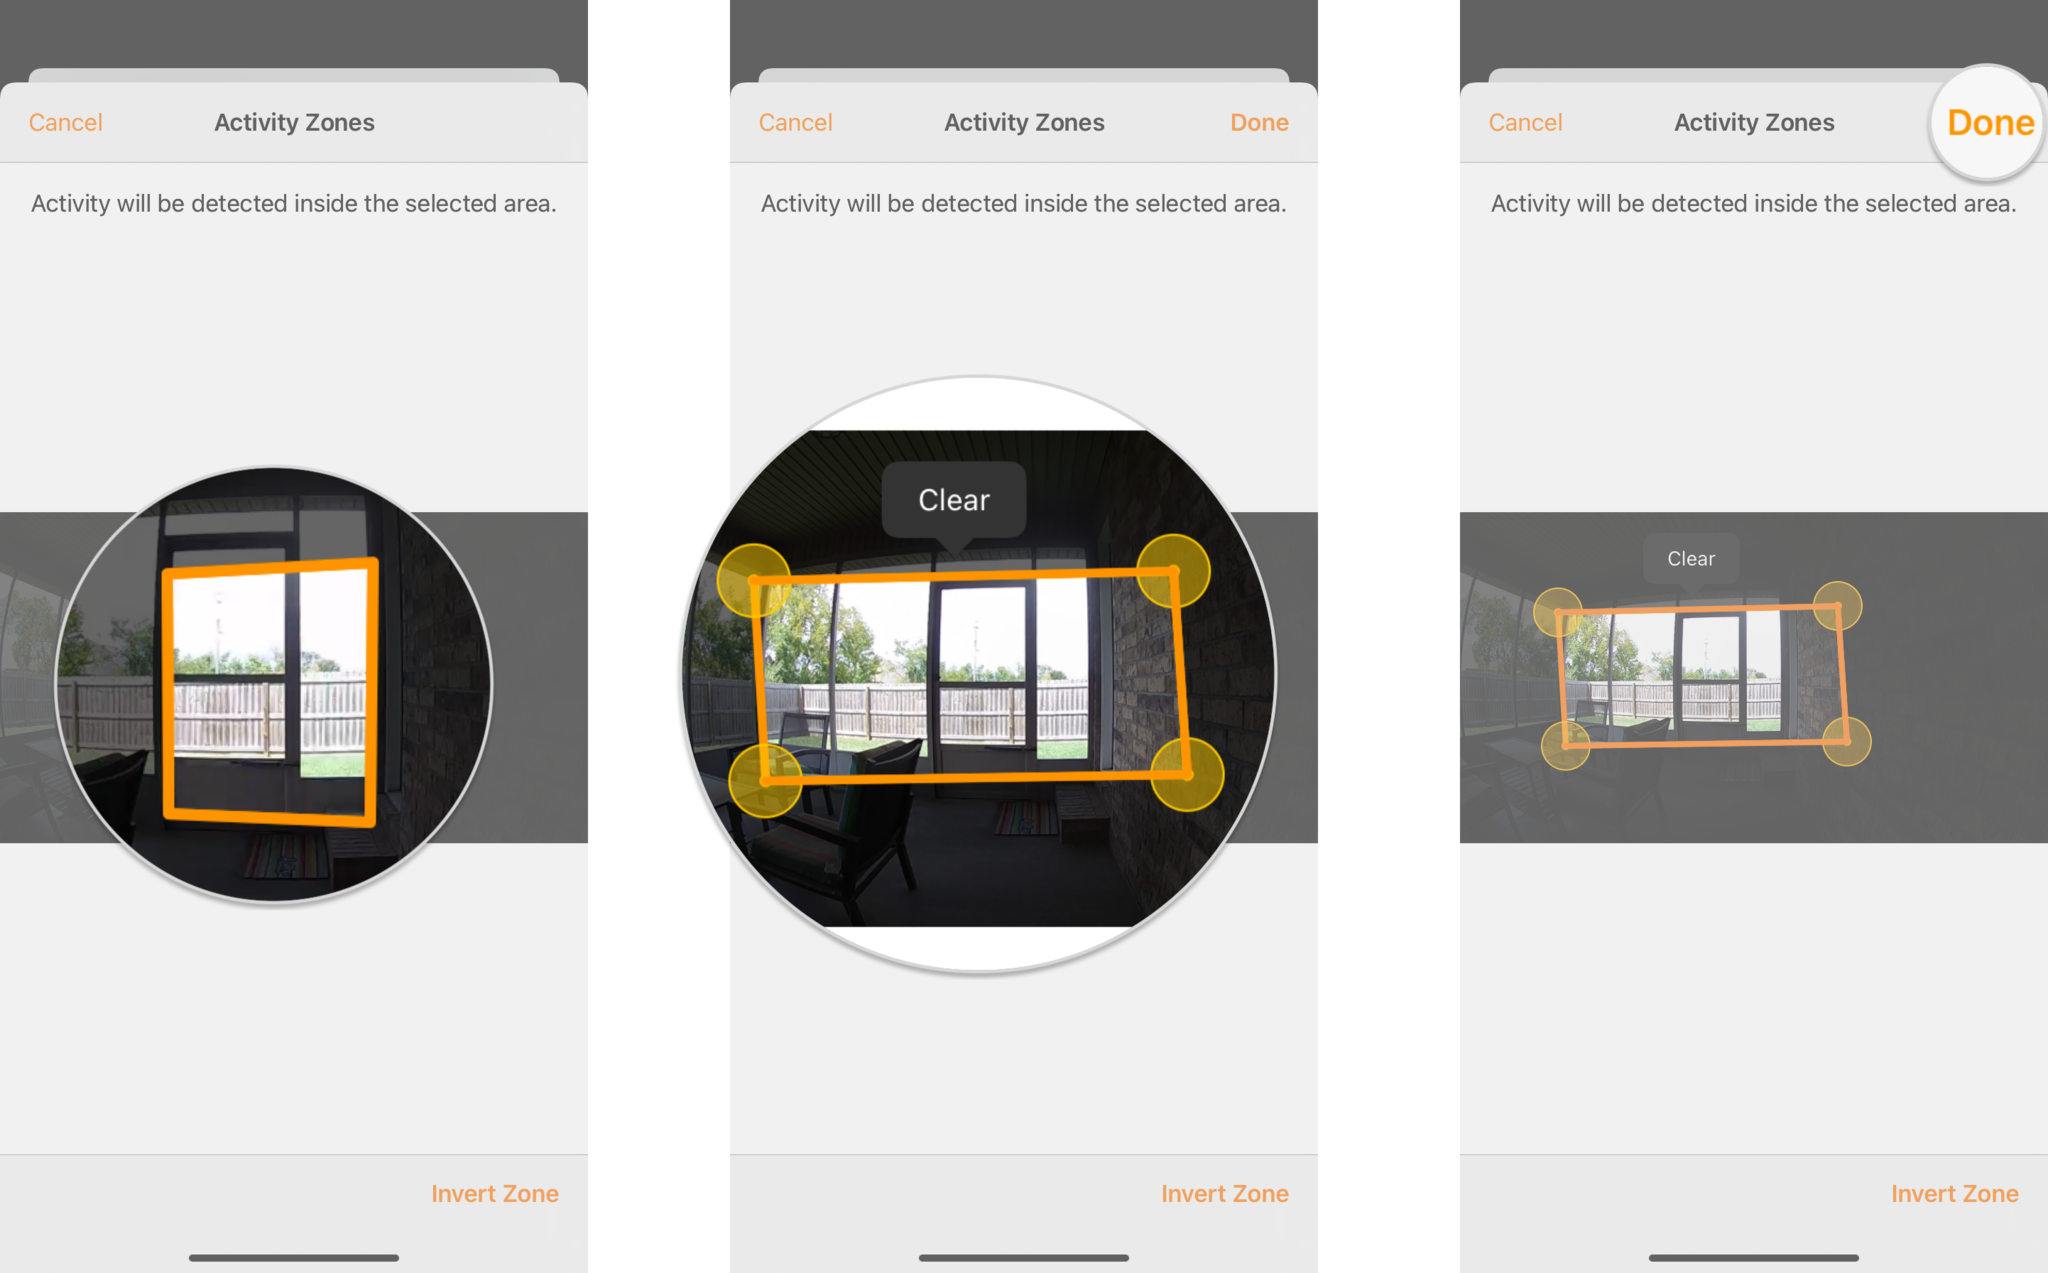
- Tap on your existing Activity Zone.
- Tap and hold an existing Activity Zone Point, then drag it to a new position.
- Repeat this process to move other points in your Activity Zone as needed.
Tap Done to save your changes.
How to delete an Activity Zone in the Home app
- Launch the Home app.
- Tap on the House icon (on iPad, skip to the next step).
- You can also tap directly on your camera from the Home tab if it is a favorite.
Tap on the name of the Room that your camera is within.

- Tap on the Thumbnail image of your camera.
- Tap on the Settings icon located near the app's top.
Tap Select Activity Zones....

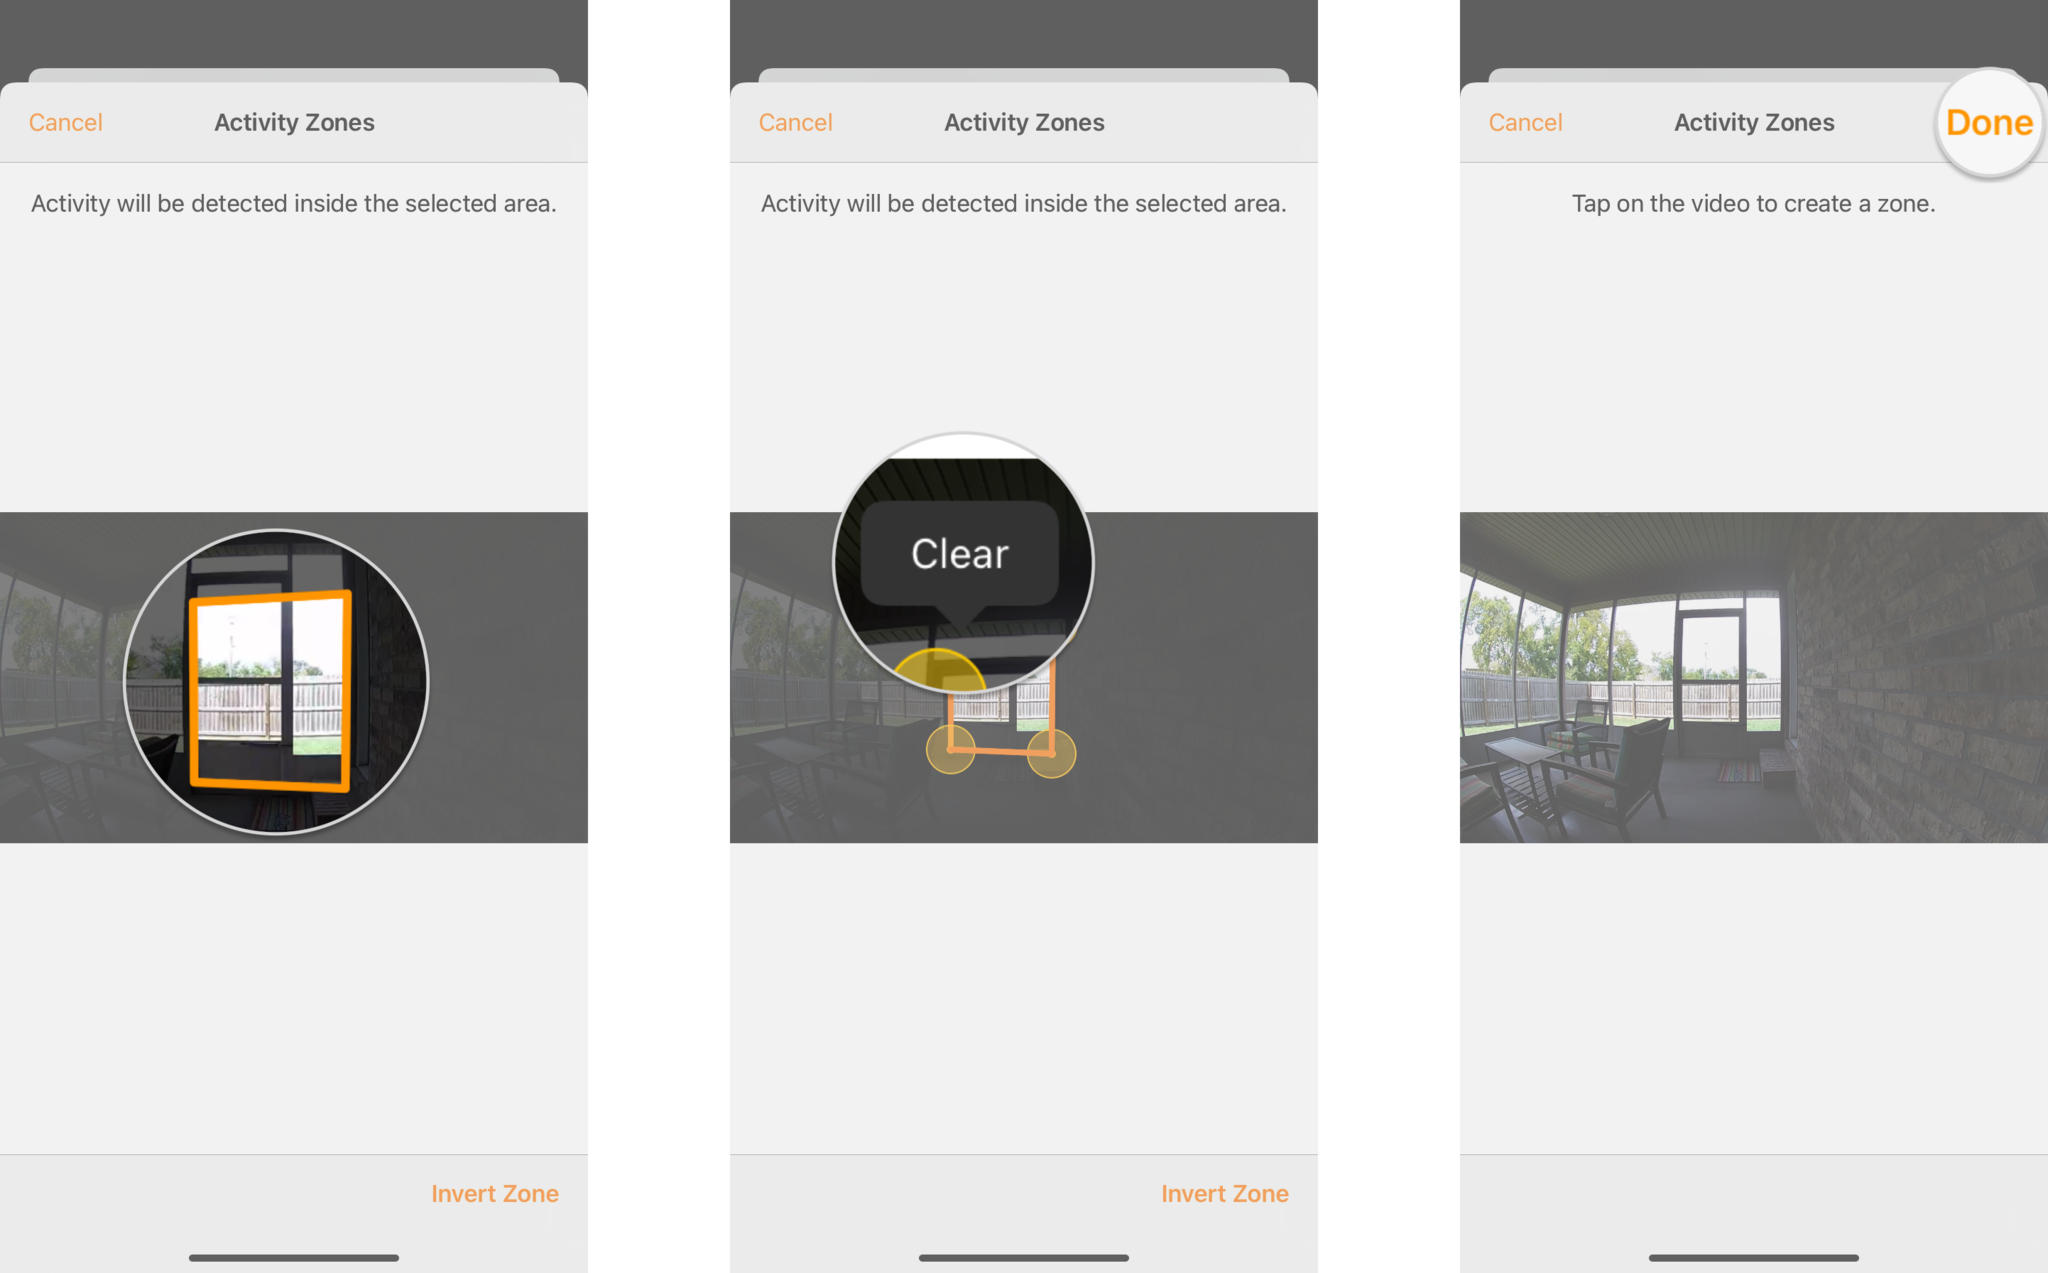
- Tap on your existing Activity zone.
- Tap Clear to delete the zone.
- You are now free to create a new Activity Zone as needed before proceeding.
Tap Done to save your changes.
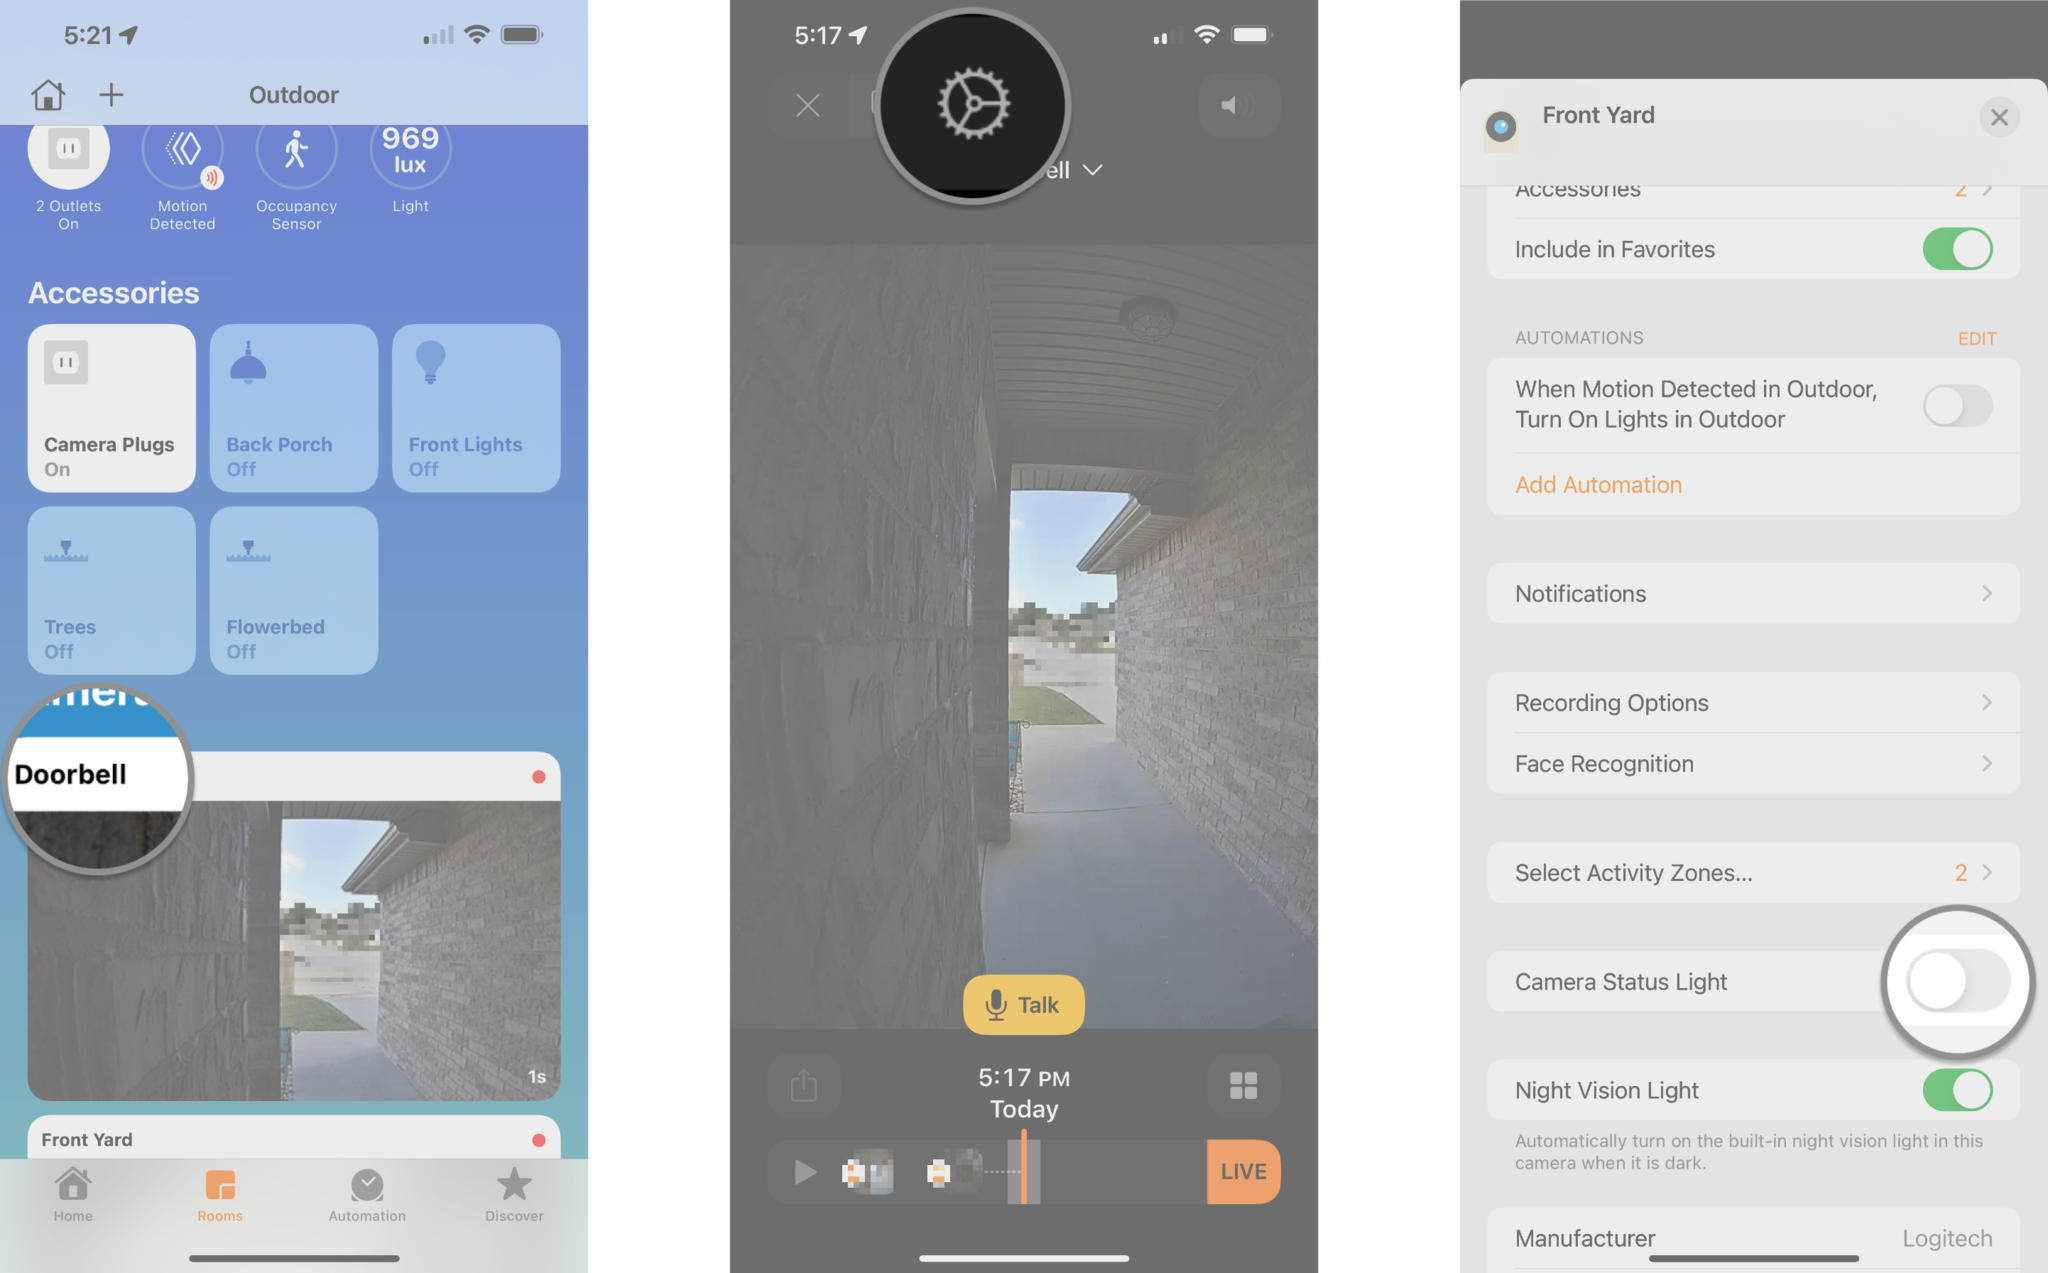
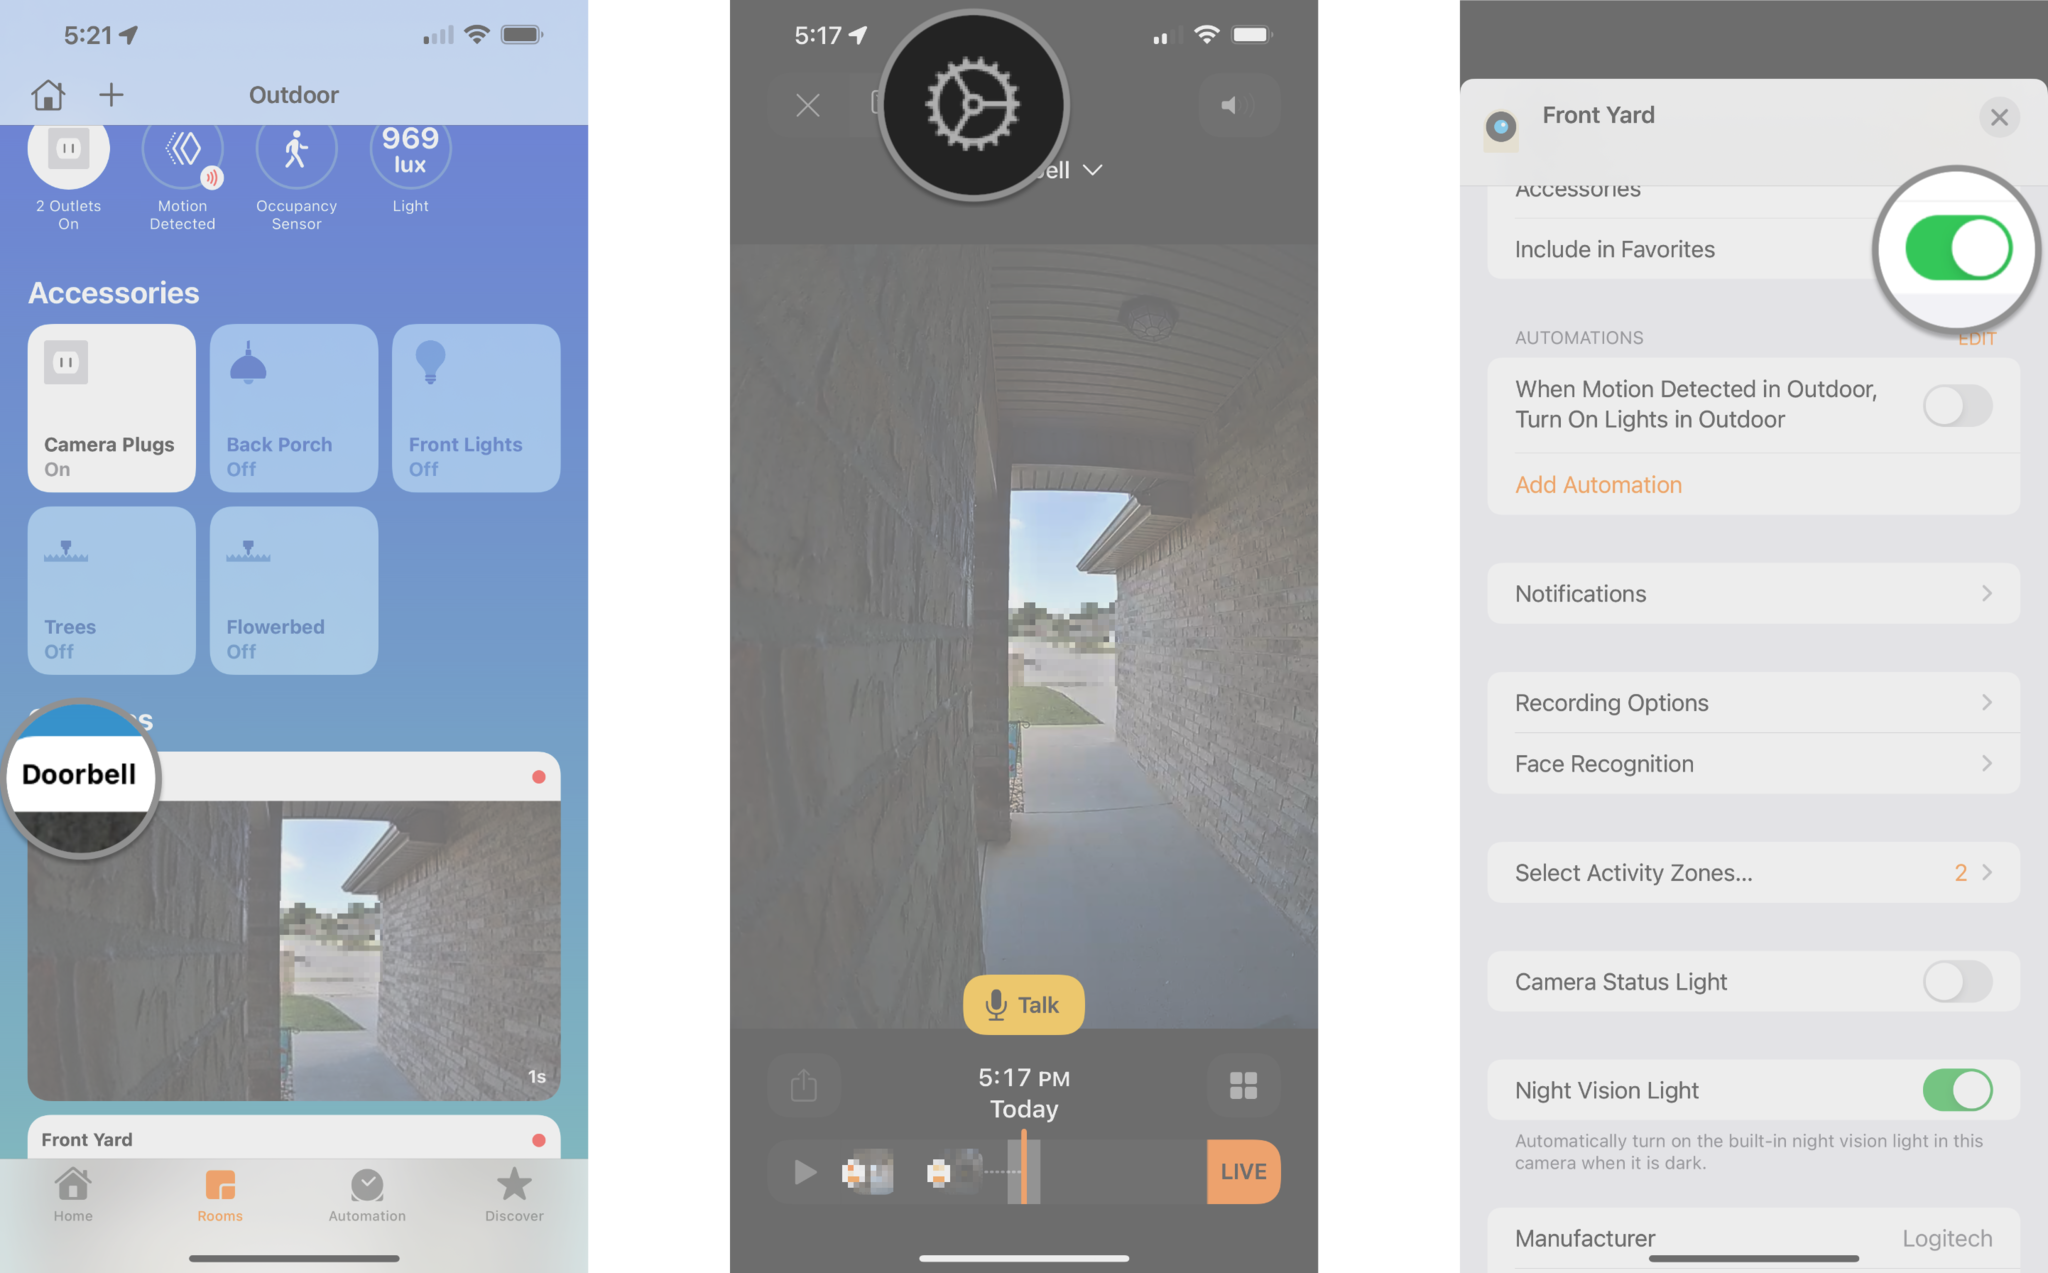
How to enable camera status and night vision lights in the Home app
- Launch the Home app.
- Tap on the House icon.
- You can also tap directly on your camera from the Home tab if it is a favorite.
Tap the Room that your camera is within.

- Tap on the Thumbnail Image of your camera.
- Tap on the Settings icon located near the app's top.
Tap the toggle for each Camera light setting that you wish to enable.
- Camera Status Light is the light on your camera that illuminates according to power and activity status.
- Night Vision Light will automatically turn on your camera's night vision mode when dark.
How to disable camera status and night vision lights in the Home app
- Launch the Home app.
- Tap on the House icon.
- You can also tap directly on your camera from the Home tab if it is a favorite.
Tap the Room that your camera is within.
- Tap on the Thumbnail Image of your camera.
- Tap on the Settings icon located near the app's top.
Tap the toggle for each Camera light setting that you wish to enable.
- Camera Status Light is the light on your camera that illuminates according to power and activity status.
- Night Vision Light will automatically turn on your camera's night vision mode when dark.

How to add a camera as a favorite in the Home app
Adding a camera or doorbell as a favorite allows it to appear on the Home tab within the Home app. As a favorite, you can jump straight to the camera in fewer taps and get a quick peek without summoning a live view.
- Launch the Home app.
- Tap on the House icon.
- You can also tap directly on your camera from the Home tab if it is a favorite.
Tap the Room that your camera is within.
- Tap on the Thumbnail Image of your camera.
- Tap on the Settings icon located near the top of the app.
Tap the toggle next to Include in Favorites to enable.
How to remove a camera as a favorite in the Home app
Adding a camera or doorbell as a favorite allows it to appear on the Home tab within the Home app. As a favorite, you can jump straight to the camera in fewer taps and get a quick peek without summoning a live view.
- Launch the Home app.
- Tap on the House icon.
- You can also tap directly on your camera from the Home tab if it is a favorite.
Tap the Room that your camera is within.

- Tap on the Thumbnail Image of your camera.
- Tap on the Settings icon located near the top of the app.
Tap the toggle next to Include in Favorites to enable.

Unleash your HomeKit camera's full potential with the Home app
As you can see, the Home app on your iPhone, iPad, and Mac offers settings for just about everything for your HomeKit Secure Video camera. Whether it is managing notifications, viewing recordings, or setting up Face Recognition with the best HomeKit cameras, you will need to know the ins and outs of the Home app to unleash its full potential. Once you master it, though, you can rest easy knowing that your home will be safe and secure with your HomeKit camera or doorbell.
Updated April 2022: Updated for iOS 15.