How to use Zoom on Mac
- okt
- 07
How do I zoom in on Mac?
You can zoom in on apps using the trackpad on your Mac laptop or gestures on the Magic Mouse, but with the Zoom accessibility feature, you can zoom in on the whole screen. You can do it with keyboard shortcuts or by using your mouse's scroll function along with modifier keys.
Here's how!
- How to enable keyboard shortcuts for Zoom
- How to enable the scroll gesture with modifier keys to zoom
- How to change the zoom style
- How to customize Fullscreen Zoom magnification
- How to customize Picture-in-picture magnification
- How to enable the preview rectangle for Fullscreen Zoom
- How to change how the screen moves in Fullscreen Zoom
- How to change the window position for Picture-in-picture Zoom
- How to change the cursor style for Picture-in-picture Zoom
- How to invert colors with Picture-in-picture Zoom
- How to enable/disable temporary zoom
- How to change the speak delay for Picture-in-picture Zoom
- How to adjust the size and location of the Picture-in-picture Zoom window
How to enable keyboard shortcuts for Accessibility zoom
By pressing a series of three keys, all at the same time, you can zoom your Mac's entire screen (not just an app window, like Safari).
- Click the Apple menu button () on the top left of your screen.
- Click System Preferences.
Click Accessibility.
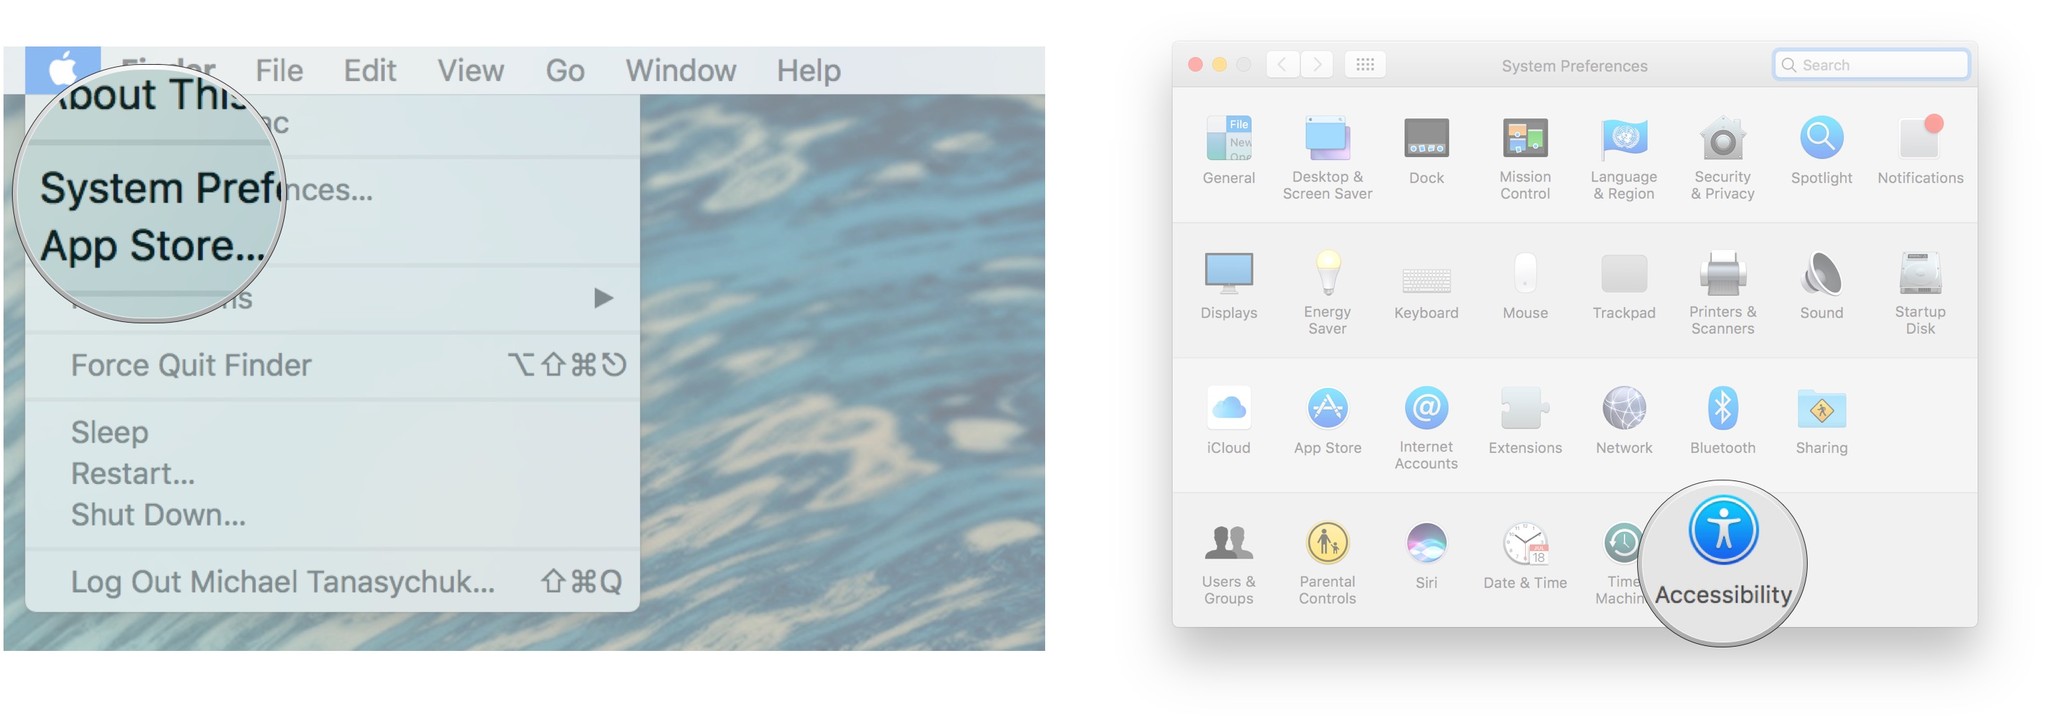
- Click Zoom in the menu on the left.
Click the checkbox next to Use keyboard shortcuts to zoom to enable the feature. The shortcuts are:
- Toggle zoom: Command-Option-8
- Zoom in: Command-Option-=
- Zoom out: Command-Option- -
Toggle smooth images: Command-Option-\

"Smooth images" means that, when super zoomed in, images have softer edges and don't look so heavily pixelated. This is useful if an image has words on it.
How to enable the scroll gesture with modifier keys for Accessibility zoom
By pressing a key, while at the same time as using the trackpad or mouse to scroll, you can zoom in your Mac's entire screen (not just an app window, like Safari).
- Click the Apple menu button () on the top left of your screen.
- Click System Preferences.
Click Accessibility.
- Click Zoom in the menu on the left.
Click the checkbox next to Use scroll gesture with modifier keys to zoom.

- Click the dropdown menu to select a modifier key.
Click a modifier key. You can use Control, Alt, or Command.
You can add any combination of those by clicking in the box and typing. You can also add Shift into the mix and use all four if you really want to (but you don't).

How to change the zoom style
You can zoom in on the whole screen or you can use picture-in-picture, which displays a zoom window on your screen that looks similar to a rectangular magnifying glass. The window will follow your cursor and move around on the screen.
- Click the Apple menu button () on the top left of your screen.
- Click System Preferences.
Click Accessibility.
- Click Zoom in the menu on the left.
- Click the dropdown menu next to Zoom style.
Click Picture-in-picture to enable the magnifying glass style zoom window.

When in Fullscreen, just move your mouse around your screen to move the zoom around. When using picture-in-picture, just move the window around with your mouse or trackpad.
How to customize Fullscreen Zoom magnification
When you have Fullscreen selected as your Zoom style, you have the option to customize the minimum and maximum zoom. When the maximum zoom is increased, you'll automatically zoom in that far when you press the keyboard shortcut to zoom in (Command-Option-8).
- Click the Apple menu button () on the top left of your screen.
- Click System Preferences.
Click Accessibility.
- Click Zoom in the menu on the left.
Click Options next to Fullscreen.

- Click and drag the sliders next to Maximum Zoom and Minimum Zoom to set each. You can start at 0 and magnify as much as 40x. If you hit the hot keys to zoom in, you'll immediately zoom in to the Maximum Zoom you've set.
Click OK when you're finished.

How to customize Picture-in-picture magnification
You can only customize the Picture-in-picture magnification when Picture-in-picture is enabled as a zoom style. Changing the magnification increases or decreases the zoom within the picture-in-picture window on your screen.
- Click the Apple menu button () on the top left of your screen.
- Click System Preferences.
Click Accessibility.
- Click Zoom in the menu on the left.
Click Options next to Picture-in-picture.

- Click and drag the slider next to Magnification. Right increases the magnification; left decreases it.
Click Done when you're finished.

How to enable the preview rectangle for Fullscreen Zoom
Make sure Fullscreen Zoom is enabled before trying to enable this feature.
- Click the Apple menu button () on the top left of your screen.
- Click System Preferences.
Click Accessibility.
- Click Zoom in the menu on the left.
Click Options next to Fullscreen.
- Click the checkbox next to Show preview rectangle when zoomed out. A black rectangle will appear on your screen that'll show you which area will be affected by the zoom.
Click OK when you're finished.

How to change how the screen moves in Fullscreen Zoom
Make sure Fullscreen Zoom is enabled before trying to enable this feature.
- Click the Apple menu button () on the top left of your screen.
- Click System Preferences.
Click Accessibility.
- Click Zoom in the menu on the left.
Click Options next to Fullscreen.
- Click a movement option under When zoomed in, the screen image moves:
- Continuously with pointer
- Only when the pointer reaches an edge
- So the pointer is at or near the center of the screen
Click OK when you're finished.

How to change the window position for Picture-in-picture Zoom
- Click the Apple menu button () on the top left of your screen.
- Click System Preferences.
Click Accessibility.
- Click Zoom in the menu on the left.
Click Options next to Picture-in-picture.
- Click an option next to Window position:
- Stationary
- Follow mouse cursor
- Tiled along edge
Click Done when you're finished.

How to change the cursor style for Picture-in-picture Zoom
With Picture-in-picture Zoom enabled, you can change the cursor from a pointer to crosshairs if you'd prefer.
- Click the Apple menu button () on the top left of your screen.
- Click System Preferences.
Click Accessibility.
- Click Zoom in the menu on the left.
Click Options next to Picture-in-picture.
- Click an option next to Cursor style:
- System cursor
- Crosshair
Click Done when you're finished.

How to invert colors with Picture-in-picture Zoom
Make sure the Picture-in-picture zoom style is enabled before trying to enable this feature.
- Click the Apple menu button () on the top left of your screen.
- Click System Preferences.
Click Accessibility.
- Click Zoom in the menu on the left.
Click Options next to Picture-in-picture.
- Click the checkbox next to invert colors. The colors will now be inverted within the picture-in-picture window.
Click Done when you're finished.

How to enable/disable temporary zoom
If you don't want to have Zoom constantly enabled, you can enable temporary zoom when you have the Picture-in-picture zoom style enabled, which allows you to zoom in quickly by pressing Control-Option.
- Click the Apple menu button () on the top left of your screen.
- Click System Preferences.
Click Accessibility.
- Click Zoom in the menu on the left.
Click Options next to Picture-in-picture.
- Click the checkbox next to Enable temporary zoom.
Click Done when you're finished**.

How to change the speak delay for Picture-in-picture Zoom
If you have Speech enabled on your Mac, you can change the number of second it takes for the system to speak the words under your mouse.
- Click the Apple menu button () on the top left of your screen.
- Click System Preferences.
Click Accessibility.
- Click Zoom in the menu on the left.
Click Options next to Picture-in-picture.
- Click the checkbox next to Speak items under mouse after delay.
- Click and drag the slider next to Speak items under mouse after delay. Right is a longer delay; left is shorter.
Click Done when you're finished.

How to adjust the size and location of the Picture-in-picture Zoom window
- Click the Apple menu button () on the top left of your screen.
- Click System Preferences.
Click Accessibility.
- Click Zoom in the menu on the left.
Click Options next to Picture-in-picture.
- Click Adjust Size and Location.
- Click and drag the corners of the window to change its size.
- Click on and drag the window around the screen to change its location. Wherever you leave it, it'll stay.
- Click OK in the center of the window when you're satisfied.
Click Done when you're finished.

Questions?
Got a question about Zoom on Mac? Let us know in the comments below!