How to use Optimized Storage on the Mac
- jan
- 28
What is Optimized Storage and how do I use it?
As we use desktop and laptop computers, we tend to fill up our hard drives with stuff we've collected over the years. It's like an attic, basement, or garage that slowly fills up over the years. Some stuff gets used often, other stuff sits in a box gets forgotten about. Eventually, though, the clutter becomes too much and you have to start getting rid of things. But how do you sort the import stuff from the trash? On macOS Sierra, that's where Optimized Storage comes in.
Optimized Storage takes files you've been storing in iCloud and moves them off of your computer if your local storage gets too full. It also leaves behind an icon of the item that has been removed so that, when you finally do want to access it again, you don't have to go somewhere different to find it. You can just click on the file and it will download back onto your computer.
There are four features to Optimized Storage that you can enable separately or all together. You can Store in iCloud, Optimize Storage, Empty Trash Automatically, and Reduce Clutter.
- How to access Optimized Storage
- How to use Store in iCloud
- How to stop syncing Desktop and Documents folders in iCloud on your Mac
- How to use Optimize Storage
- How to disable Optimze Storage on your Mac
- How to use Empty Trash Automatically
- How to disable Empty Trash Automatically on your Mac
- How to use Reduce Clutter
- How to use Optimized Storage with Photos
- How to stop using iCloud Photo Library on the Mac
How to access Optimized Storage
There are two ways to access Optimized Storage. The first is easy. Do nothing until your storage gets full. When it does, you'll get a notification asking if you want to optimize your storage. Click Yes to be directly taken to the Optimized Storage tool window.
To access Optimized Storage manually:
- Click on the Apple icon () in the upper left corner of your screen.
Select About this Mac from the drop-down menu.

- Click on the Storage tab in the System Information window.
Click on Details.

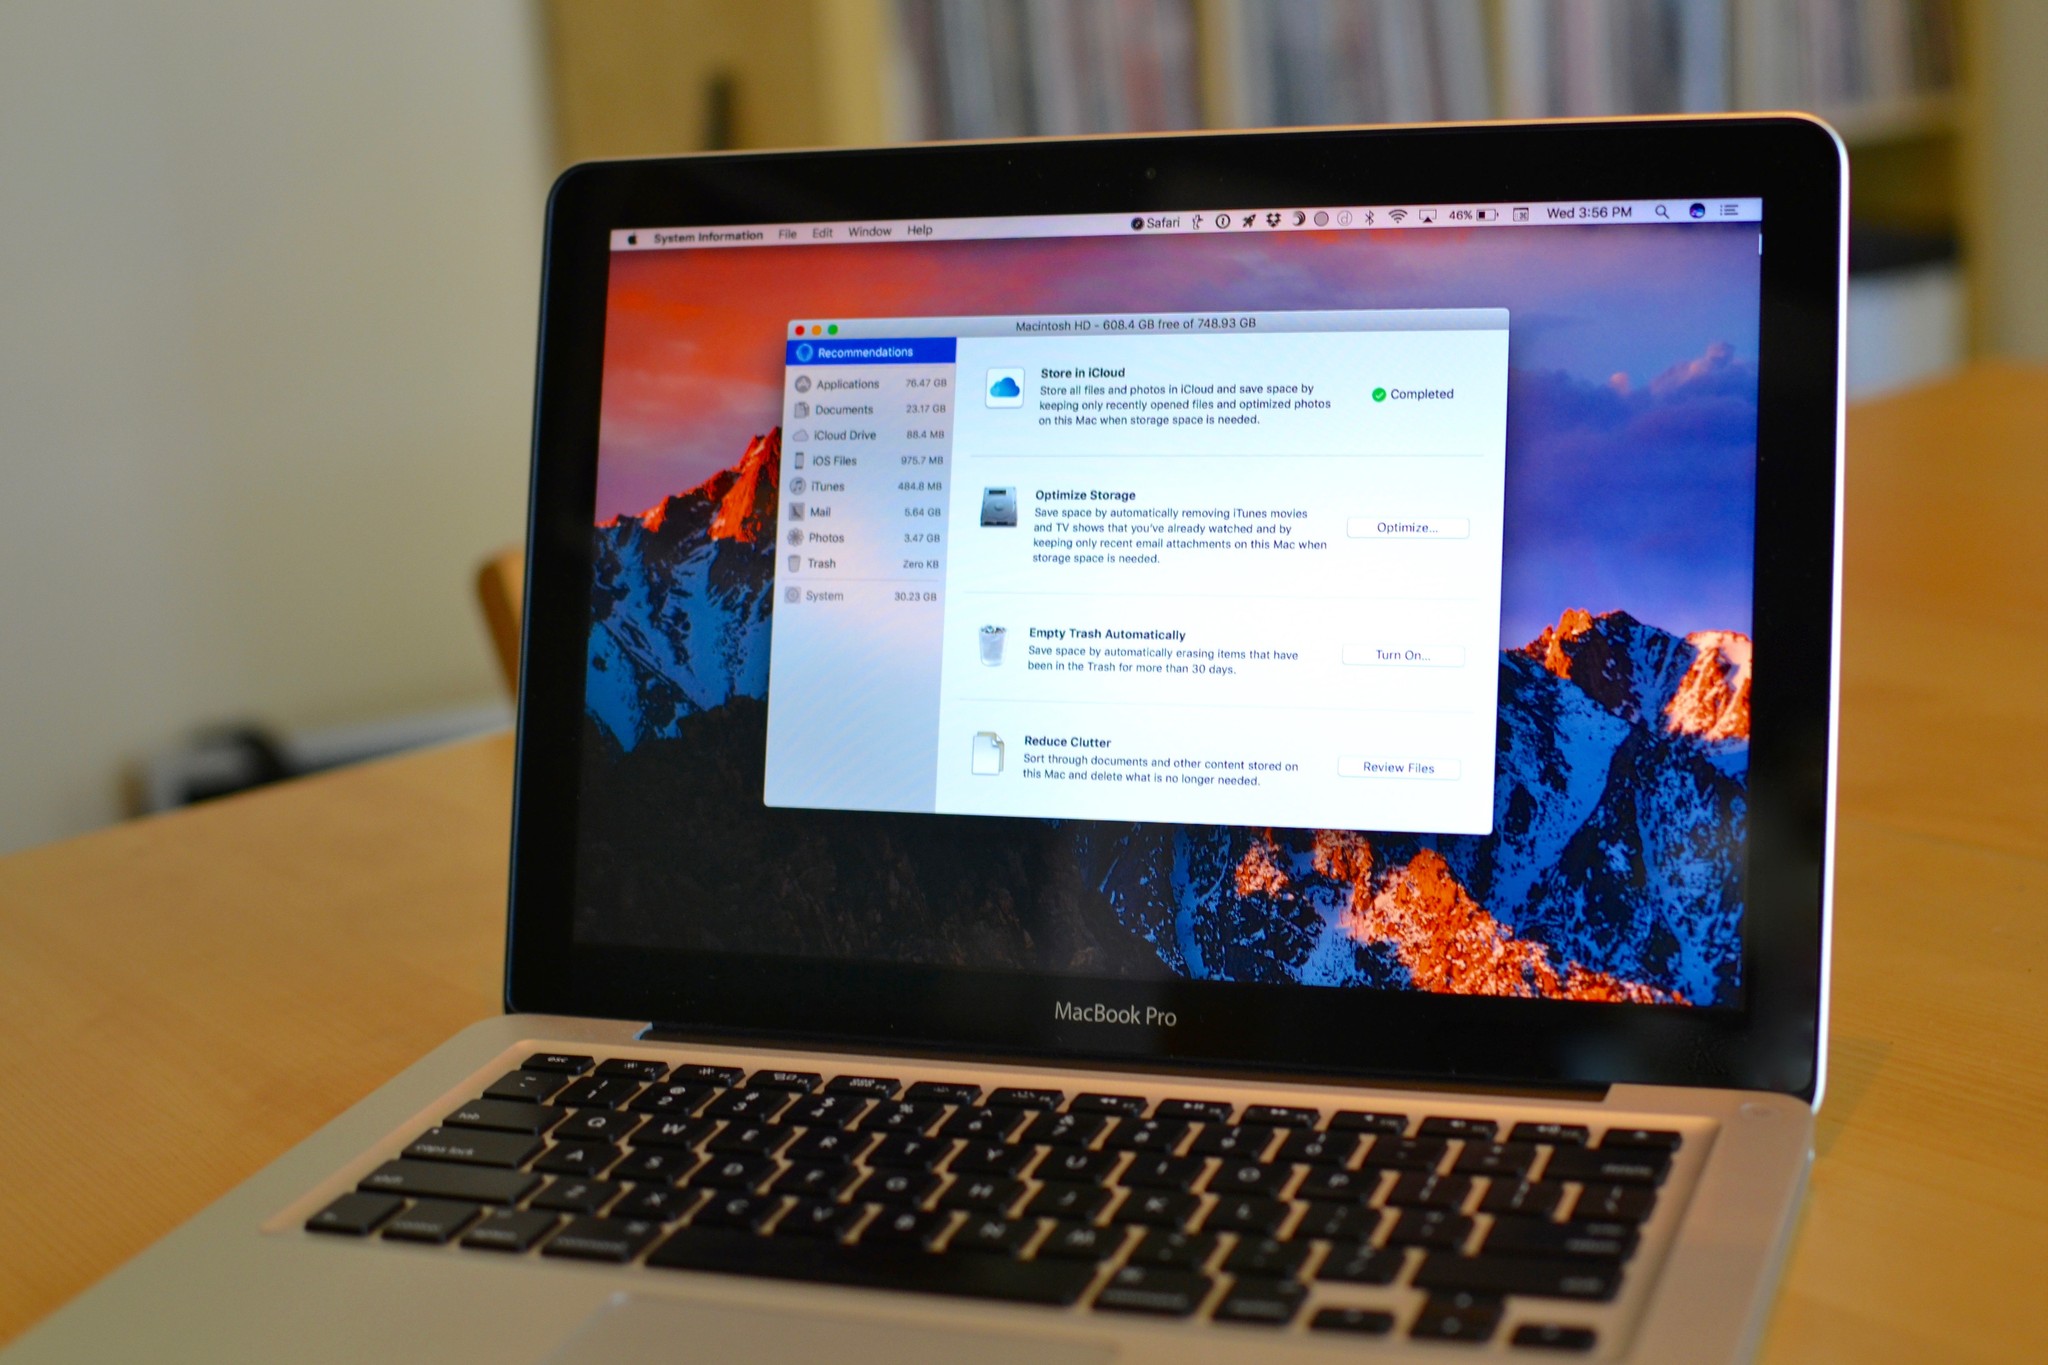
This opens up the four Optimized Storage tools, which are on the right side of the window.
How to use Store in iCloud
Store in iCloud is basically a one-stop shop for turning on iCloud Photo Library and Desktop and Documents Syncing (the latter of which is new in macOS Sierra). When you turn it on, you can select one or both iCloud syncing features (you don't have to use both if you don't want to). You may already have both enabled if you turned them on prior, in which case, Store in iCloud will not affect your iCloud storage any further. If you do not have iCloud Photo Library or Desktop and Documents Syncing already turned on, Store in iCloud will affect your iCloud storage limit. If it does, you will receive a notification with a recommendation for which tier that will work best for your needs. The average person only needs the $0.99 per-month 50GB tier, though some might need a larger plan.
- Click on Store in iCloud.
- Tick the box for Store files from Desktop and Documents in iCloud Drive to store all files on your desktop and in your Mac's Documents folder in iCloud.
- Tick the box for Store photos and videos in iCloud Photo Library to store all original photos and videos in iCloud.
Click Store in iCloud to enable these iCloud features.

How to stop syncing Desktop and Documents folders in iCloud on your Mac
If you've tried out Desktop and Documents folder syncing in iCloud but decided you don't like it, you can stop syncing. If you disable syncing, Desktop files will no longer appear on a secondary Mac computer's desktop, but they will still be in a file in iCloud Drive, which you can move them out of. Your Documents folder will also still be visible in iCloud Drive, which you can also move.
- Click the Apple icon () in the upper left corner of your Mac's screen.
Click System Preferences in the drop-down menu.
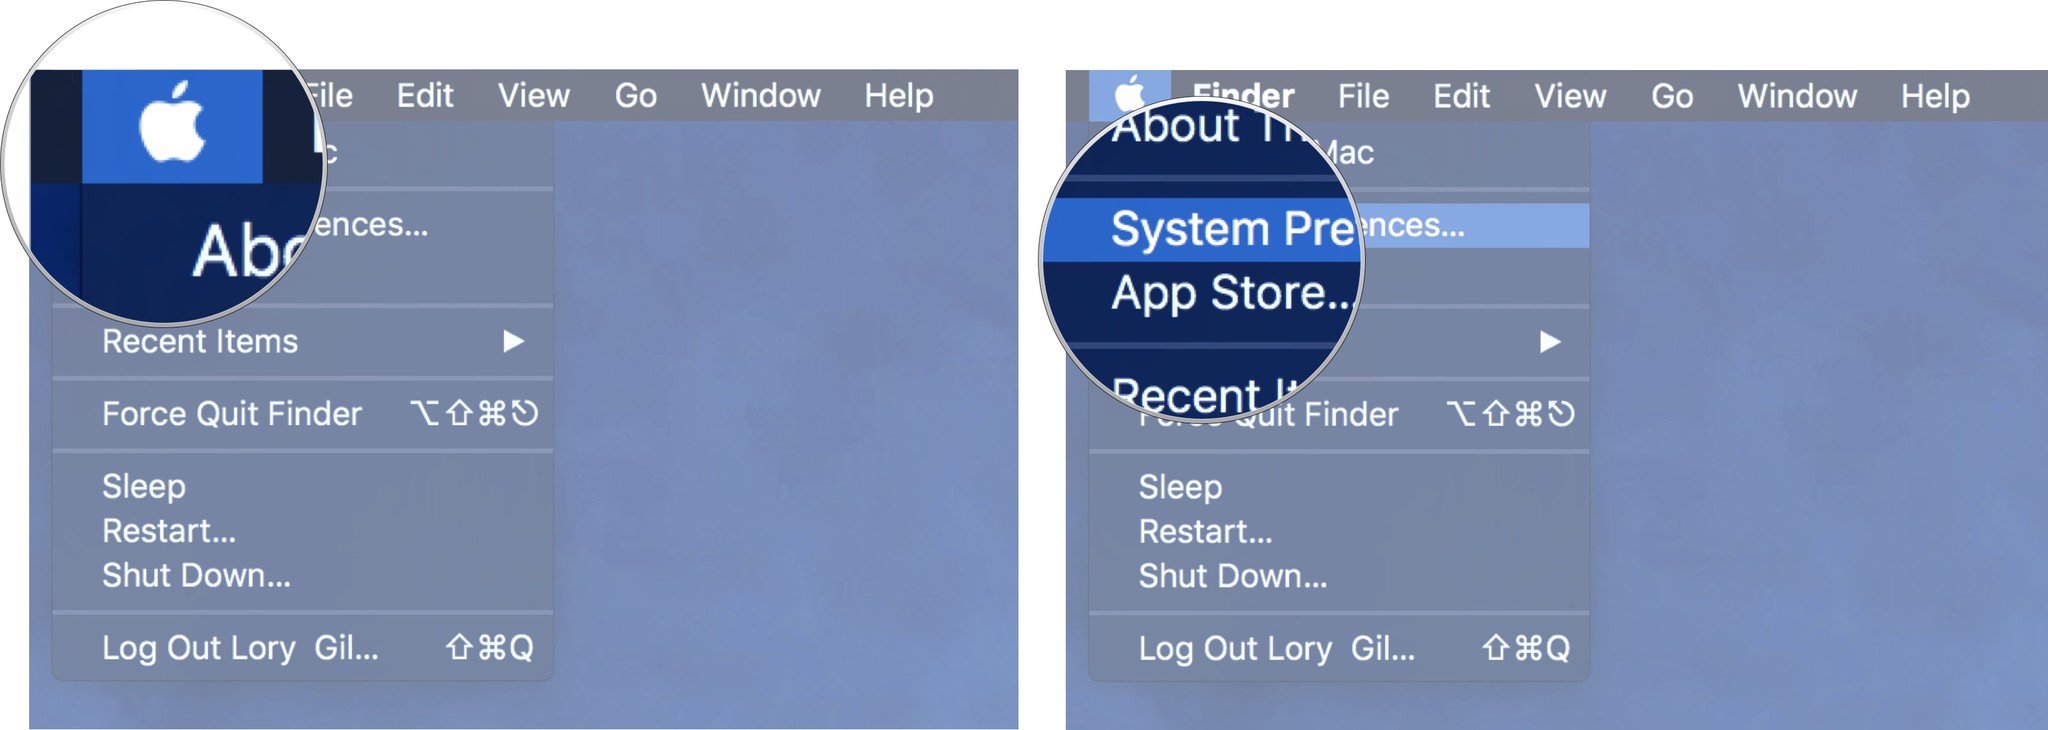
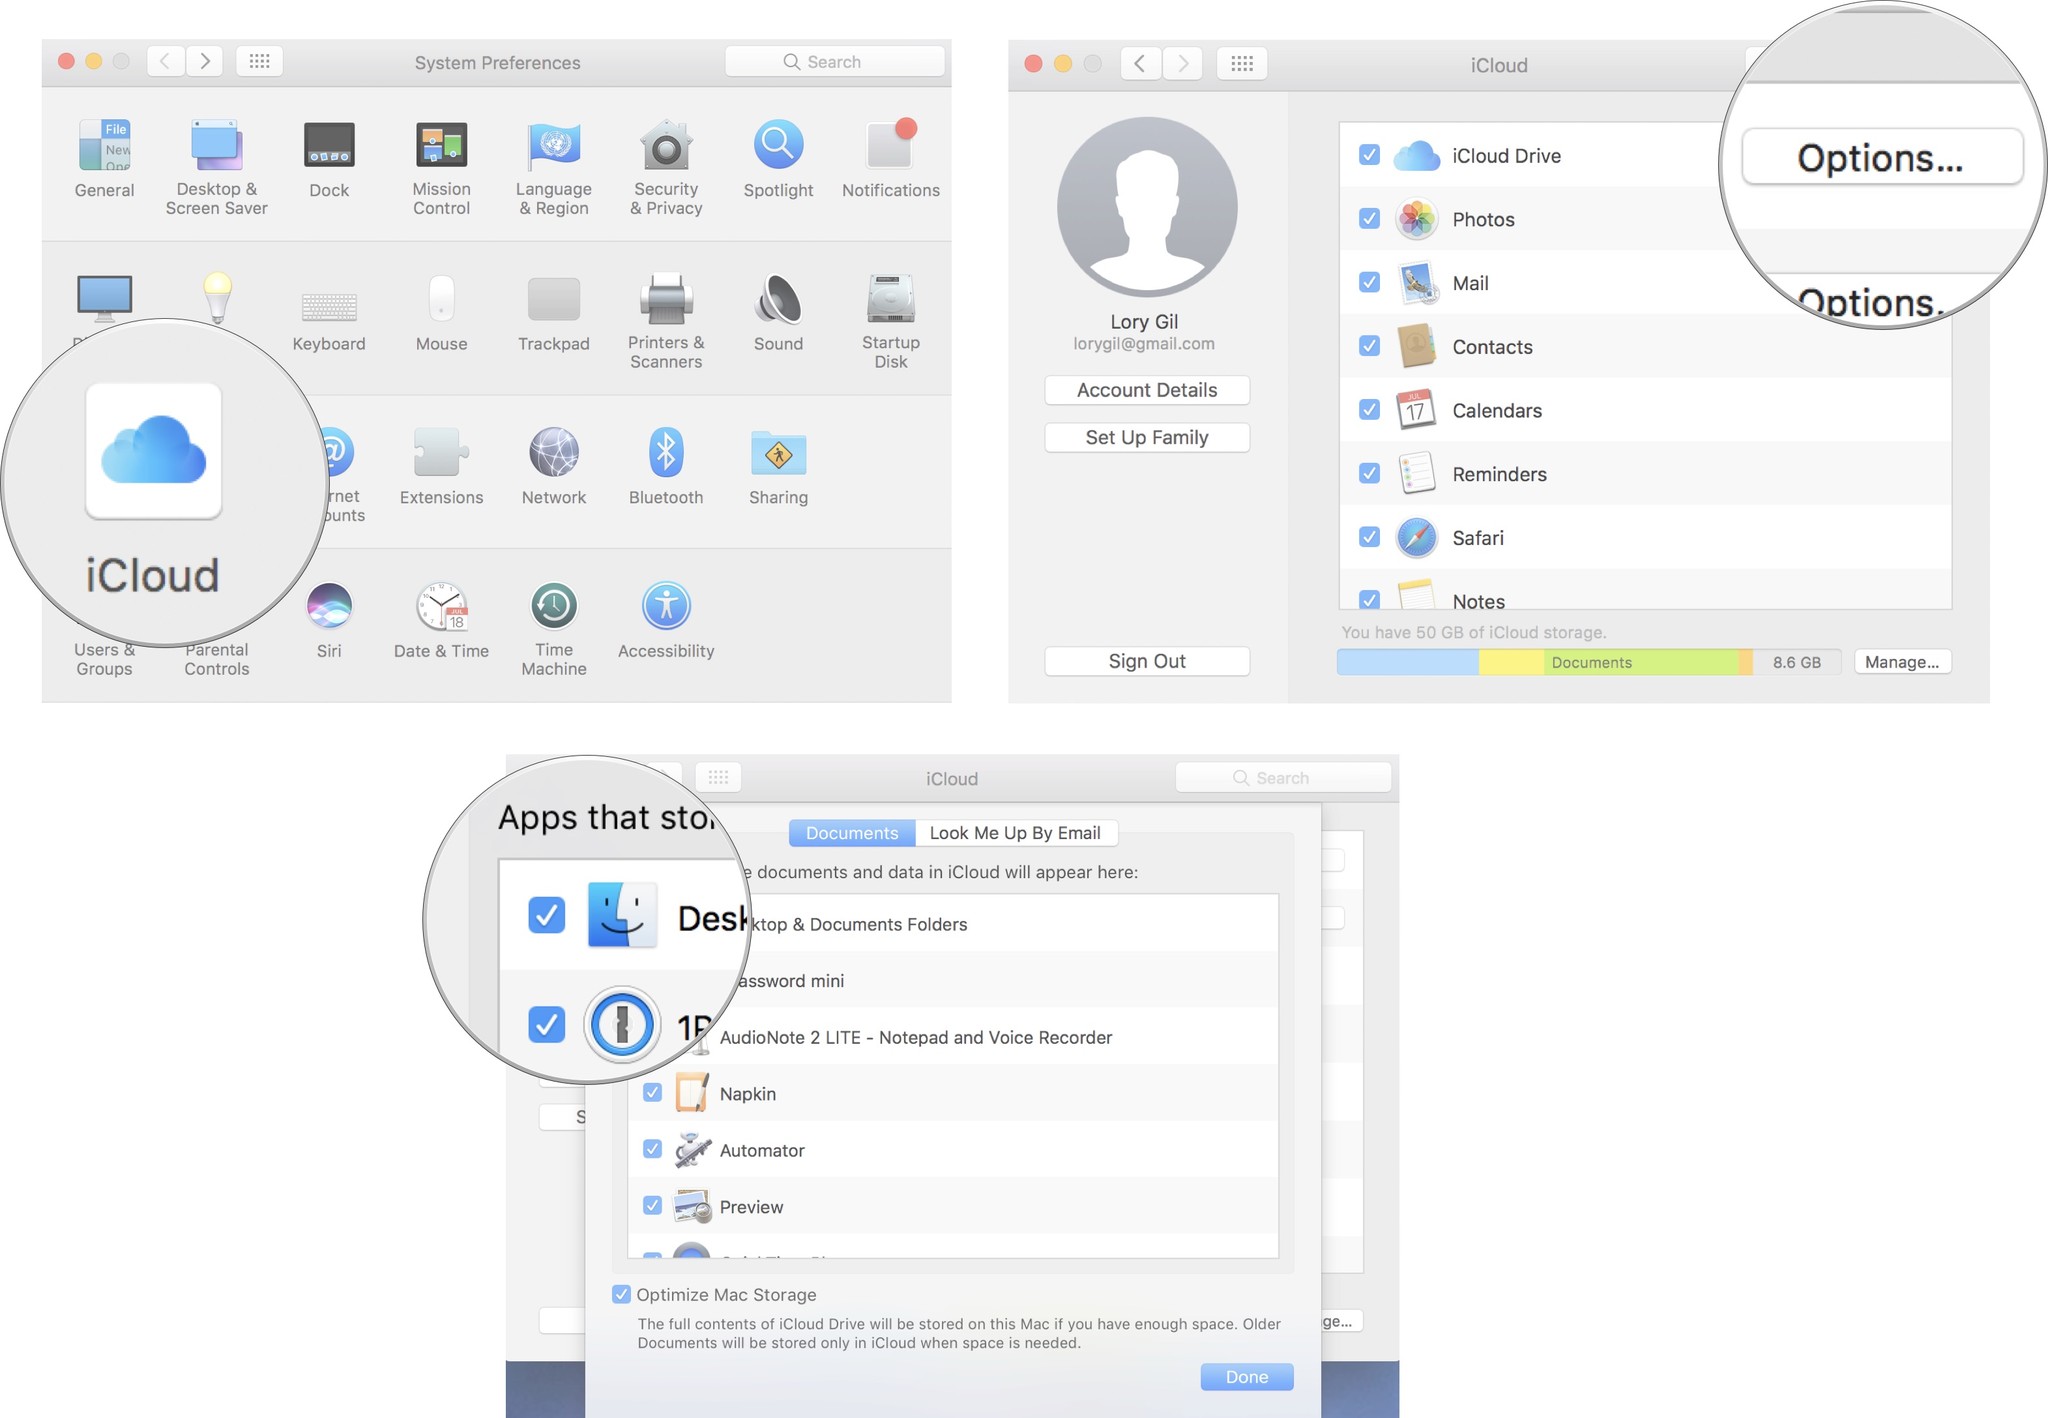
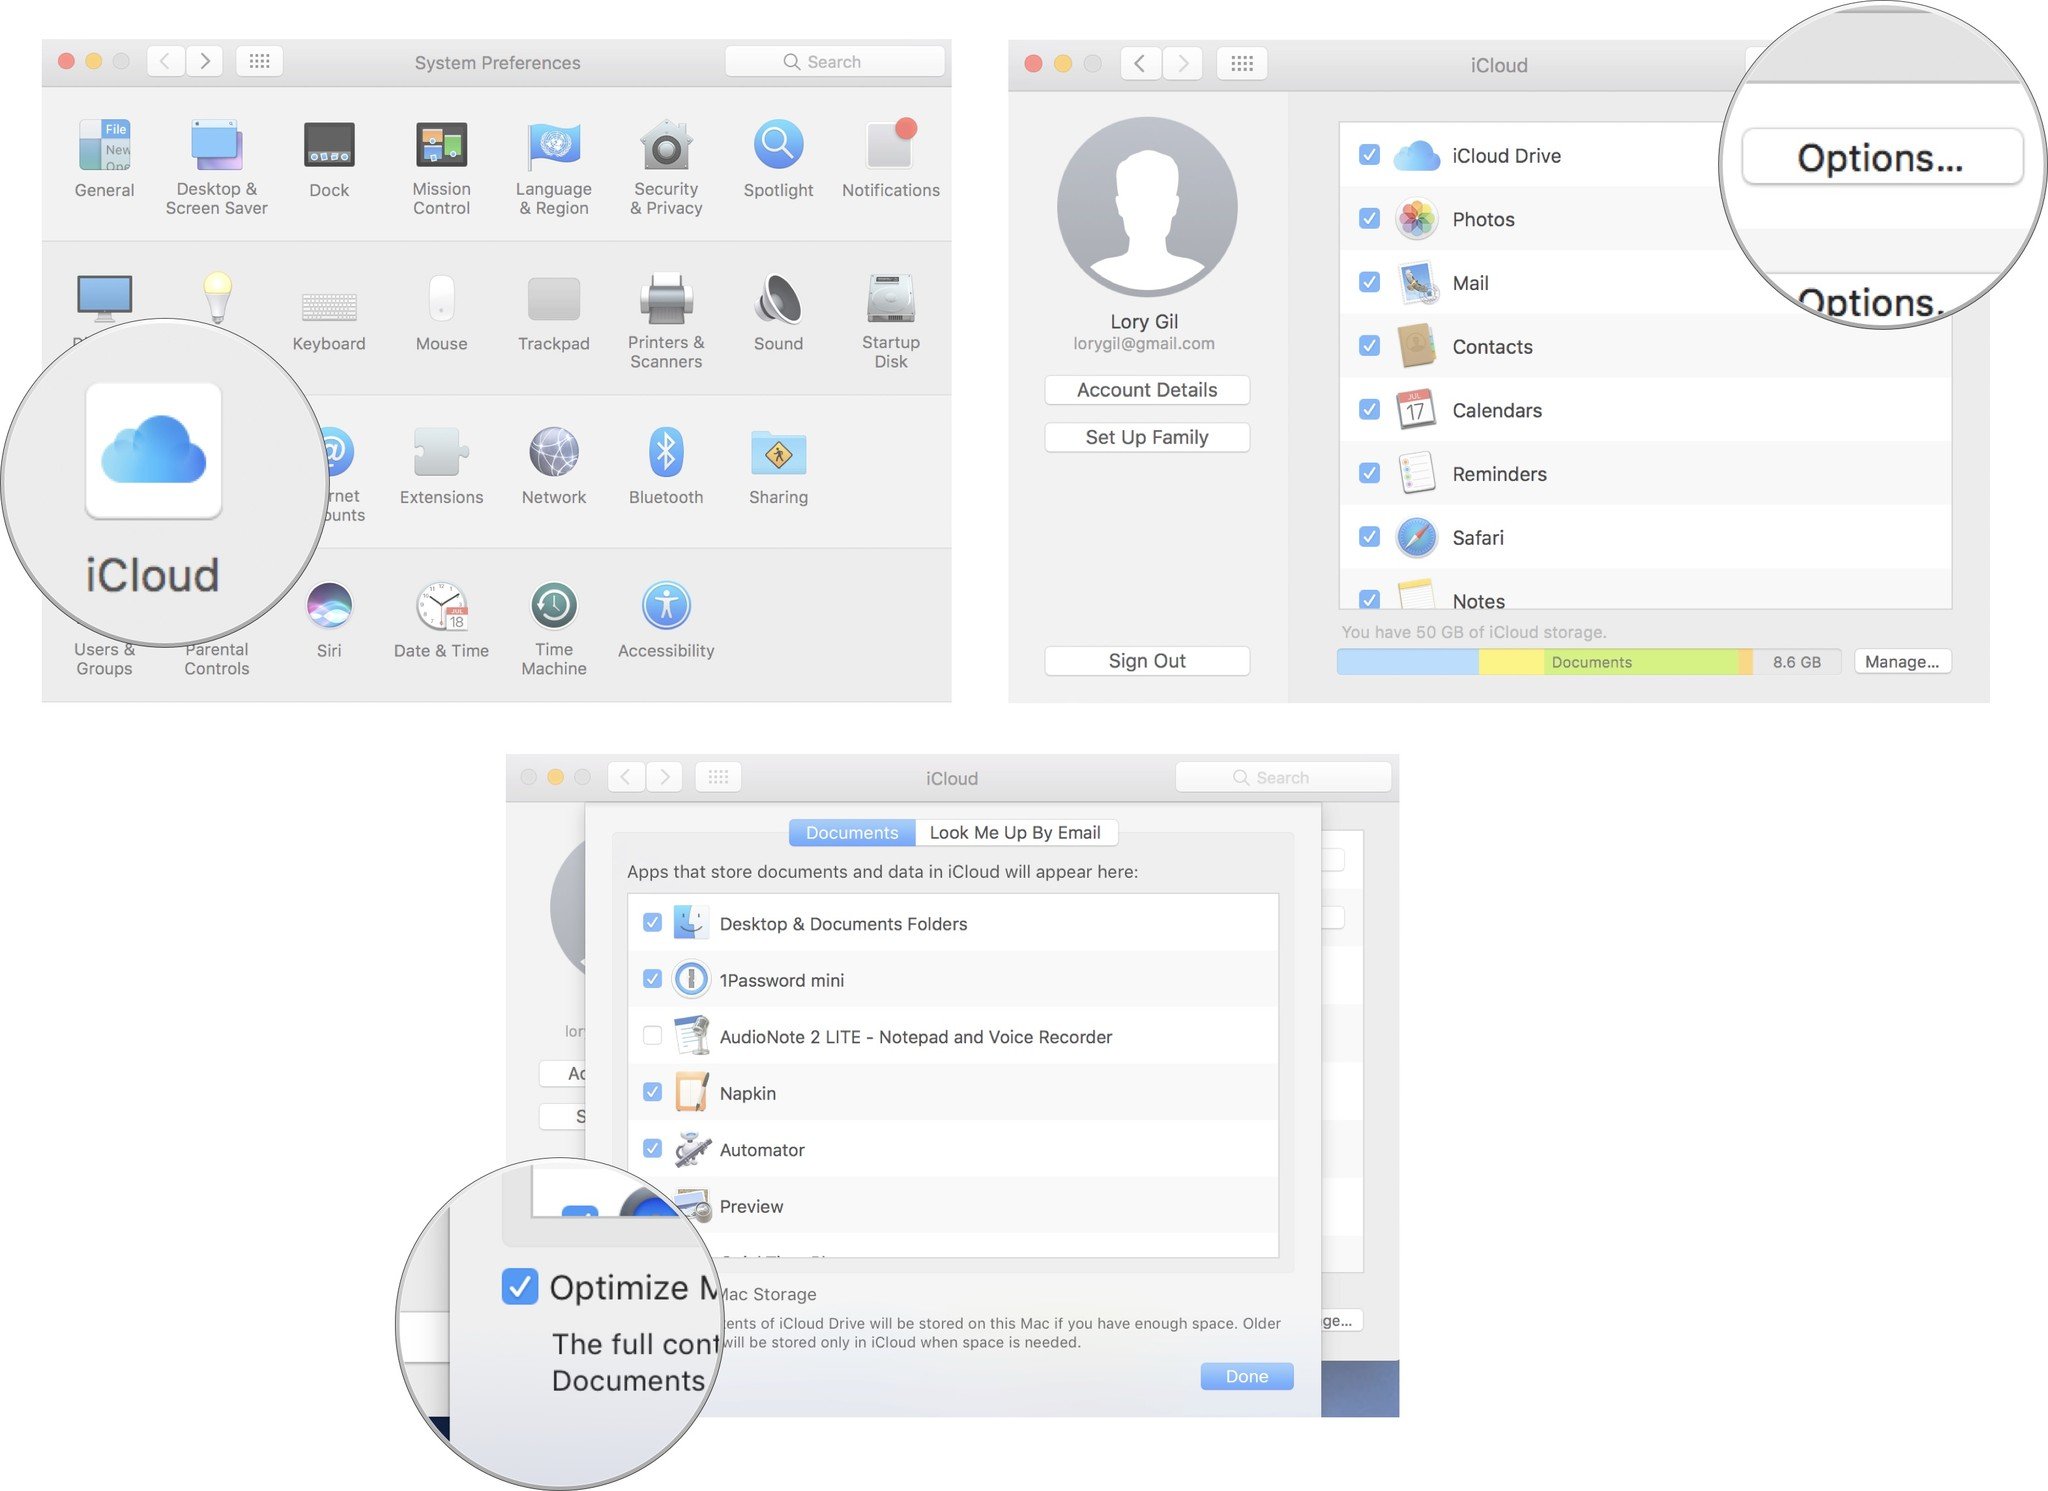
- Click on iCloud.
- Click on Options next to iCloud Drive.
Click to uncheck the checkbox for Desktop & Documents Folders.
How to use Optimize Storage
Optimize Storage relates to storing media in the cloud that is not necessarily already in your iCloud storage, specifically movies and TV shows you have already watched on iTunes. When you select Optimize Storage, it will remove these files from your computer. If you want to watch them again, you can redownload them from iTunes.
It also gives you the option to store your email attachments. You can set it up so that recent email attachments are stored on your Mac, or you can store all of your email attachments in the cloud and download files that you need when you need them.
- Click on Optimize... in the Optimize Storage section of the window.
Click on Optimize again to confirm that you want to enable the feature to automatically remove iTunes movies and TV shows that you've already watched.

How to disable Optimize Storage on your Mac
Optimize Storage automatically removes iTunes movies and TV shows that you've already watched from your Mac. It also only keeps recent email attachments on your Mac when your hard drive starts to run out of room. If you want to keep your movies and TV shows on your hard drive so you don't have to re-download them everytime you want to watch them, you can disable the feature.
- Click the Apple icon in the upper left corner of your Mac's screen.
Select System Preferences from the drop-down menu.
- Click on iCloud.
- Click on Options next to iCloud Drive.
- Click to uncheck the checkbox at the bottom of the window for Optimize Mac Storage.
- Click on Done when you are finished.
How to use Empty Trash Automatically
It is pretty common for the average computer user to forget to empty the trash bin regularly. Just like a real garbage can, trash can start to add up. Unfortunately, unlike a garbage can, your Mac's trash bin doesn't get full, so you don't realize you've been stocking up digital waste for months and months. Empty Trash Automatically will enable a tool that will erase items that have been in the Trash for more than 30 days. You don't even have to think about it anymore.
- Click on Turn On in the Empty Trash Automatically section of the Optimized Storage window.
Click Turn On again to confirm that you want to enable the feature to automatically erase files that have been in the Trash for more than 30 days.

How to disable Empty Trash Automatically on your Mac
If you worry that you are going to delete something from your Mac and need it back more than 30 days later, you can disable the feature and go back to manually emptying the trash.
- Open a Finder window.
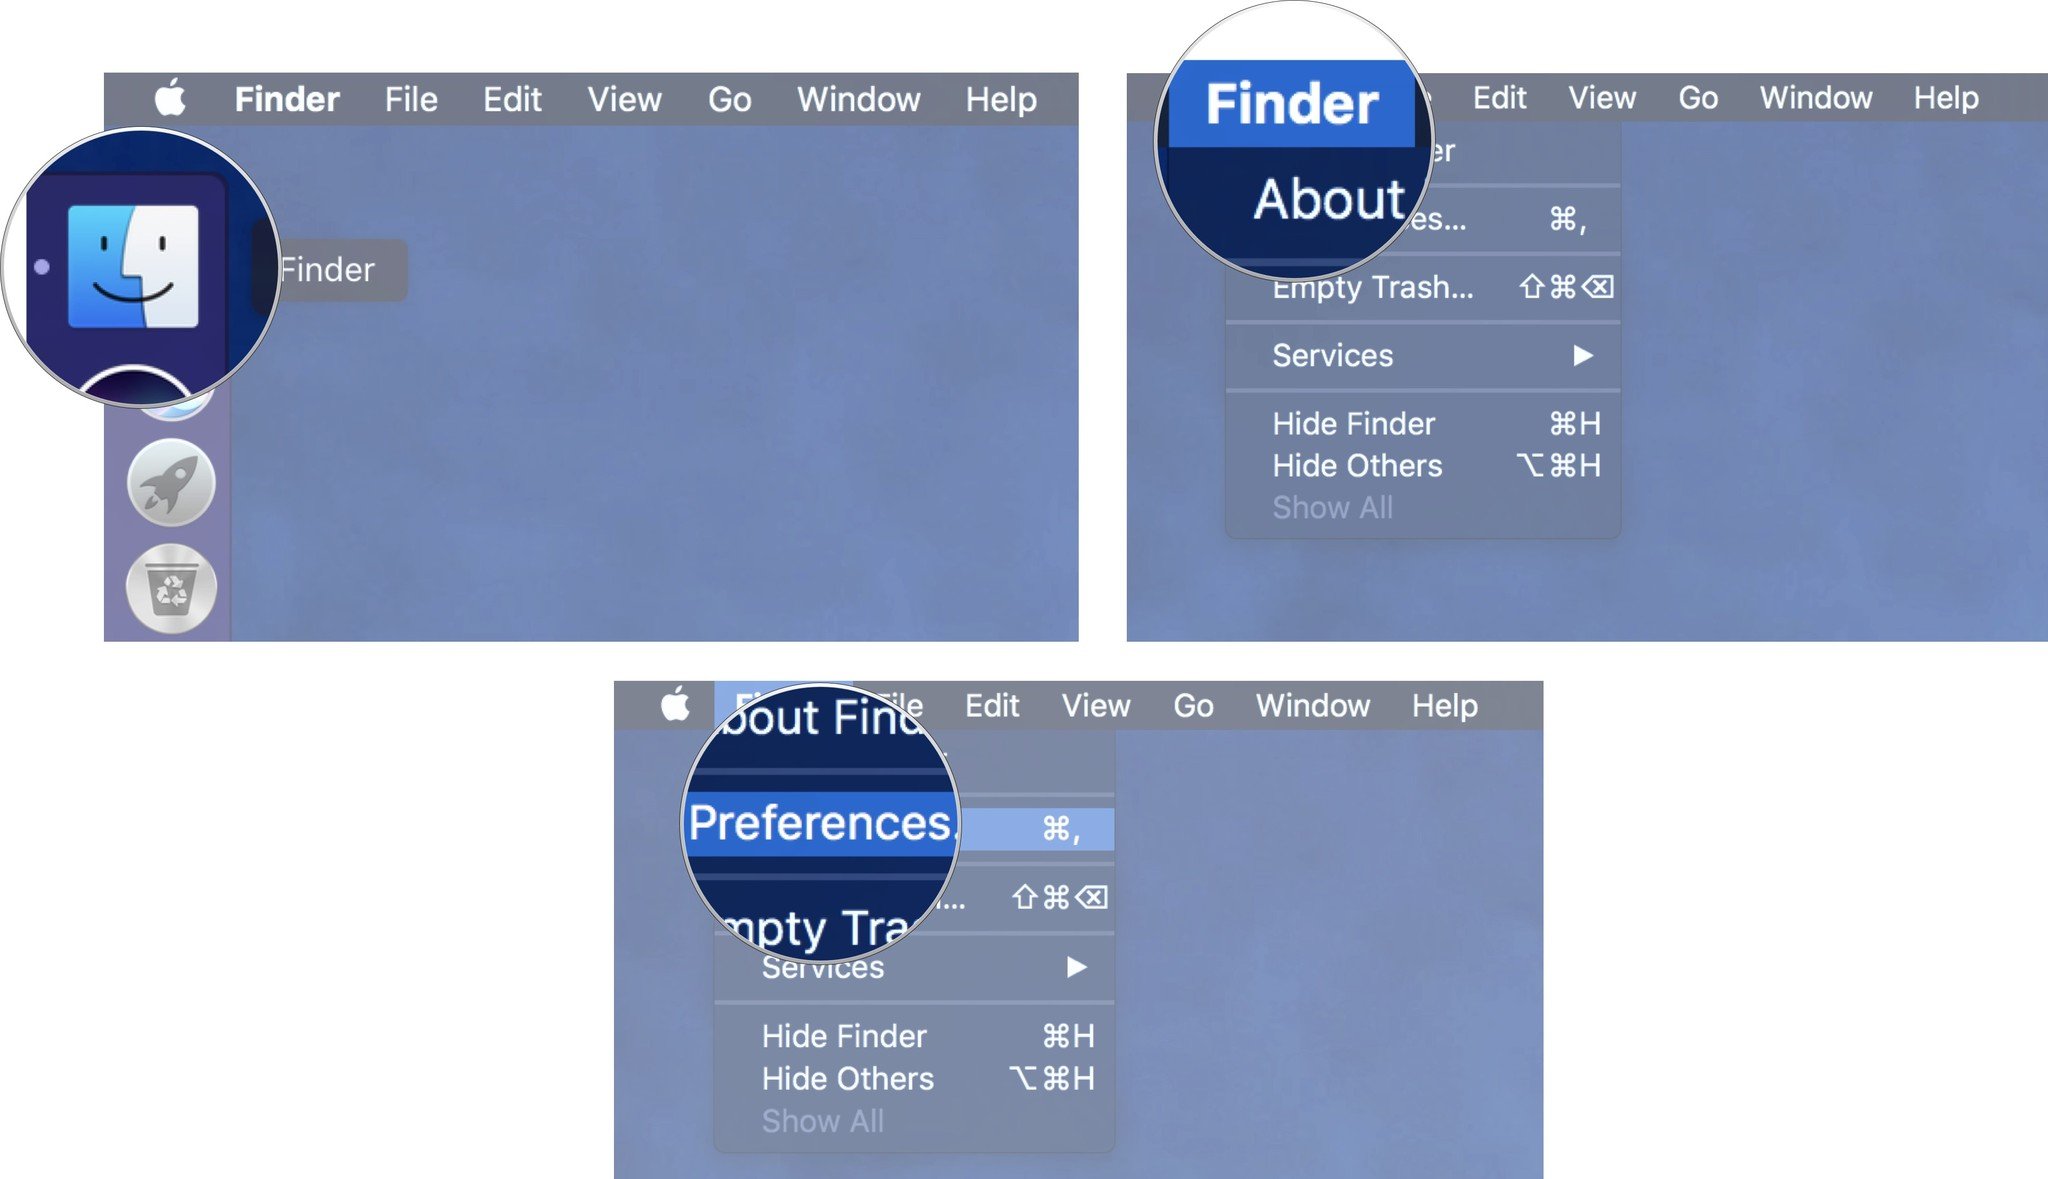
- Click on Finder in the upper left corner of your Mac's screen.
Click Preferences in the drop-down menu.
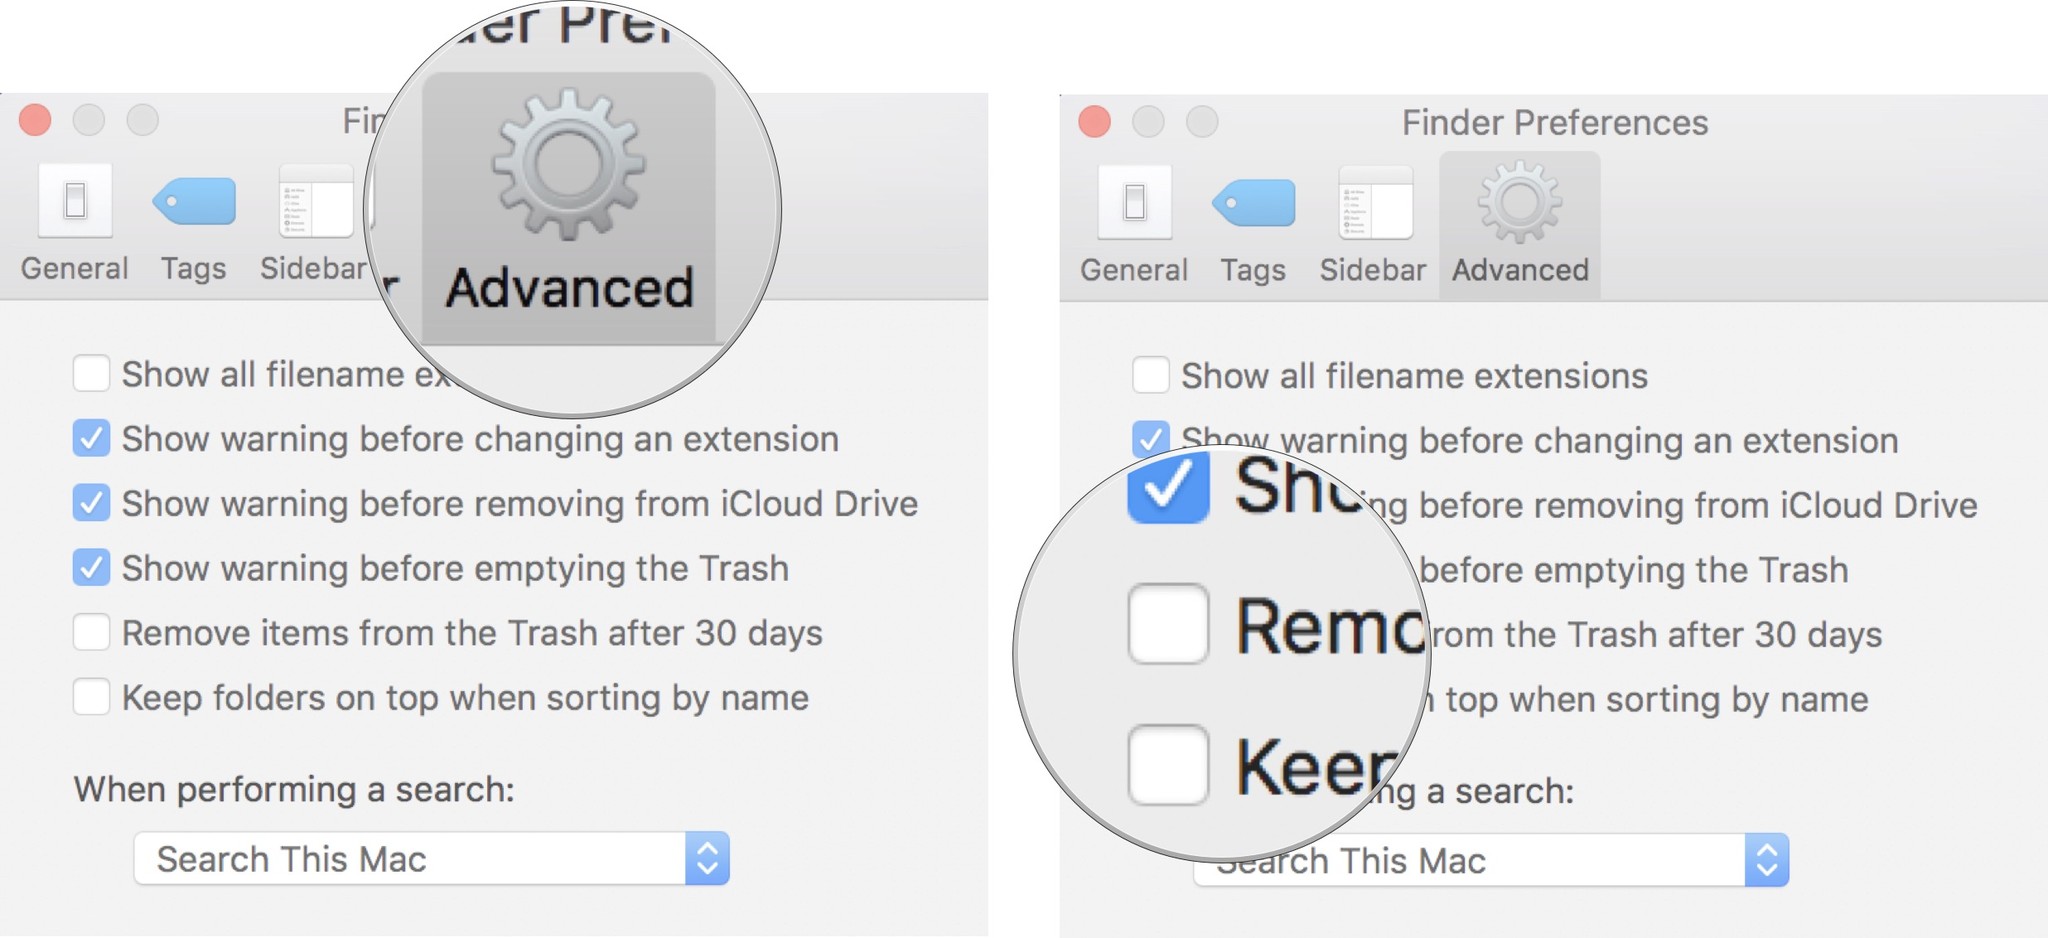
- Click on Advanced in the Finder Preferences window.
Click to uncheck the checkbox for Remove items from the Trash after 30 days.
How to use Reduce Clutter
Reduce Clutter is the one feature in Optimized Storage that requires you to manually clean files on your Mac.
The list of categories on the left side of the Optimized Storage window represent the folders that tend to store files that are older and can be removed from your Mac.
You can either click on Review Files in the Reduce Clutter section of the Optimized Storage window or select a Folder from the list on the right side of the window.
You can then go through the files individually and decide whether you want to keep or remove them from your Mac.
For example, in the Applications folder, you can view apps on your Mac by type. Older versions of apps you are currently using can sometimes take up dozens of GB of space. You can delete the files right from the Optimized Storage window.

How to use Optimized Storage with Photos
Photos on the Mac optimizes storage by letting you store full-resolution photos and videos in iCloud instead on your internal hard drive. Even if you don't want to store all of your files and documents in iCloud, you can keep your photos safe, while freeing up space on your hard drive.
Your photos will also remain on your Mac's hard drive until it starts to get full, at which point, photos and videos — starting with the oldest — will be removed from your Mac and only stored in iCloud.
Photos and videos tend to take up a lot of space. You may find you don't have enough iCloud storage to keep your entire photo library in iCloud. You can upgrade your iCloud storage to a larger plan if you are running out.
- Launch the Photos app on your Mac.
- Click Photos in the App menu in the upper left corner of your screen.
Select Preferences from the drop-down menu.

- Click the iCloud tab.
Click Optimize Mac Storage.

Full-resolution versions of your photos and videos will be uploaded to iCloud.
How to stop using iCloud Photo Library on the Mac
For some, the Photo library is the biggest space hog in iCloud. It is incredibly convenient to store your pictures in the cloud and be able to access them from any device without having to use up hard drive space (or in the case of the iPhone and iPad, device storage space), but it is also a burden on your iCloud storage limit. You can turn off iCloud Photo Library on all of your devices, which is inconvenient, but frees up a lot of space in iCloud.
- Click the Apple icon () in the upper left corner of your Mac's screen.
Select System Preferences from the drop-down menu.
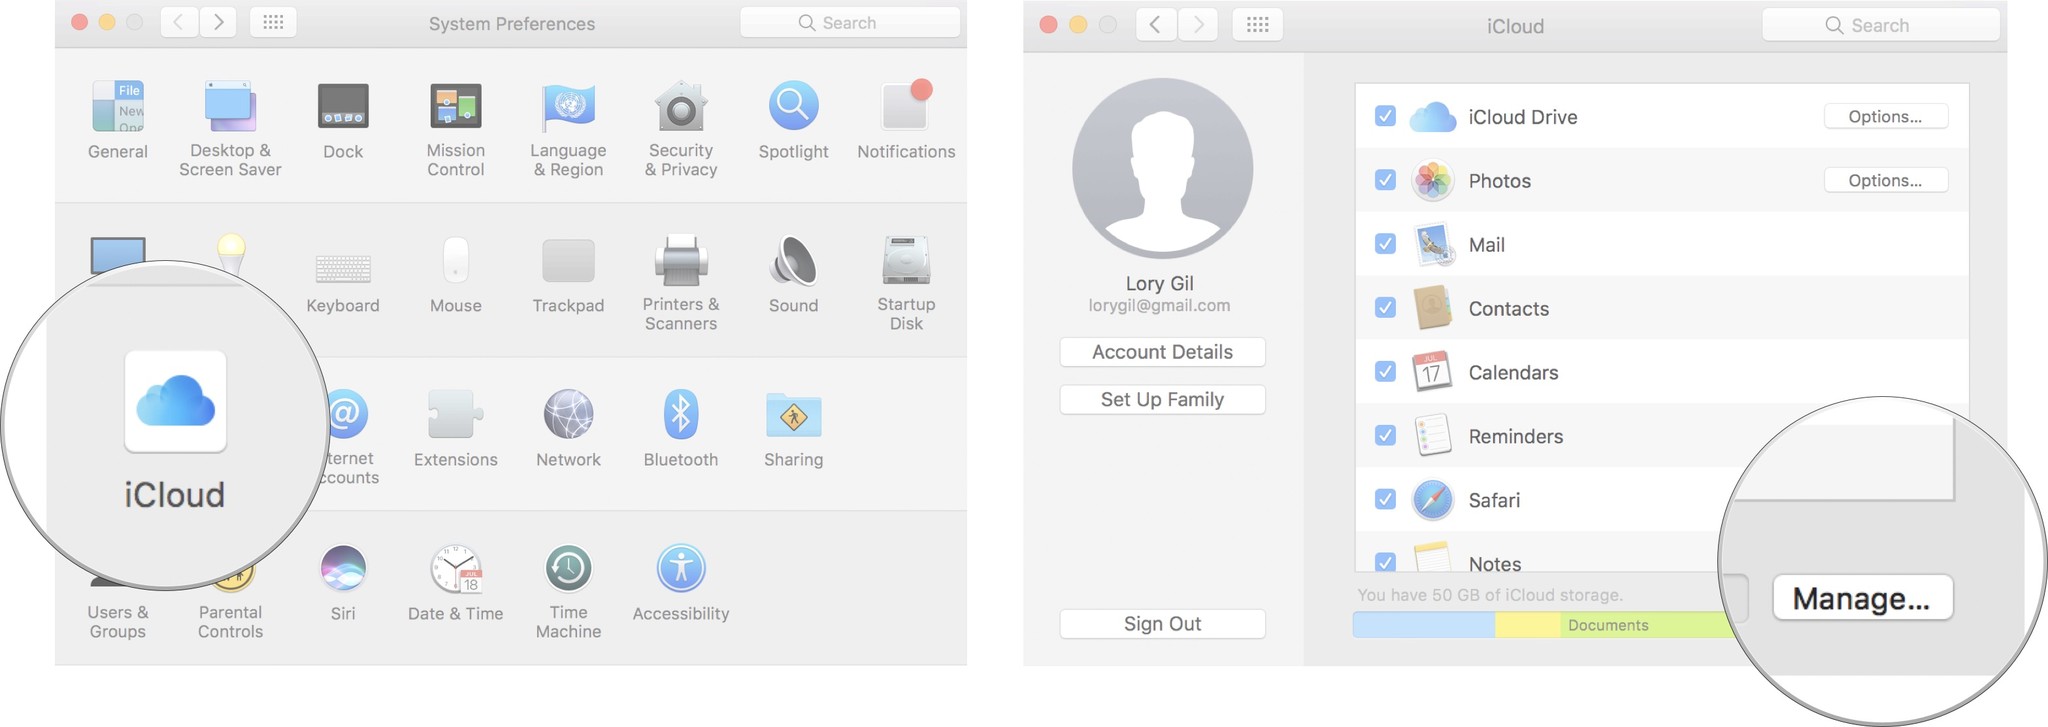
- Click on iCloud.
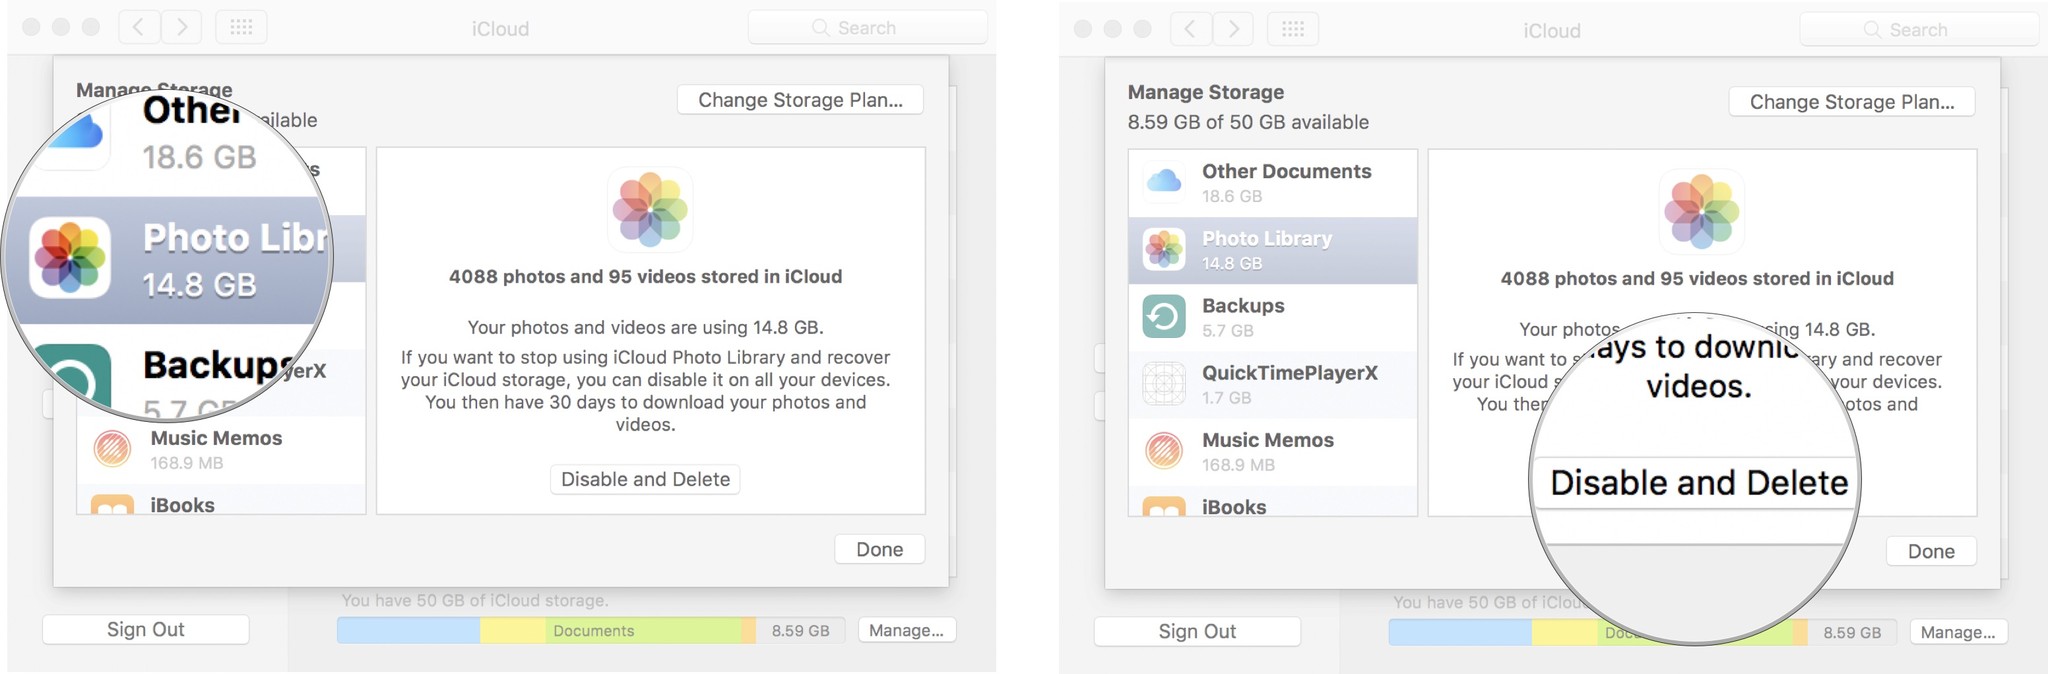
Click on Manage in the bottom right corner of the iCloud window.
- Click on Photo Library from the sidebar.
Click on Disable and Delete.
Any questions?
Do you have any questions about what Optimized Storage is or how to use the tools? Let me know and I'll help you out.
Updated January 2018: Added information about disabling these features if you need to.