
Using Screen Time on macOS Catalina
- jun
- 11

Digital wellness tools come to Mac with Screen Time
With macOS Catalina, Screen Time is arriving on Macs for the first time. The tool, which launched on iPhone and iPad in 2018, records the amount of time a user spends in various apps, from social networking to games. It also contains blocking features to limit usage. There are also a number parental controls, such as the ability to place limits on communication, particularly from specific contacts..
The feature has been designed to improve our digital wellness and get us away from our screens every once in a while. Here's how it works.
Apple occasionally offers updates to iOS, watchOS, tvOS, and macOS as closed developer previews or public betas for iPhone, iPad, Apple TV and Mac (sadly, no public beta for the Apple Watch). While the betas contain new features, they also contain pre-release bugs that can prevent the normal use of your iPhone, iPad, Apple Watch, Apple TV, or Mac, and are not intended for everyday use on a primary device. That's why we strongly recommend staying away from developer previews unless you need them for software development, and using the public betas with caution. If you depend on your devices, wait for the final release.
- How to turn on Screen Time on macOS
- How to turn off Screen Time on macOS
- How to share Screen Time on macOS across all devices
- How to add a password to Screen Time on macOS
- How to view app usage in Screen Time on macOS
- How to view notifications sent in Screen Time on macOS
- How to view pickups in Screen Time on macOS
- How to schedule Downtime using Screen Time for macOS
- How to set limits using Screen Time for macOS
- How to set always allowed content in Screen Time for macOS
- How to limit communication using Screen Time for macOS
- How to set content and privacy using Screen Time for macOS
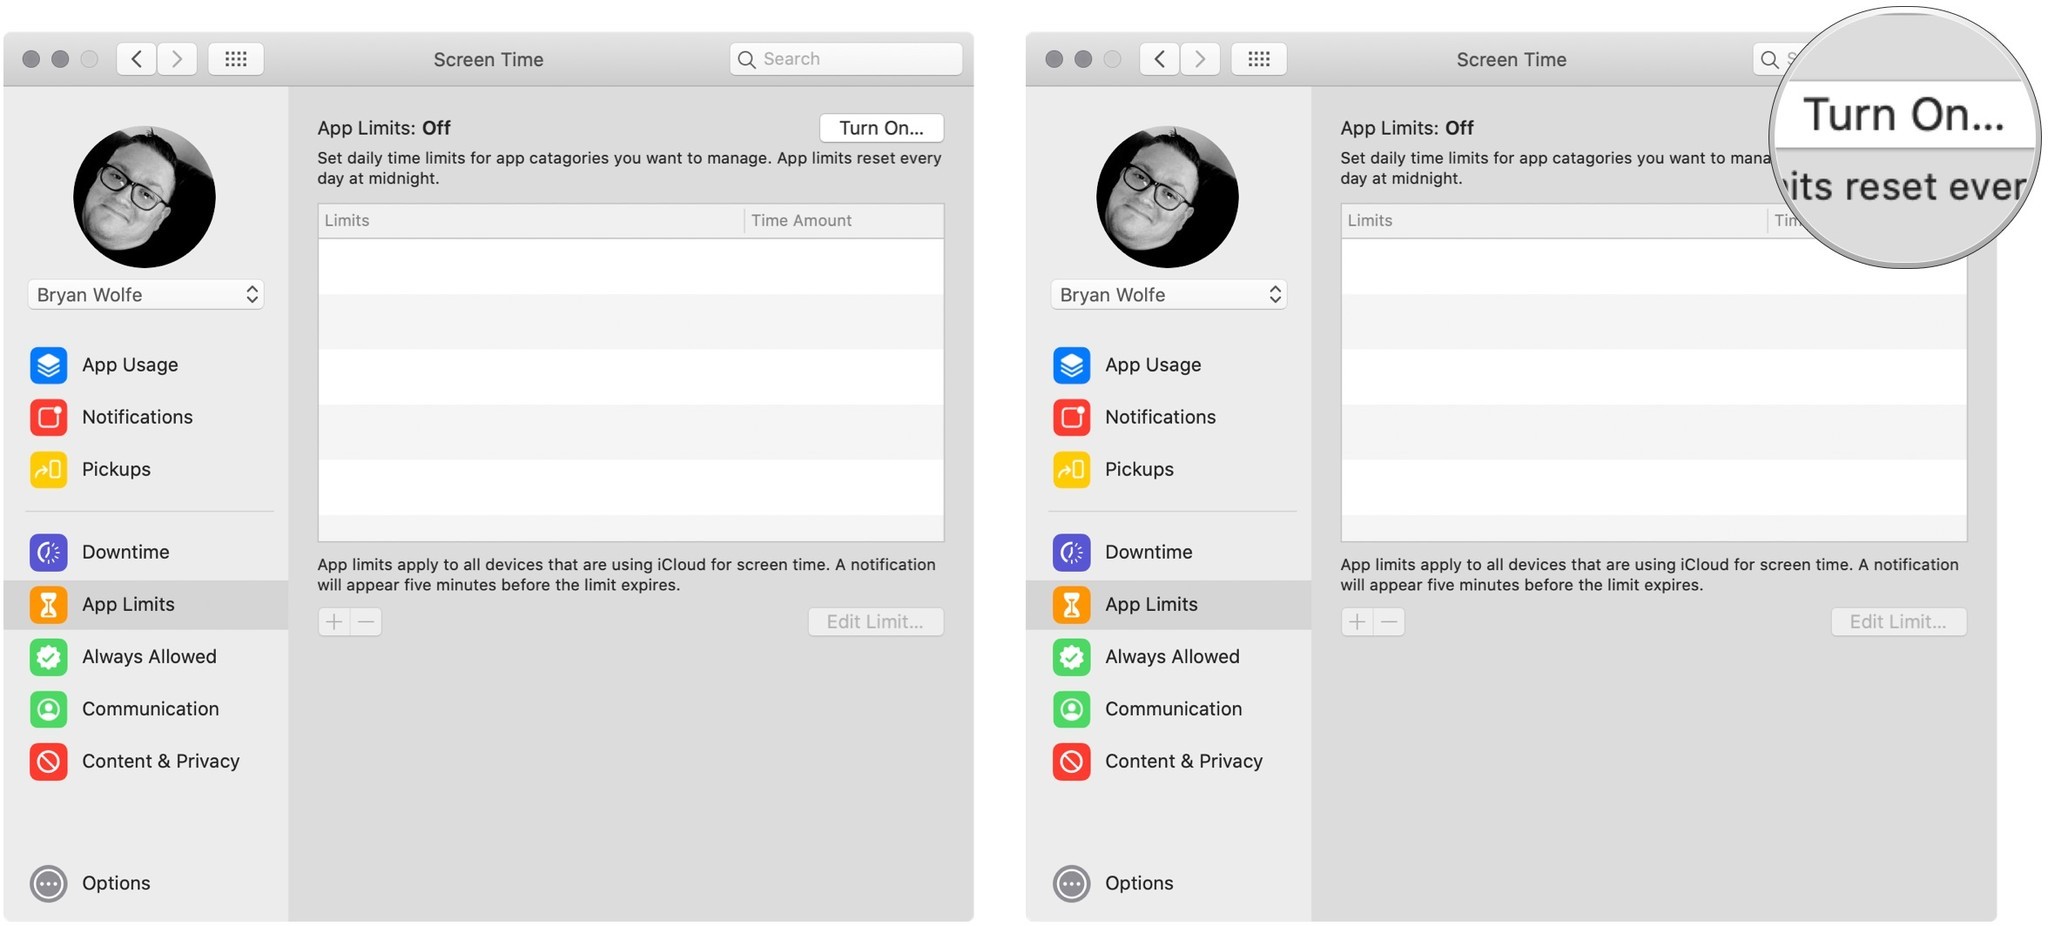
How to turn on Screen Time on macOS
Screen Time is located in System Preferences in macOS Catalina. To get started:
- Click Screen Time in System Preferences.
- Select the Options button at the bottom left.
-
Click the Turn On button at the top right.
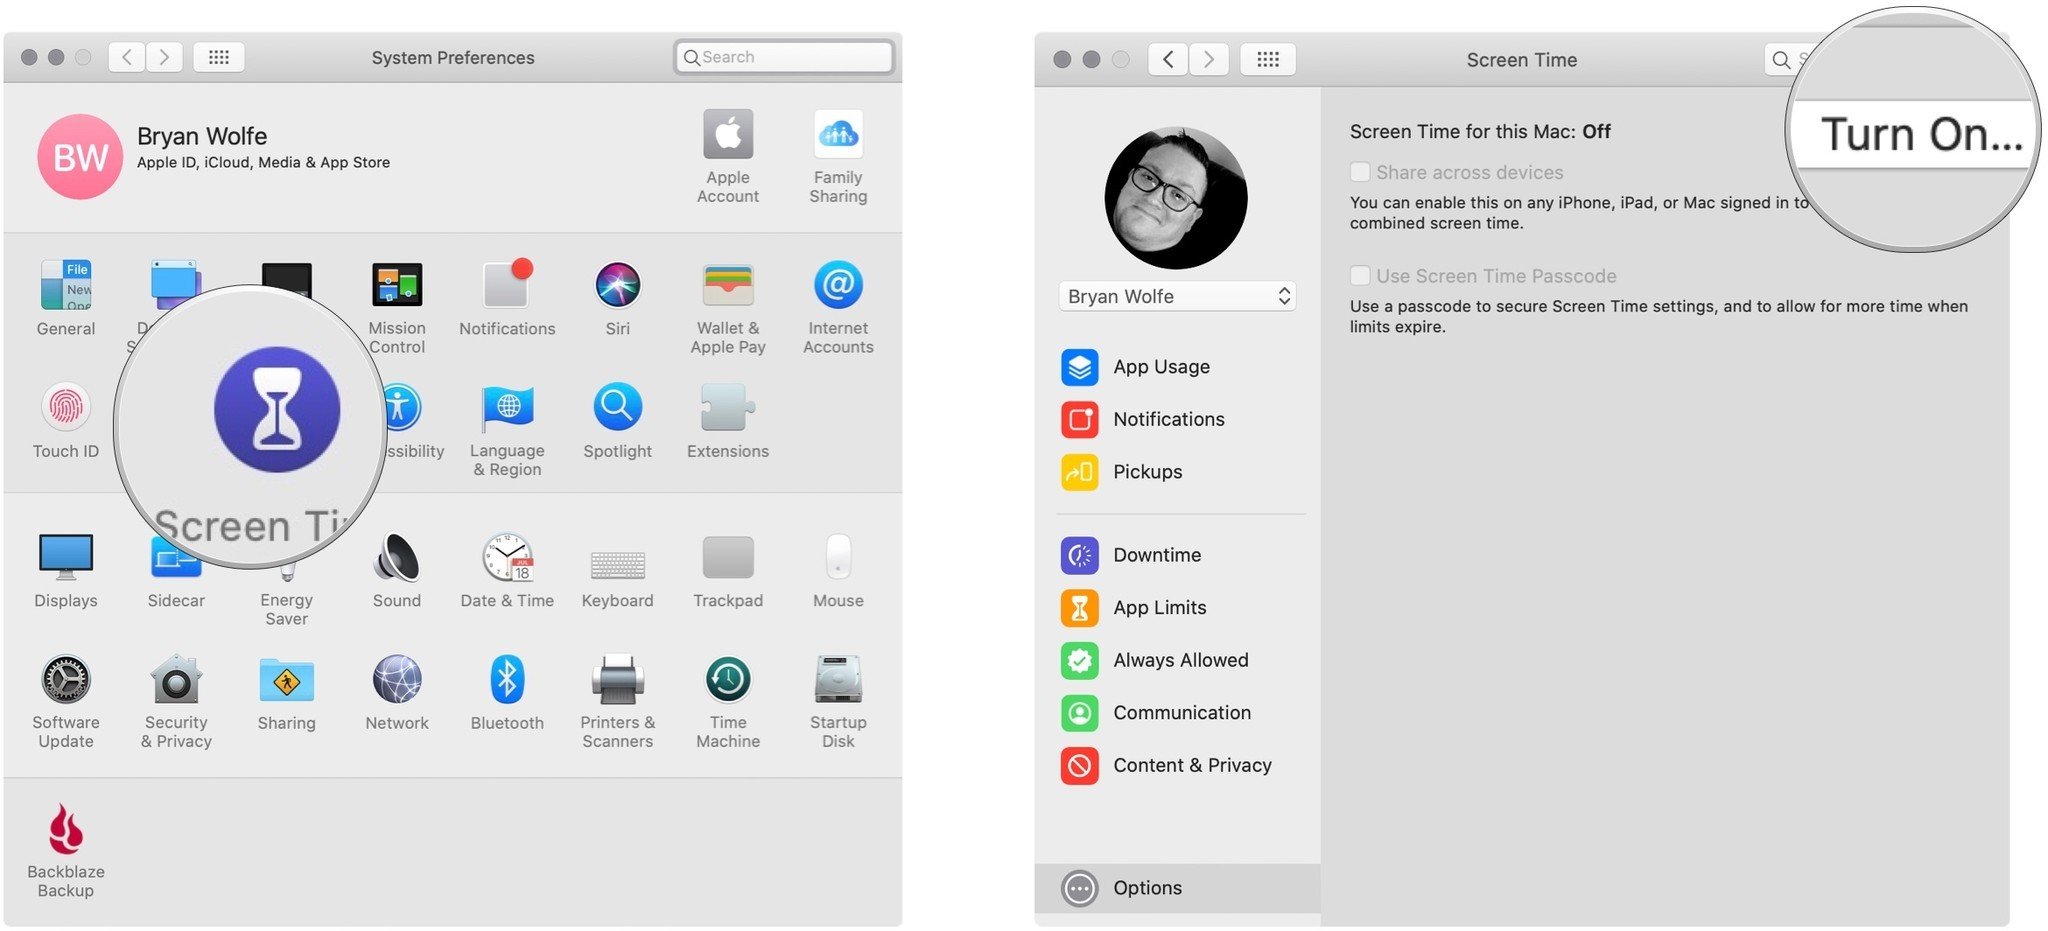
You can now start using Screen Time on Mac.
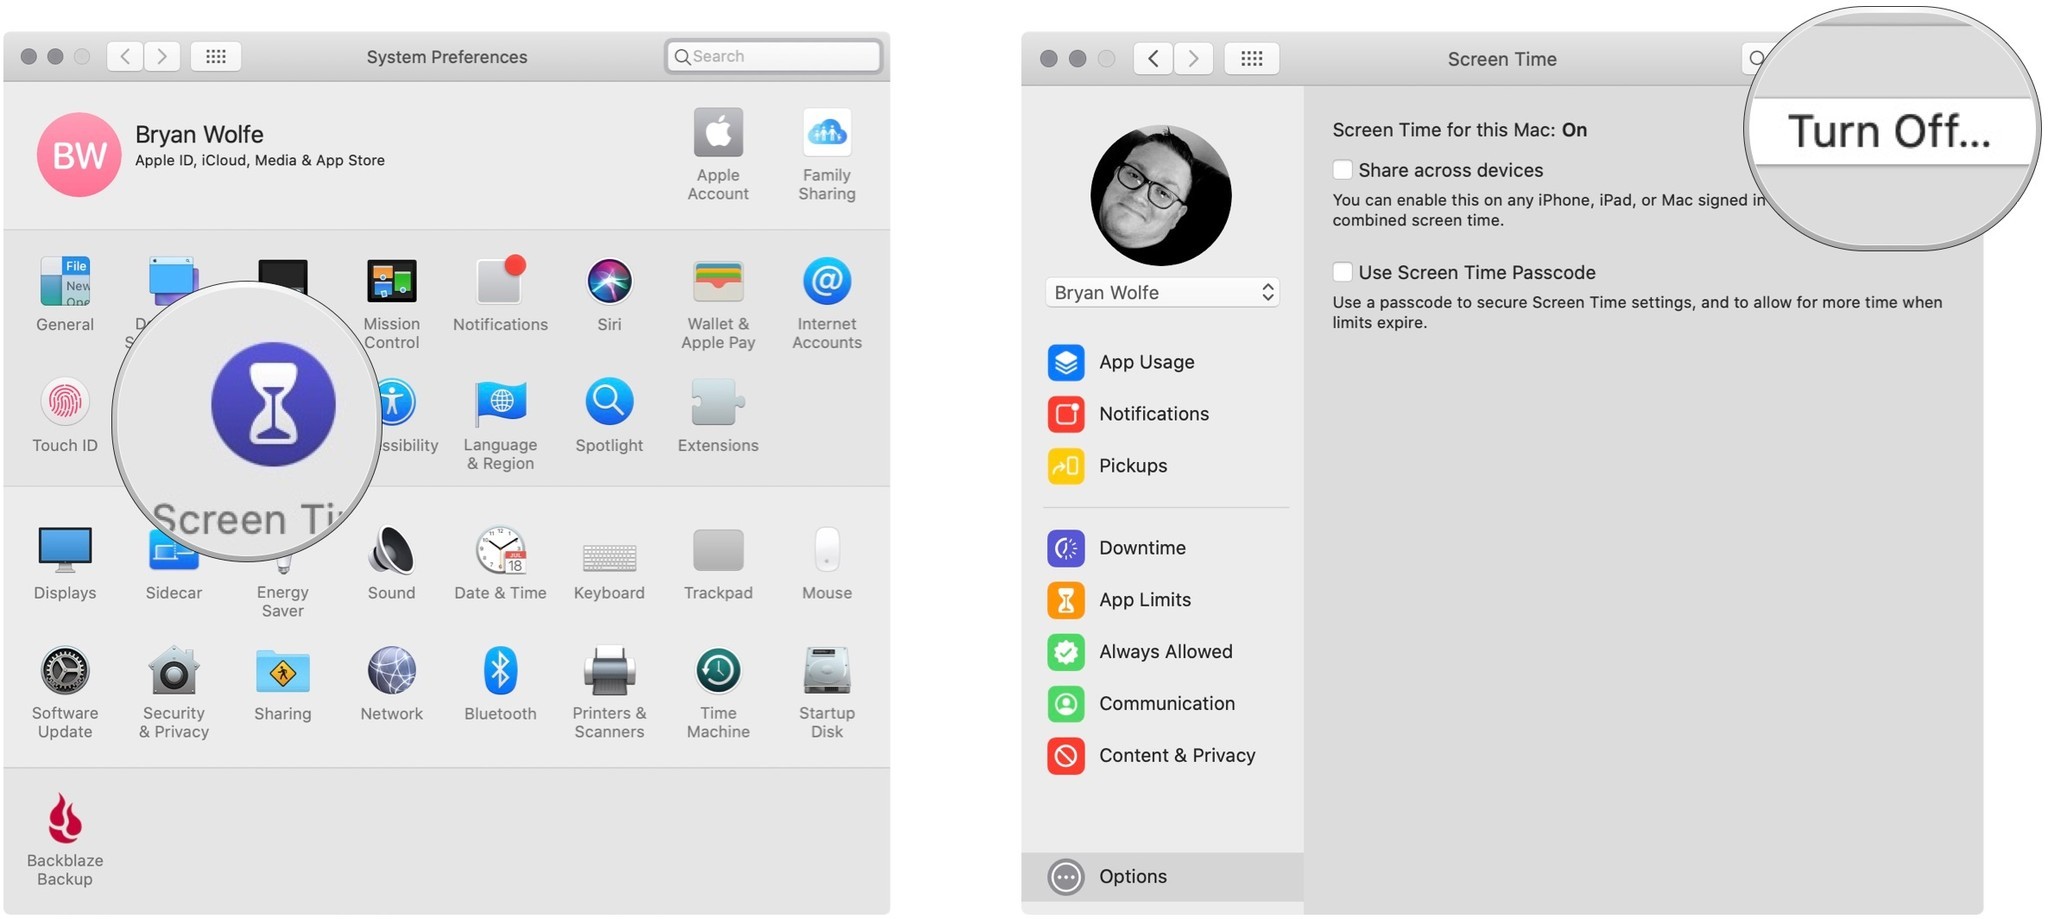
How to turn off Screen Time on macOS
To stop using Screen Time on Mac:
- Click Screen Time in System Preferences.
- Select the Options button at the bottom left.
-
Click the Turn Off button at the top right.
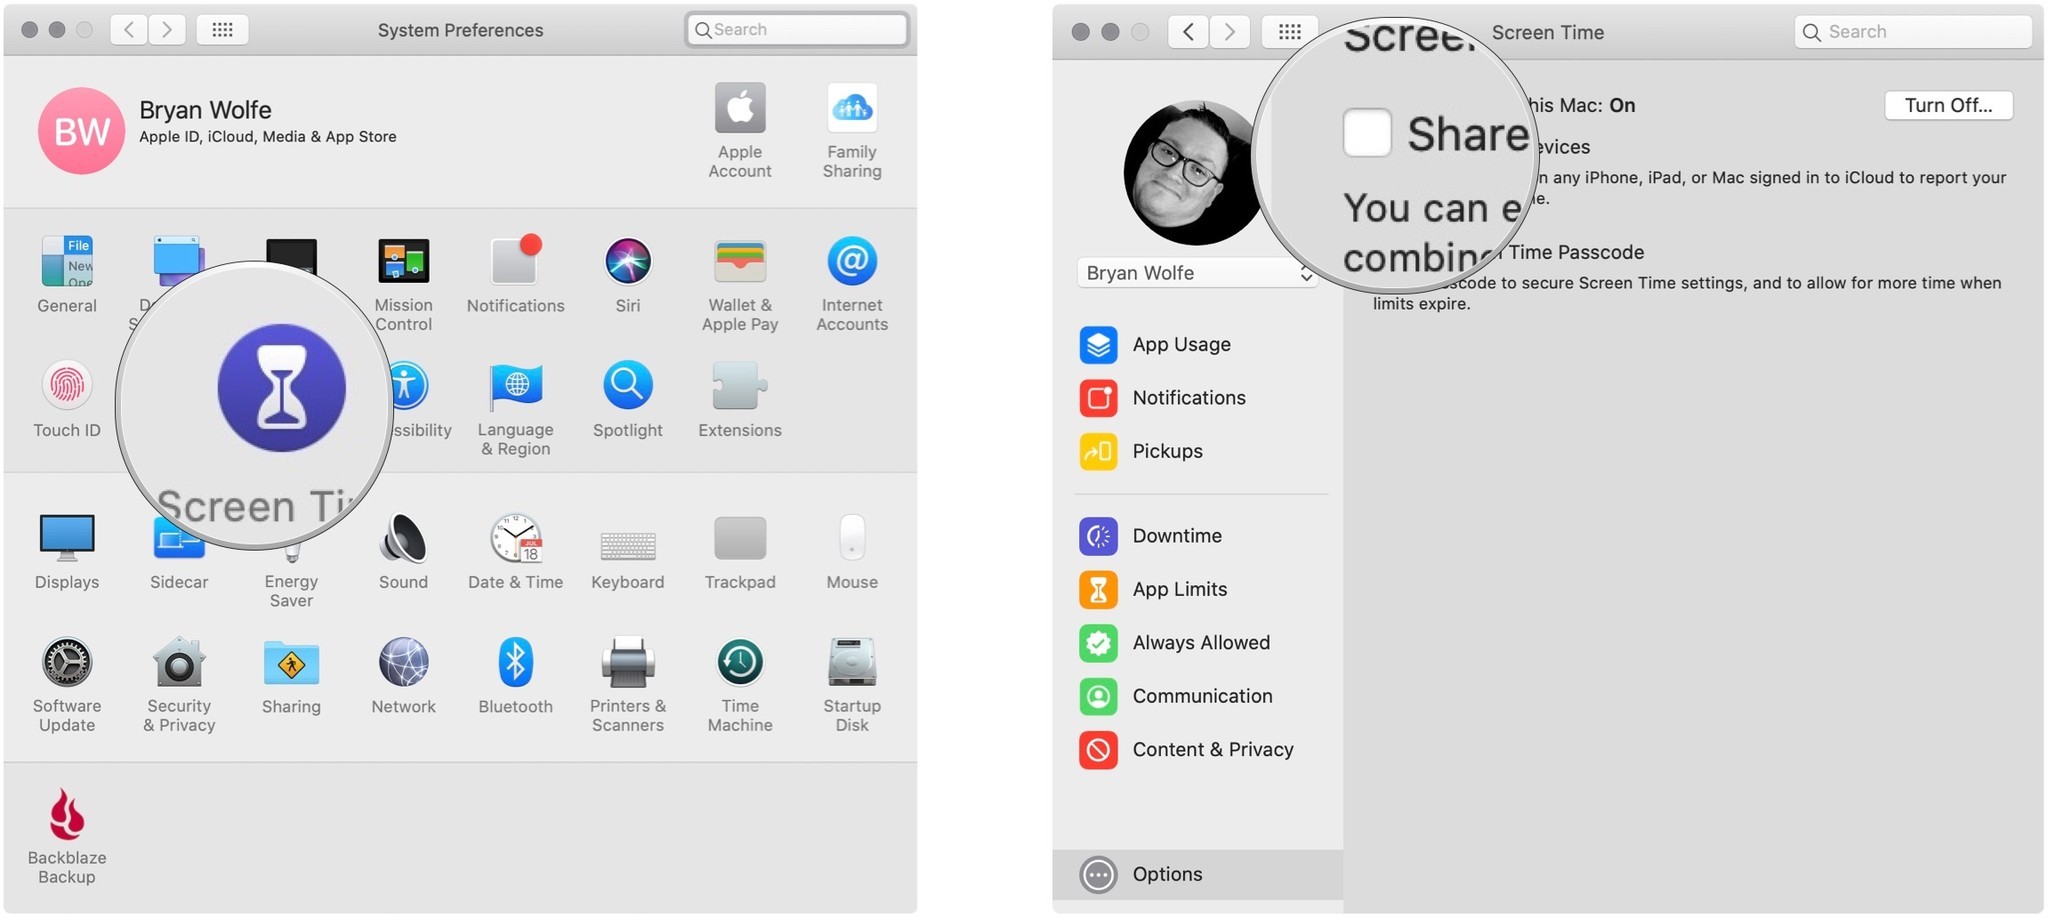
How to share Screen Time on macOS across all devices
To get a more accurate picture of how much time you spend online, you can use Screen Time across all of your devices. In doing so, you can view your total Screen Time from the app. You must first turn this on, however.
- Click Screen Time in System Preferences.
- Select the Options button at the bottom left.
-
Check the Share Across Devices box.
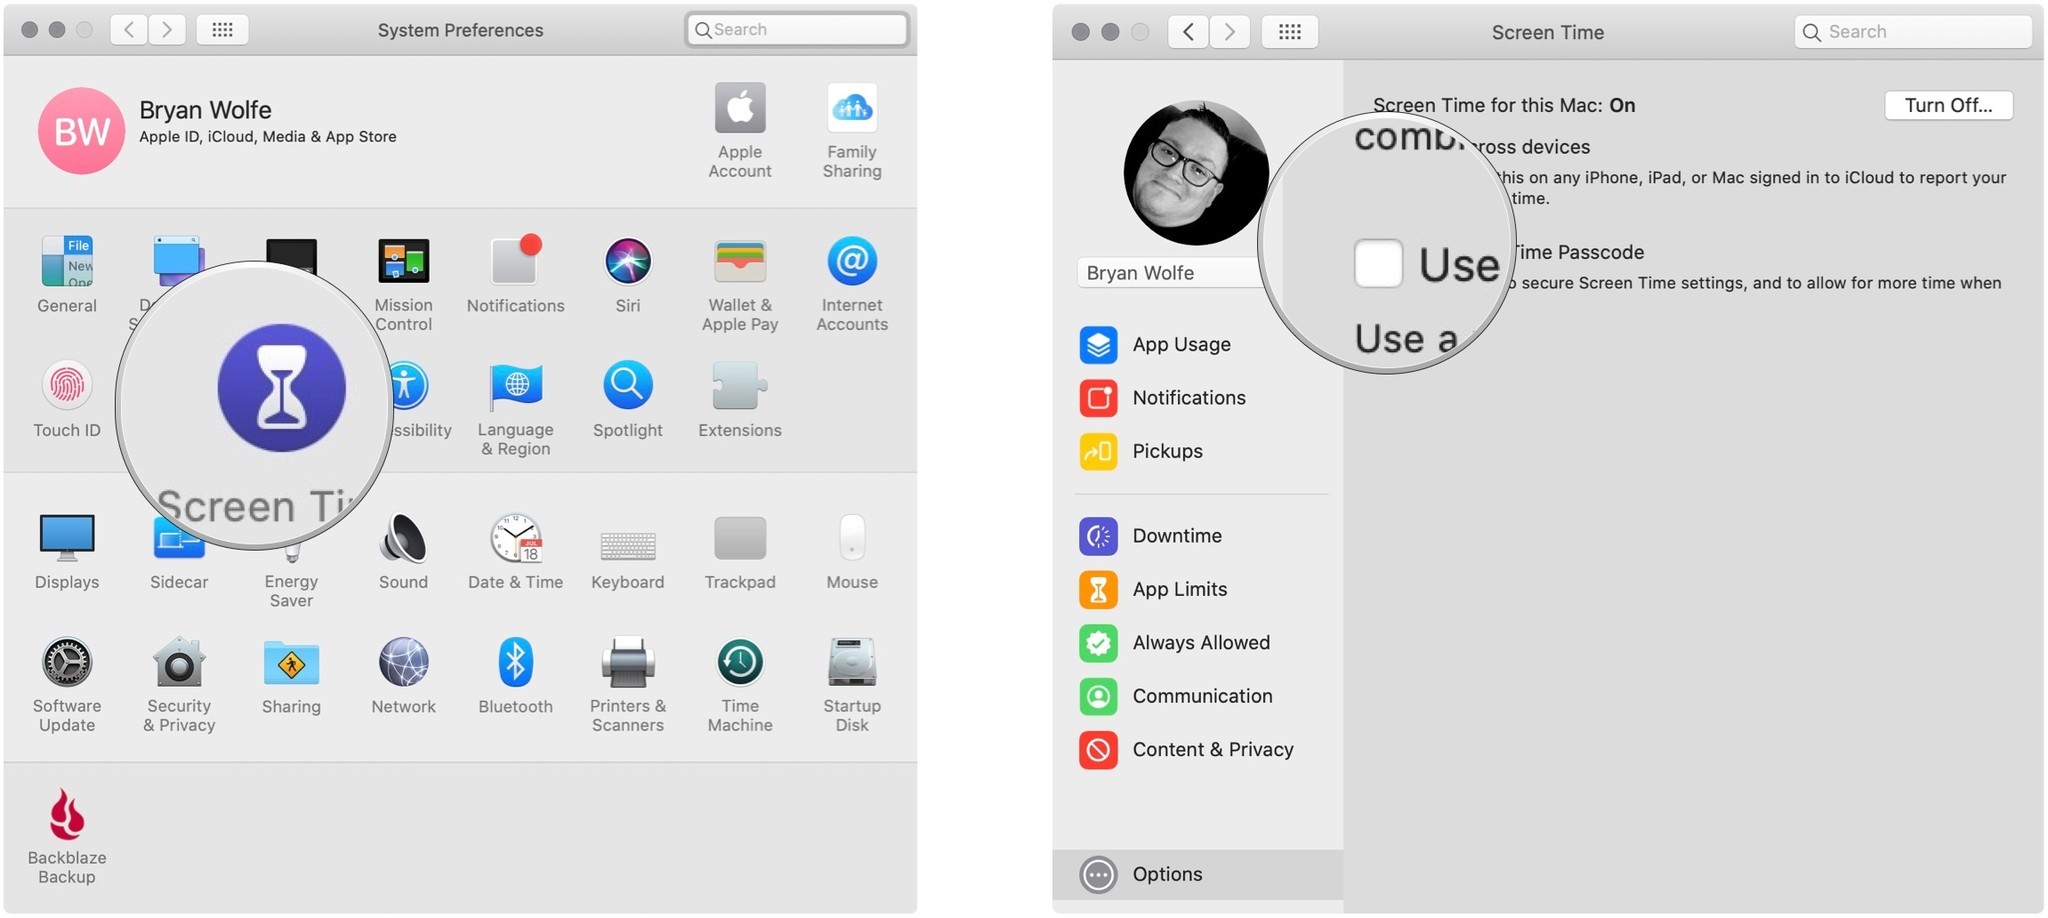
How to add a password to Screen Time on macOS
You can set a password in Screen Time on Mac. By doing so, you can secure your settings and also use the password to extend the time for users when necessary.
- Click Screen Time in System Preferences.
- Select the Options button at the bottom left.
-
Check the Use Screen Time Password box.
How to view app usage in Screen Time on macOS
- Click Screen Time in System Preferences.
-
Select App Usage on the left side.
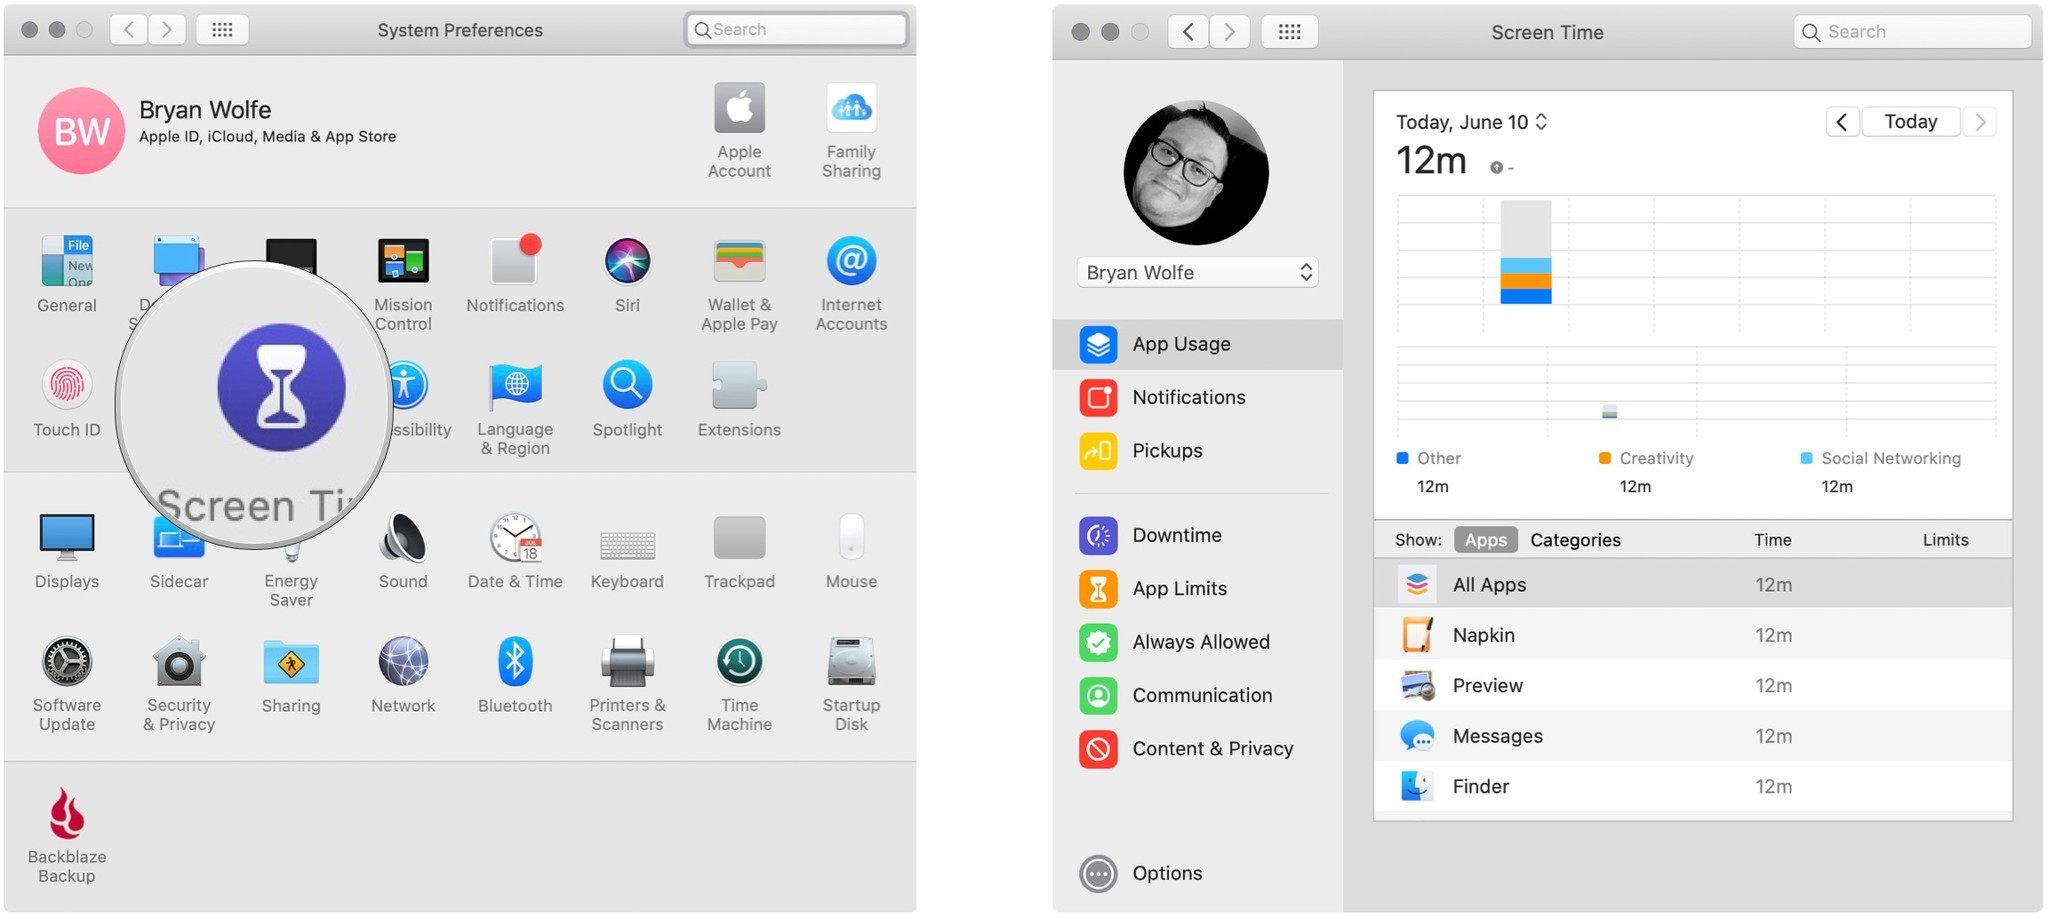
From this screen, you can see your app usage by day, apps, and categories. When there are limits (see below), you'll also see them here.
How to view notifications sent in Screen Time on macOS
Are receiving notifications on your Mac each day slowing down your work? Do you wonder who's sending all of those alerts? Screen Time can help.
- Click Screen Time in System Preferences.
-
Select Notifications on the left side.
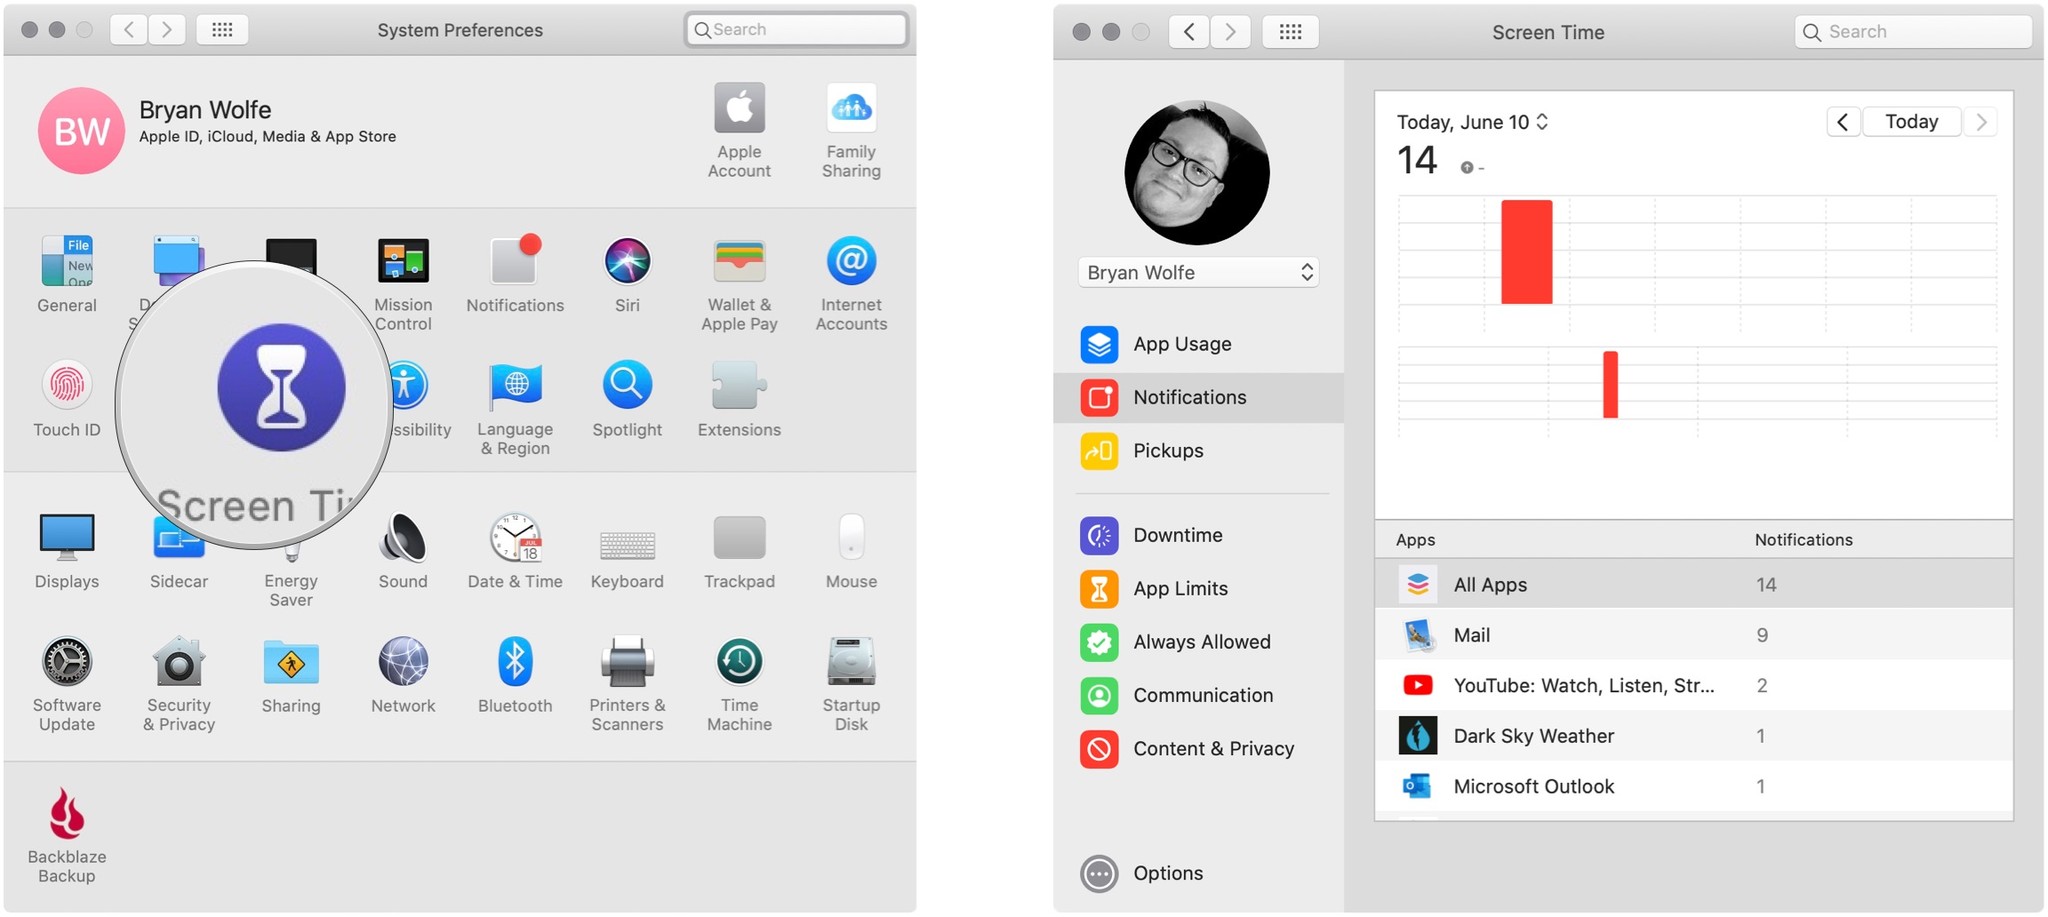
Look how many notifications you've received by who by day or week.
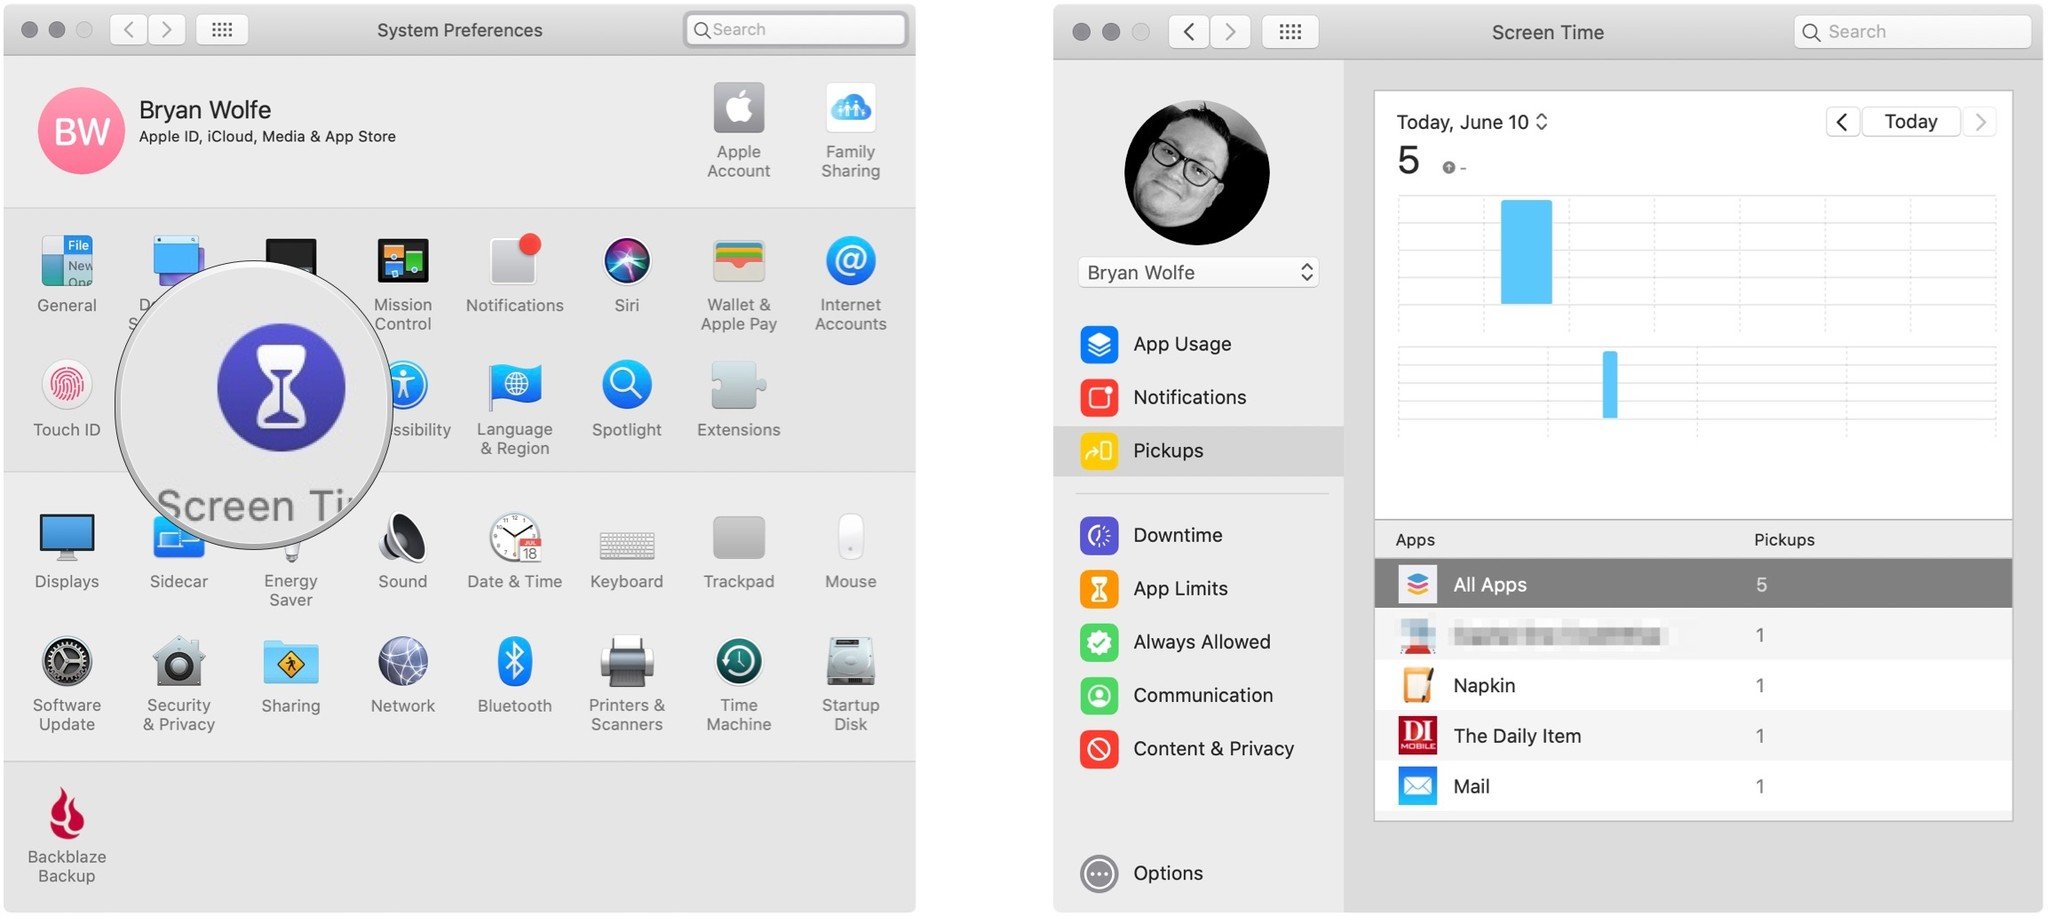
How to view pickups in Screen Time on macOS
If you're sharing Screen Time information across your Apple devices, you can see the number of times you pick up your mobile device(s) through the Mac app. Lifting to see your devices excessively each day could become a distraction.
- Click Screen Time in System Preferences.
-
Select Pickups on the left side.
How to schedule Downtime using Screen Time for macOS
During Downtime, only apps you choose to allow will work plus phone calls, when applicable. To set up a Downtime schedule:
- Click Screen Time in System Preferences.
- Select Downtime on the left side.
- Click the Turn On button to activate Downtime.
-
Using the radio buttons, select Every Day or Custom depending on the schedule you'd like to set.
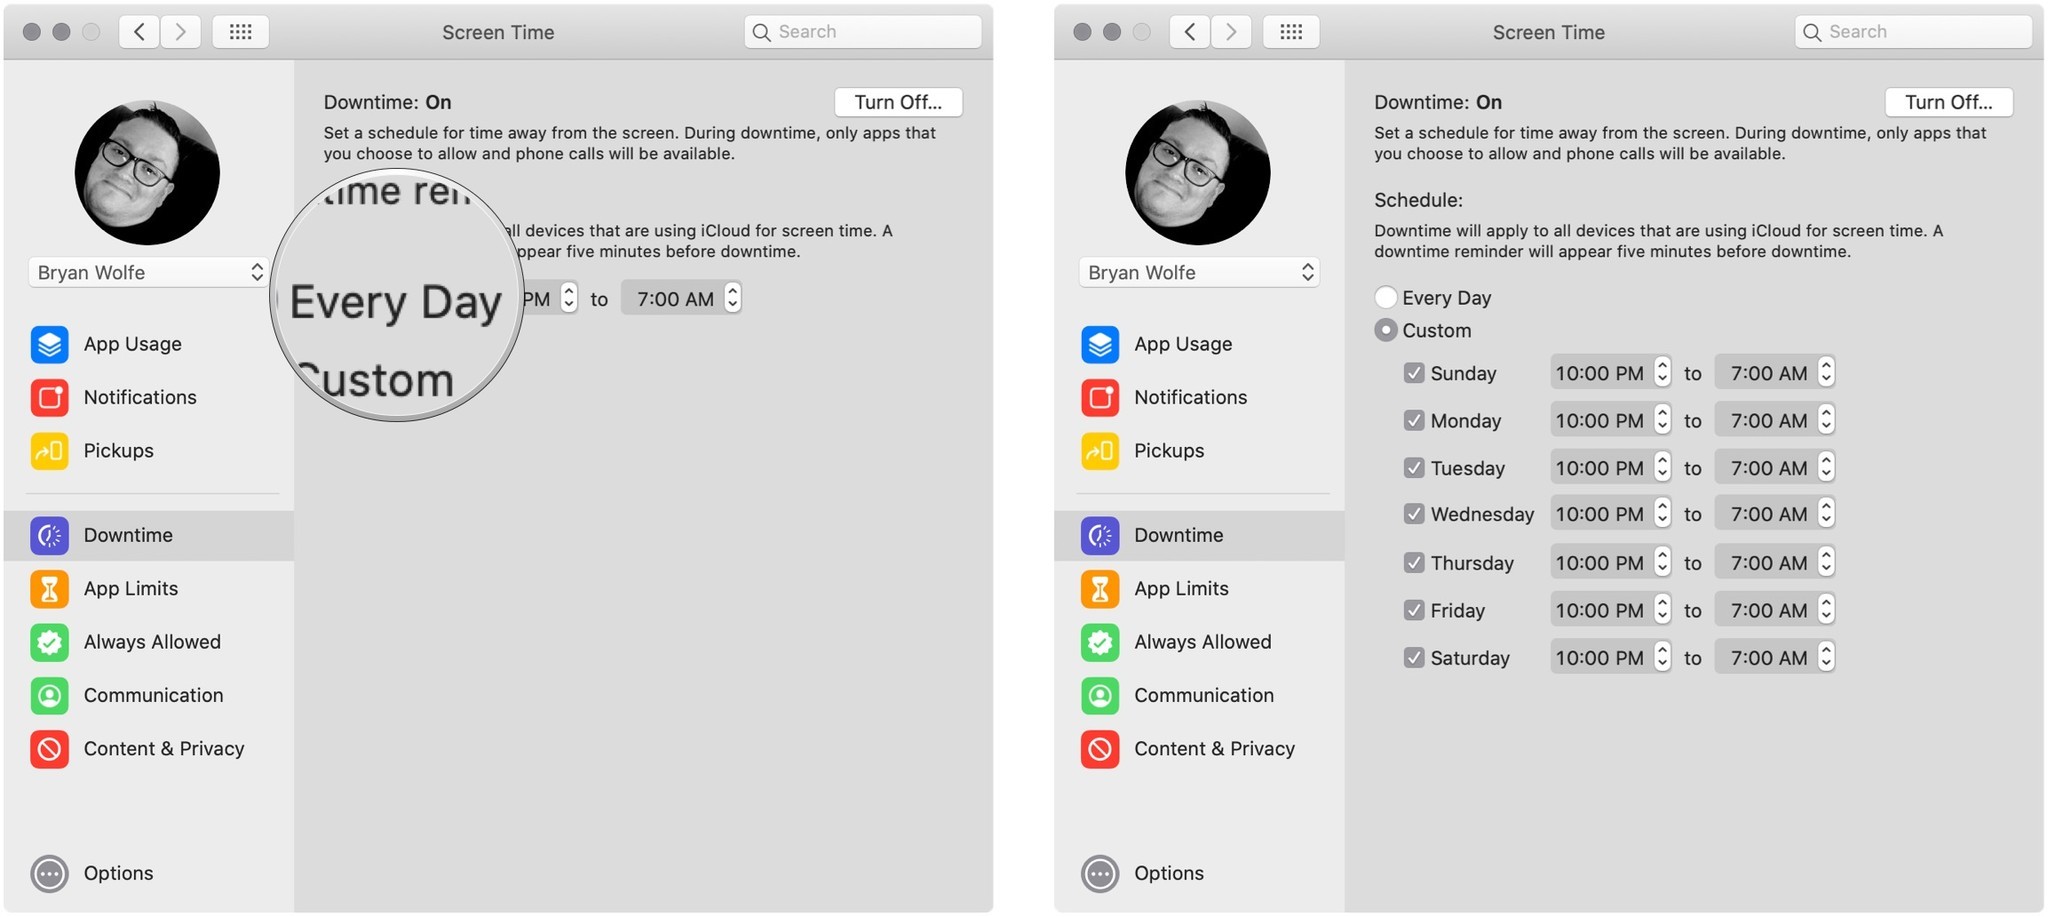
With Every Day selected, Downtime is enforced during the same time each day. With Custom picked, you can adjust the time for each day of the week or uncheck the box next to a day to turn Downtime off for that day.
How to set limits using Screen Time for macOS
In Screen Time for Mac, you can set time limits according to app categories.
- Click Screen Time in System Preferences.
- Select App Limits on the left side.
-
Click the Turn On button to activate App Limits.
- Select the + to add an app category.
- Next, check the box next to the app category you'd like to limit.
-
With the app category highlighted, set the limit using the radio buttons. You can set the limits Every Day or using a Custom schedule.
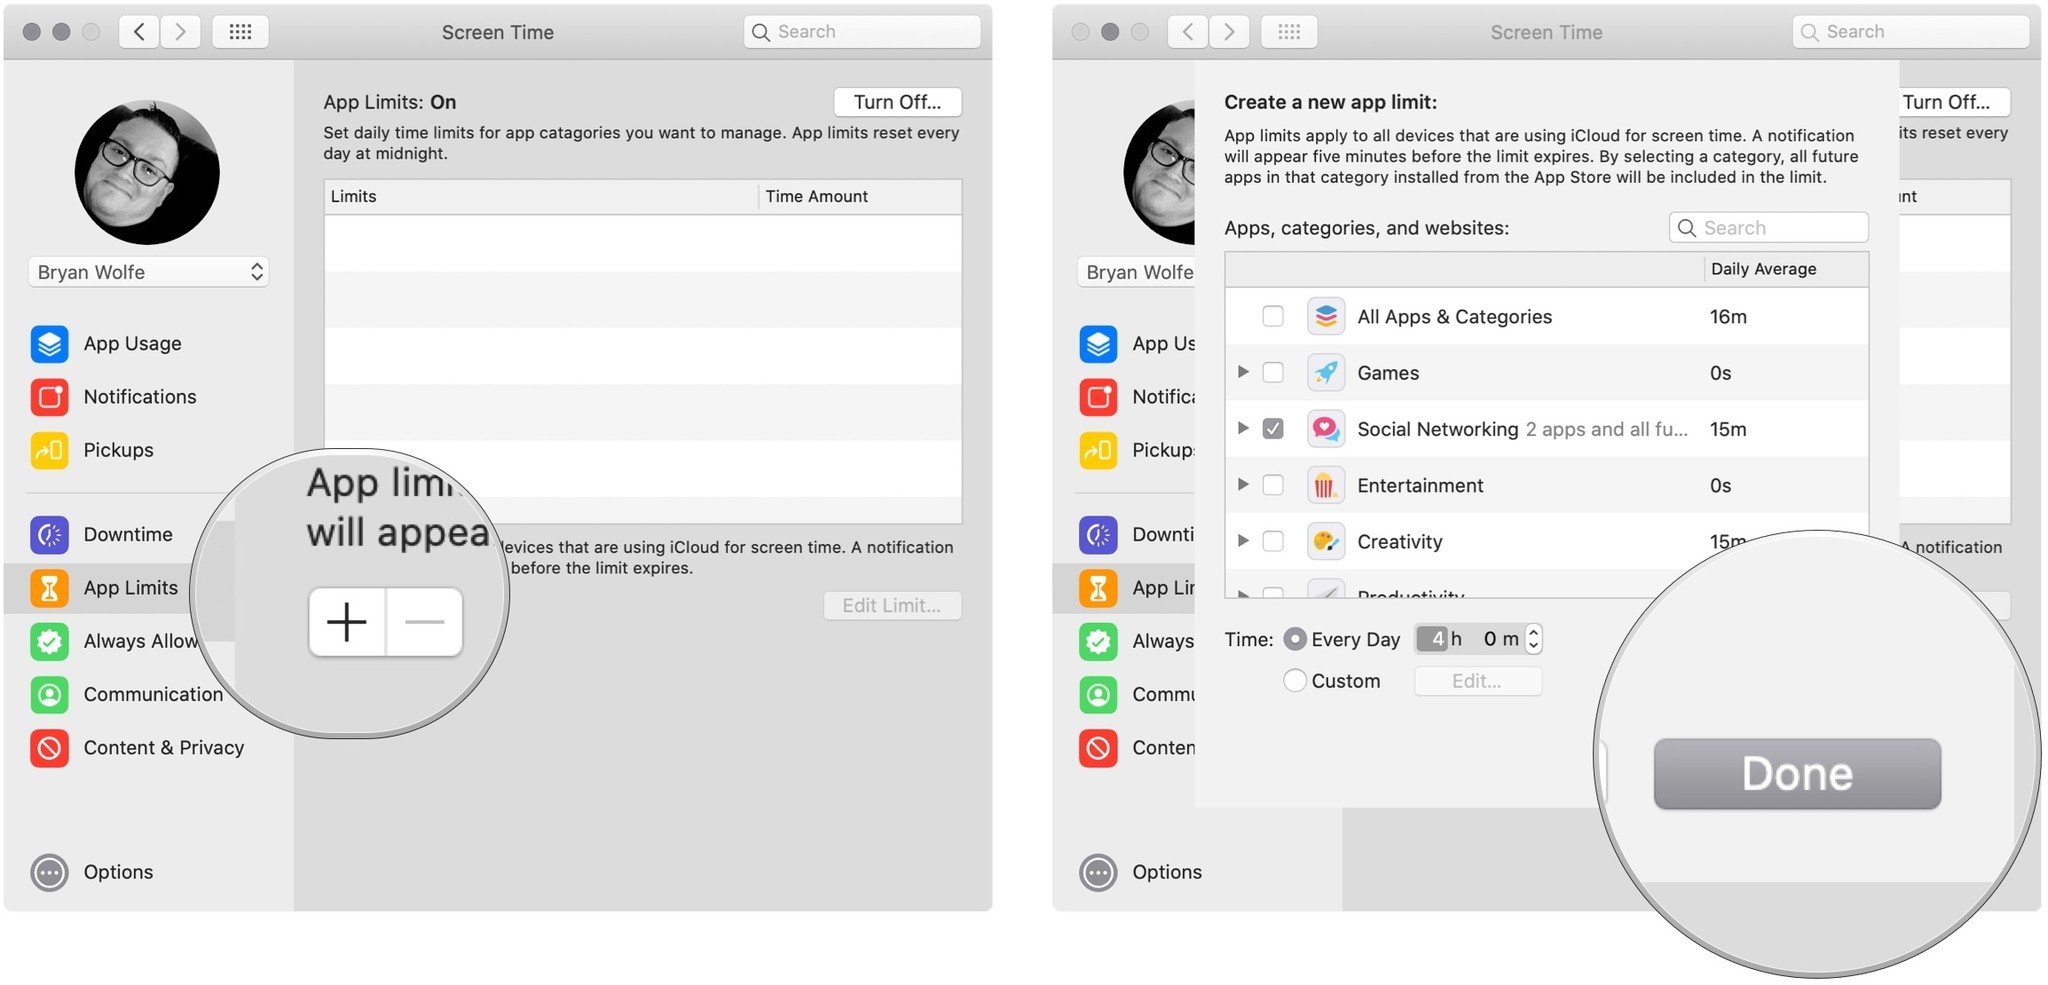
- Repeat Steps 5-6 for each app category you'd like to limit.
- Click Done to complete.
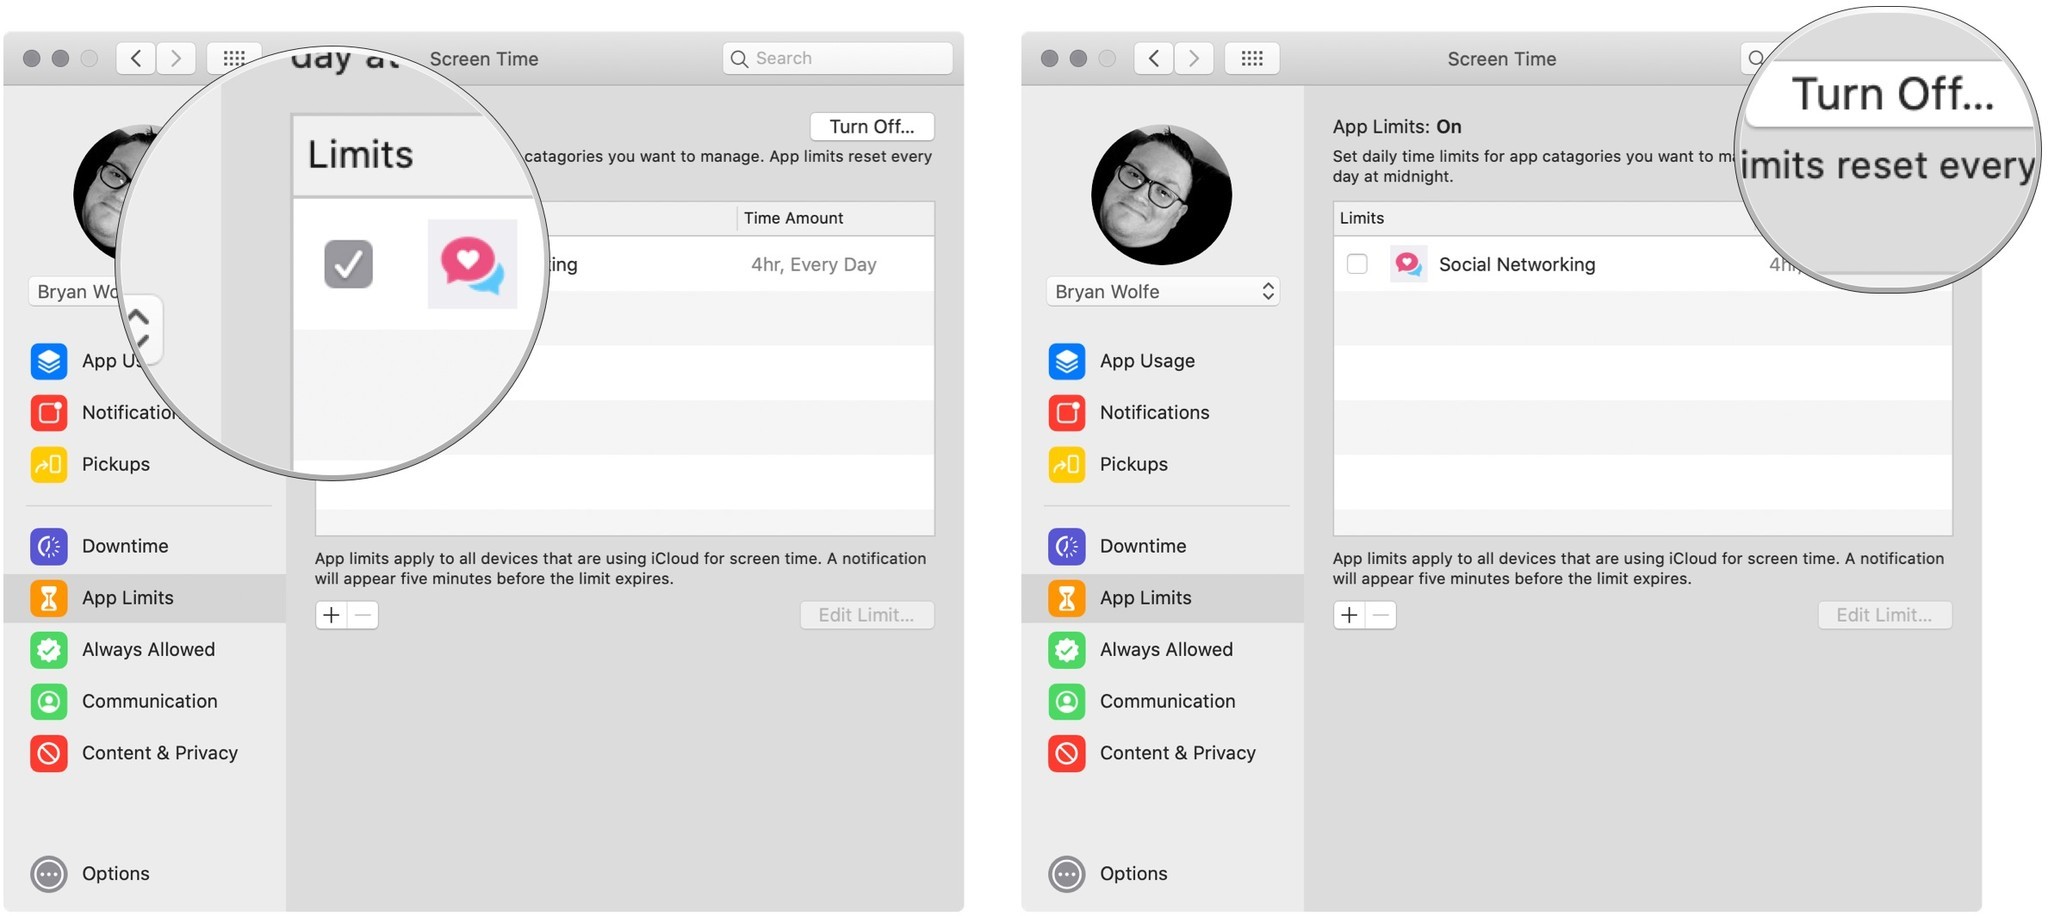
To remove app limits:
- In Screen Time for Mac, select App Limits on the left side.
- On the right, uncheck the box next to each app category you no longer want to limit.
-
To turn off app tracking, click the Turn Off button.
How to set always allowed content in Screen Time for macOS
You might want specific processes available on the Mac all the time, regardless of other restrictions. This can include communication with certain people or apps.
To set always allowed content:
- Click Screen Time in System Preferences.
-
Select Always Allowed on the left side.
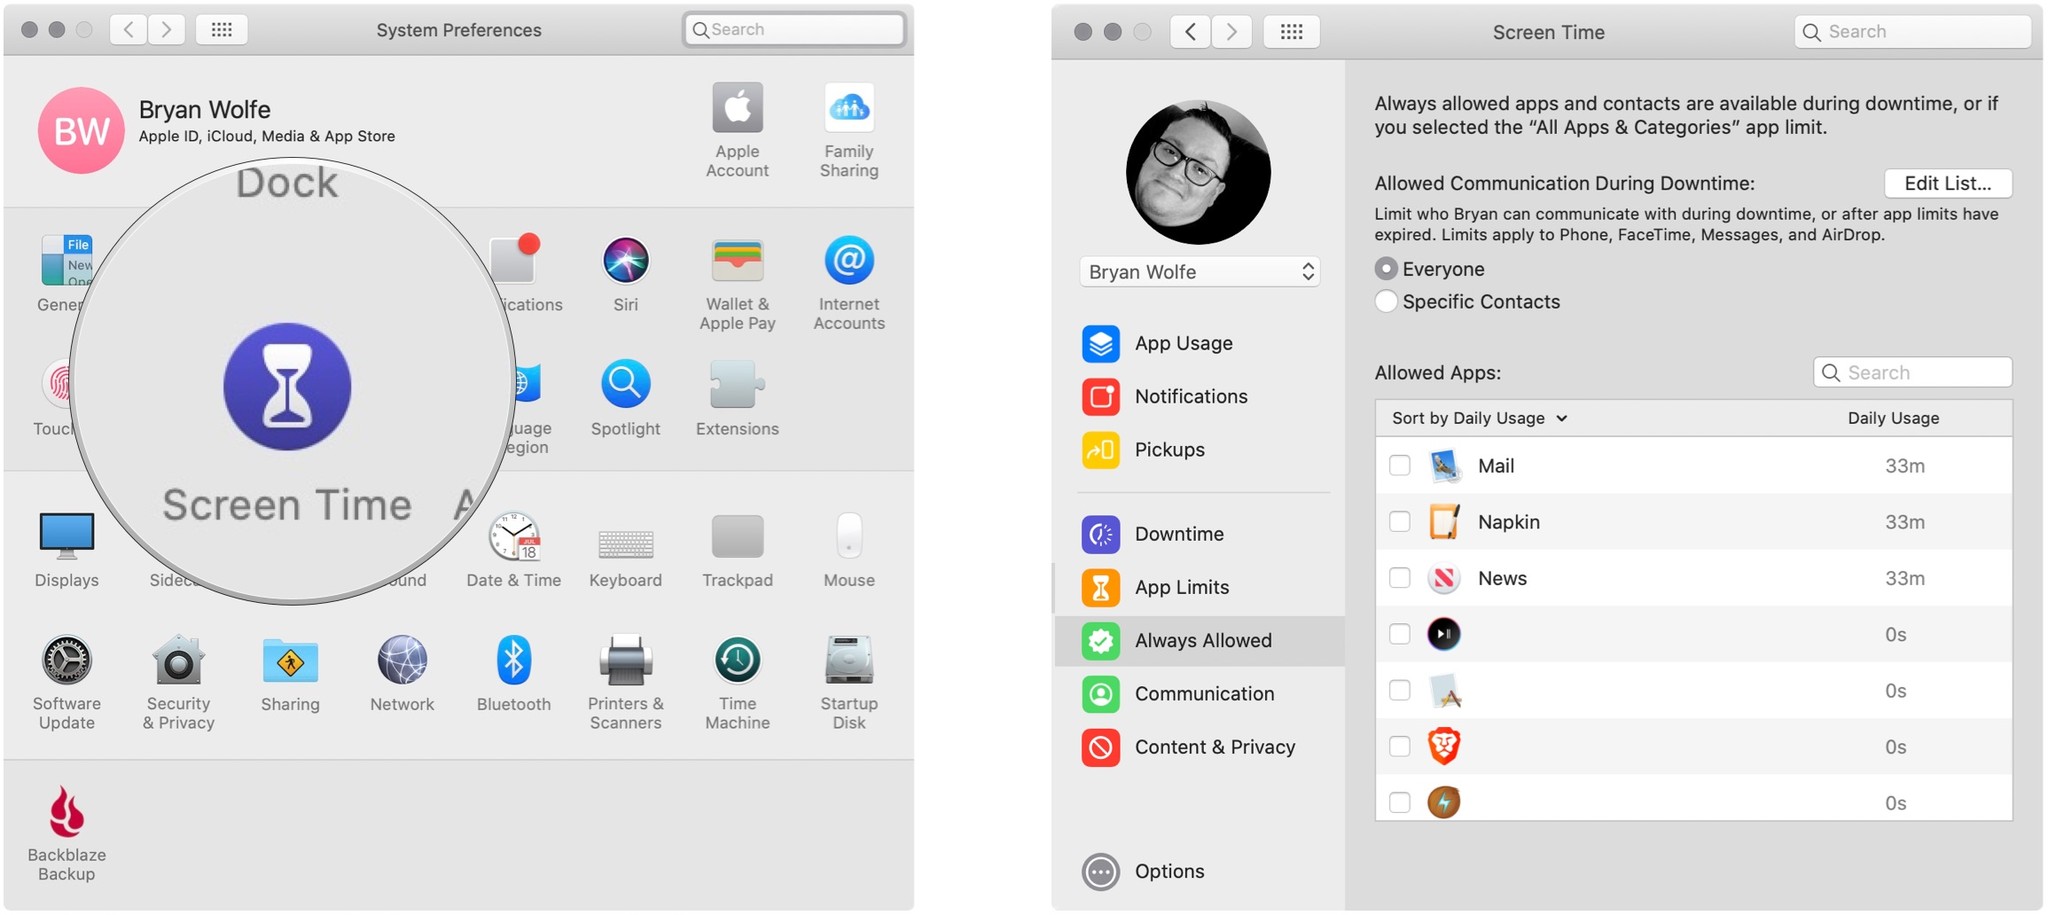
- Under Allowed Communication During Downtime, you can select Everybody or Specific Contacts.
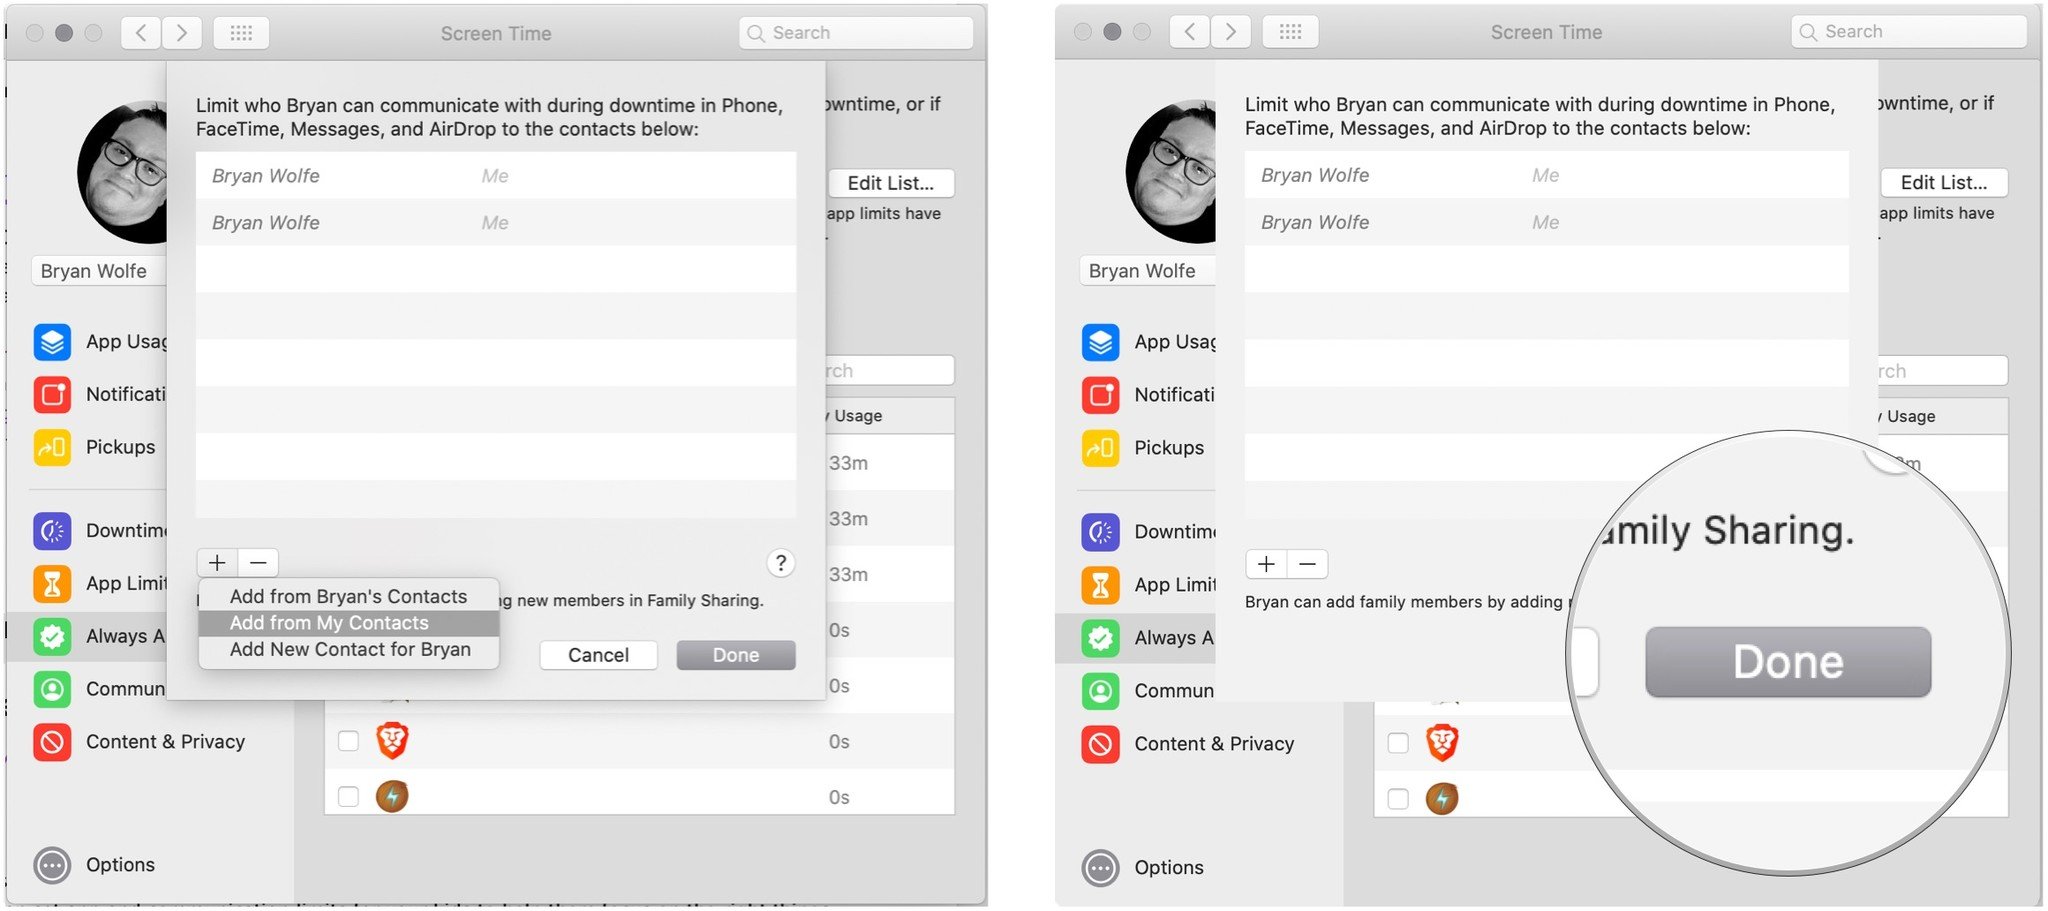
- When selecting Specific Contacts, click the Edit List button.
-
Click the + to add contacts.
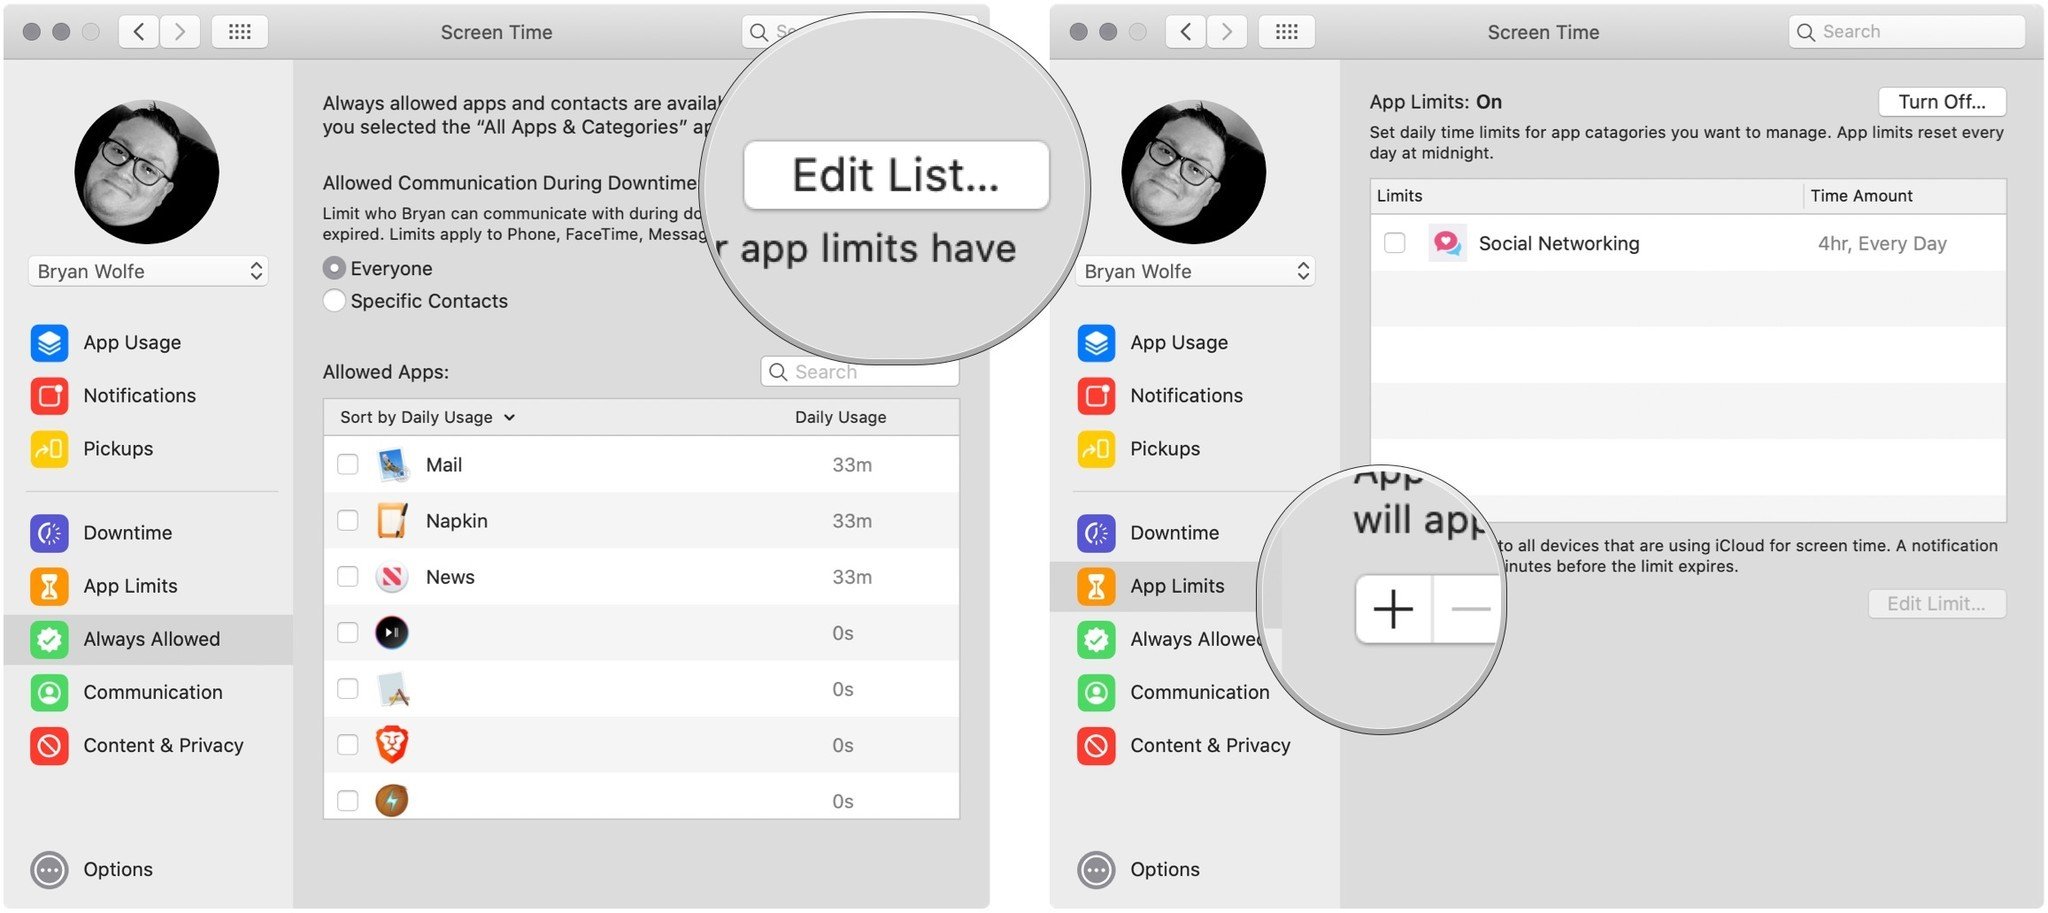
- Add someone from your Contacts app or add someone new.
-
Click Done to complete.
To add always allowed content:
- Click Screen Time in System Preferences.
- Select Always Allowed on the left side.
-
Under Allowed App check the boxes next to the apps you want on all the time.

How to limit communication using Screen Time for macOS
In Screen Time for Mac, you can limit who someone can communicate with on the machine during regular use or downtime.
- Click Screen Time in System Preferences.
-
Select Communication on the left side.
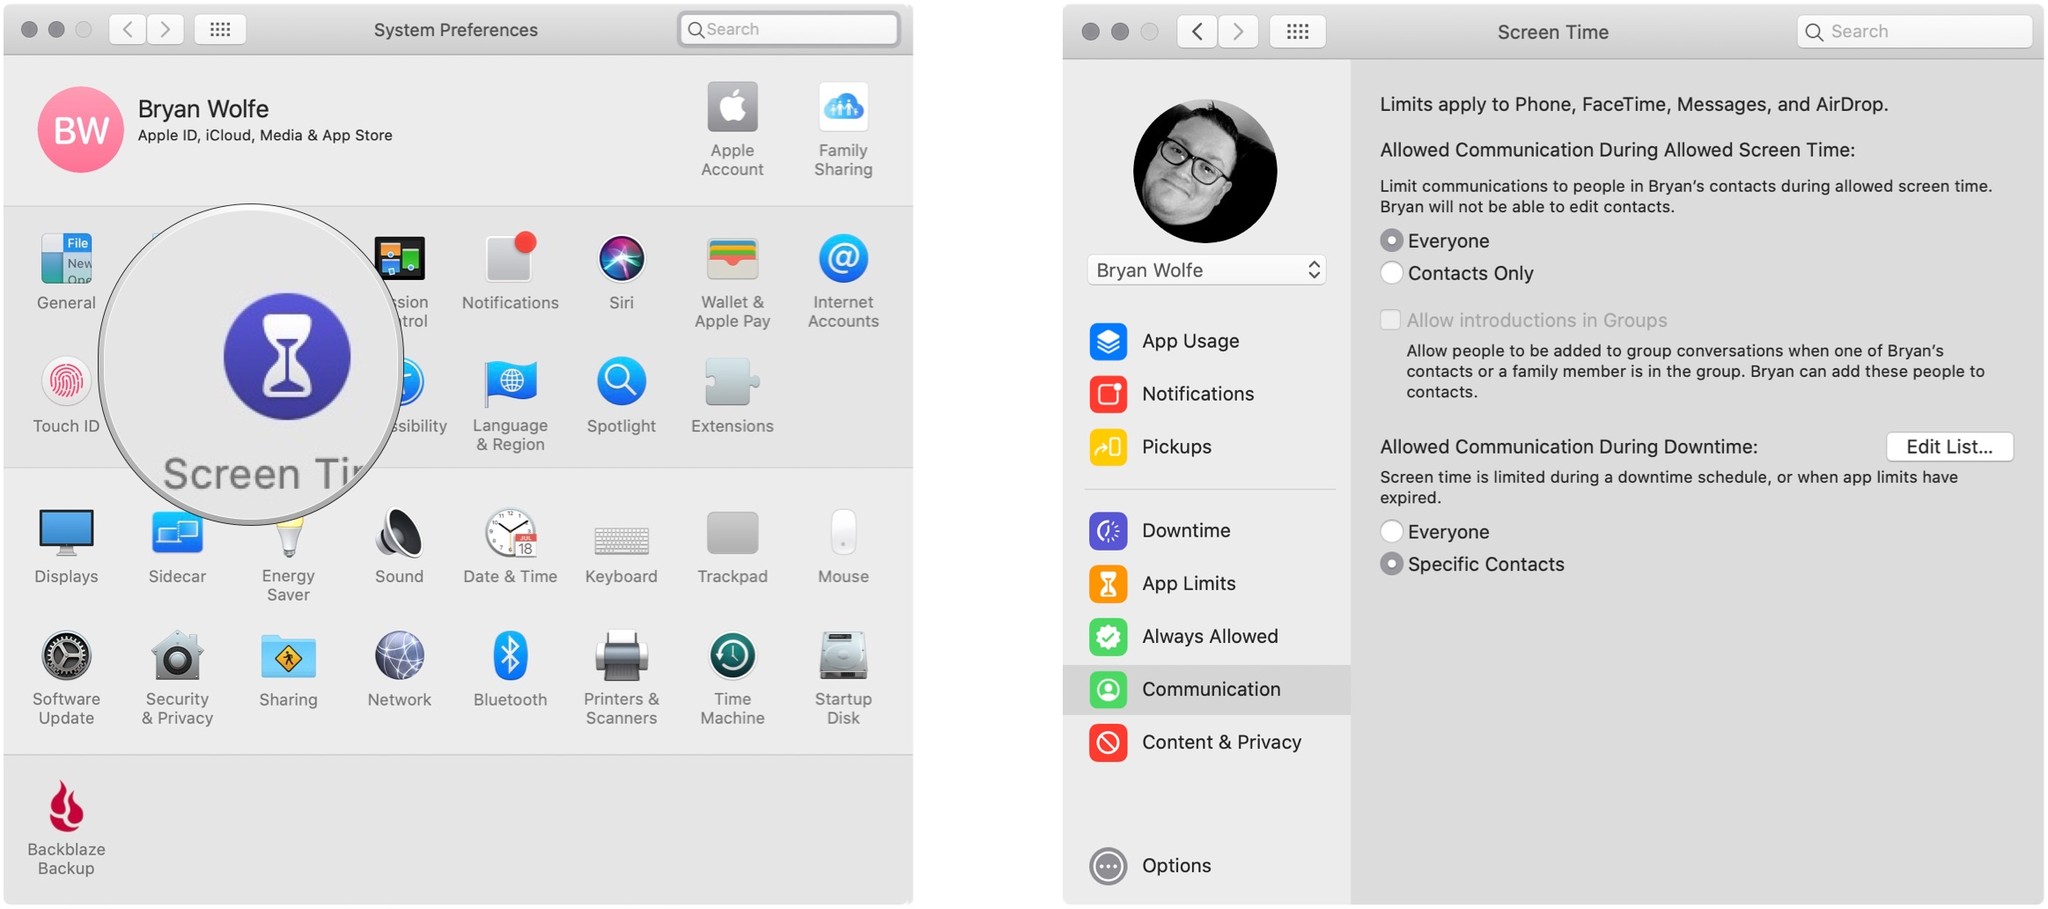
- Under Allowed Communication During Allowed Screen Time, you can use the radio dials to choose Everyone or Contacts Only.
- Under Allowed Communication During Downtime, the choices are Everyone or Specific Contacts.
- With Specific Contacts selected, click Edit List to add contacts.
-
Select Done to complete.

How to set content and privacy using Screen Time for macOS
You can also restrict content and privacy using Screen Time.
- Click Screen Time in System Preferences.
-
Select Content & Privacy on the left side.
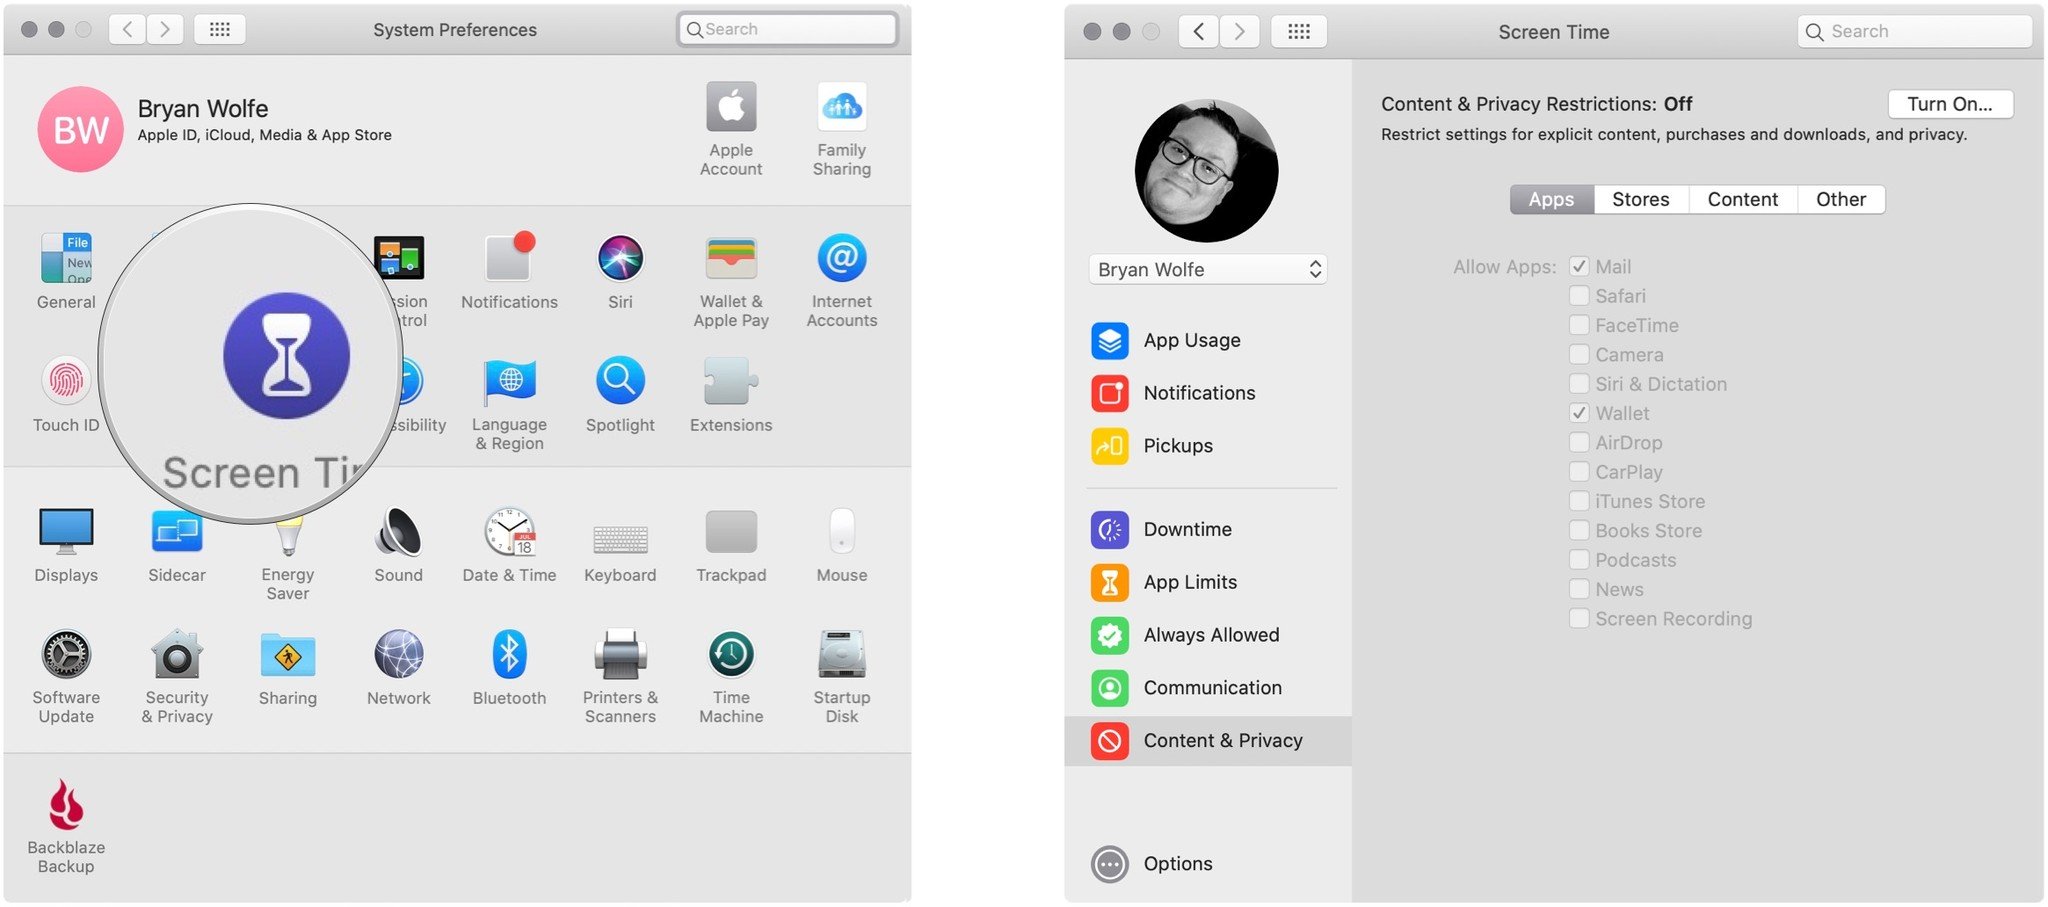
- Click Turn On to activate Content & Privacy.
- There are four sections here: Apps, Stores, Content, Other. Under each, check the box. See samples below.


Great add-ons for Mac
Your Mac could be even more useful with one of our favorite accessories.
Blackmagic eGPU Pro
This external GPU offers a workstation-class graphics experience to enhance what your Mac is capable of, utilizing Radeon RX Vega 56 graphics with 8GB for HBM2 memory for a massive boost in performance. All of this power can be delivered to any Mac with Thunderbolt 3, including a MacBook Pro, which can be charged while you use its thanks to the eGPU's 85W power supply.
Sonnet eGFX Breakaway Box

If you want a less expensive eGPU solution for your Mac, try Sonnet's eGFX breakaway box. You'll need to supply your own AMD graphics card for the box, but the box connects via Thunderbolt 3 for maximum throughput. The combination of this box and a compatible AMD GPU (RX 470, 480, 570, or 5800 will be much cheaper, though less powerful, than Blackmagic's solution.
Final questions and comments
Apple will release macOS Catalina later this year. Until then, there's a chance the Screen Time process on Mac will change. If that happens, we'll update this post. In the meantime, let us know if you have any questions about the new syncing process with macOS Catalina.